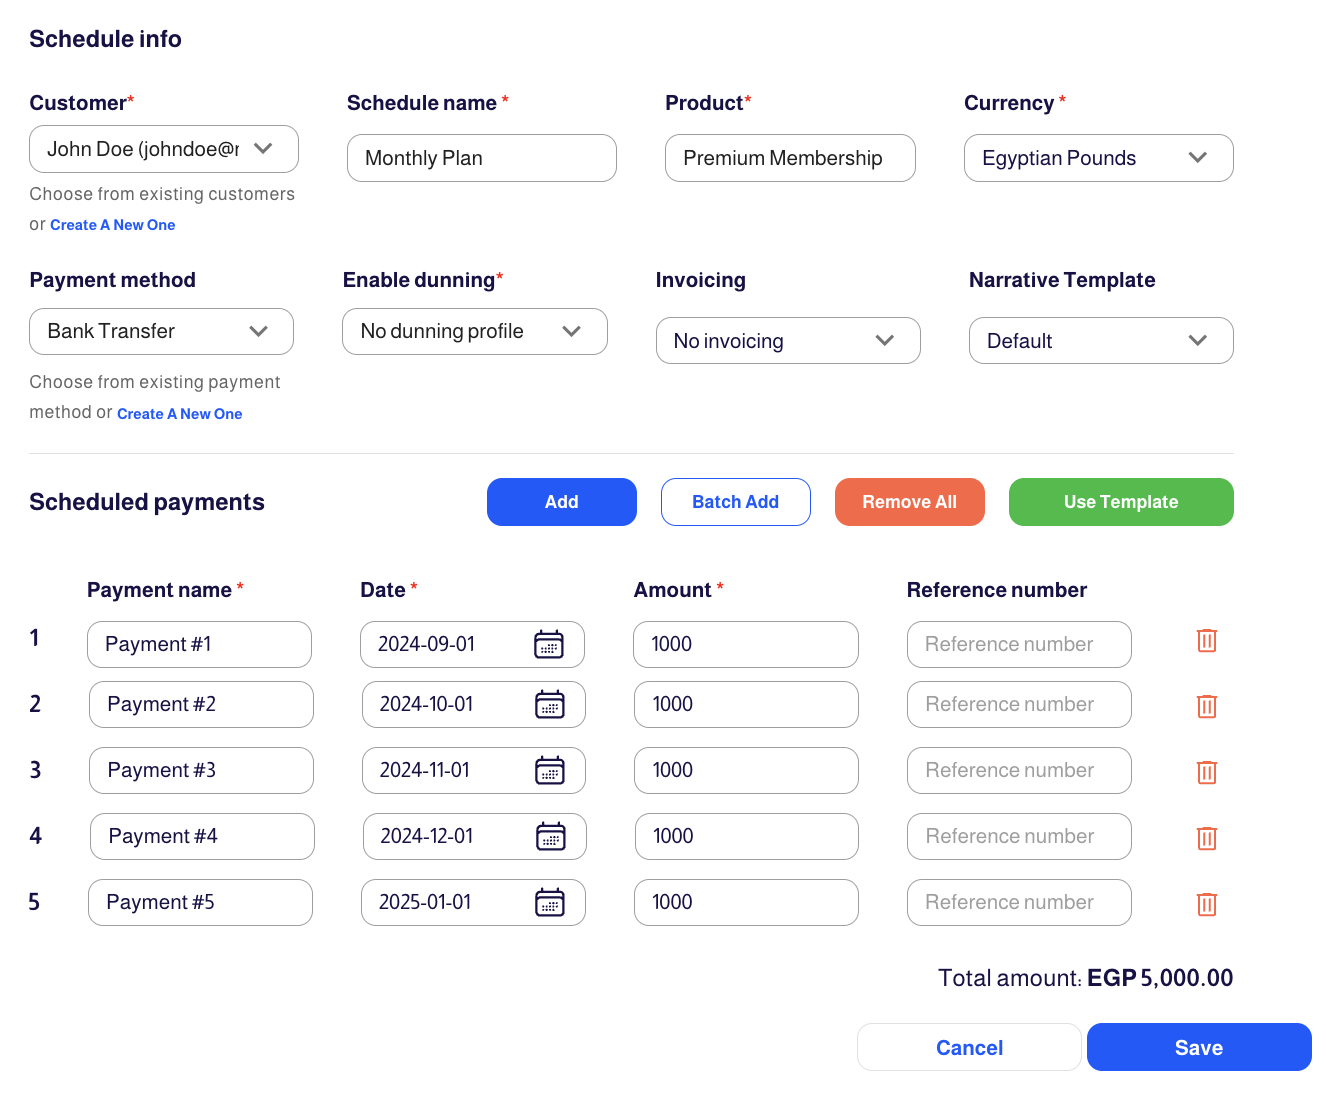
Create a Payment Schedule
Payment schedules allow you to define billing frequencies, manage invoicing, and customize payment terms for your customers. With options for templates, localization, and dunning profiles, you can create schedules tailored to your business needs. This guide focuses on the key steps for creating a payment schedule and managing schedule profiles efficiently.
Create a Payment Schedule

Follow these steps to create a new payment schedule:
1. Access the Schedules Page
Navigate to the Schedules page in the Admin Portal and click the Create Payment Schedule button.
2. Fill in the Schedule Info Section
- Customer:
- Select an existing customer or click "Create A New One" to add a new customer.
- Alternatively, you can create a new customer from the Customers page.
- Schedule Name:
- Enter a name for the schedule. While not required to be unique, using a distinctive name is recommended for easier reference.
- Product (Product Name):
- Specify the product associated with the schedule. Similarly, using a unique product name is advised.
- Currency:
- Choose from the allowed currencies configured for your site.
- Payment Method (Optional):
- Select an existing payment method, create a new one, or request the customer to add a payment method.
- If you choose "Request New," ensure the "Customer is requested to add payment method" event is set up beforehand.
- Enable Dunning:
- Choose an existing dunning profile or create a new one to handle failed payments.
- Invoicing Options:
- No Invoicing: Only transactions are recorded.
- Collective Invoice: A single invoice for all payments.
- Per Payment Invoice: An invoice for each payment.
- Narrative Template:
- Select a template for the invoice narrative to customize terms or add messages.
- Narrative templates can be translated and configured in the Site Settings section.
3. Set Up Scheduled Payments
Once the Schedule Info section is complete, configure the payment details:
- Add Payments Individually:
- Create each scheduled payment manually.
- For cheque payments, include the cheque reference number.
- Batch Add Payments:
- Use this feature for repetitive payment schedules.
- Use Template:
- Select a pre-existing template from the Templates section. To create a template, go to Schedules > Templates and click Create Template.
4. Save the Payment Schedule
Review all the details and click Save to finalize the payment schedule.
Manage Schedule Profiles
Once the payment schedule is created, you can access the Schedule Profile to further configure and refine its details. The Schedule Profile provides a comprehensive view, allowing you to navigate through different tabs such as Scheduled Payments, Details, Localization Settings, Additional Info, and more.
For more detailed information about creating and managing payment schedules in Subsbase, please refer to Schedules.