Customers
Overview
The Customers' page on the Admin Portal includes all your customers/subscriptions. A subscription is created when a customer subscribes to one of your plans, and this is how Subsbase tracks when and how much to bill the customer.
Subscription Statuses
| Status | What does it mean? |
|---|---|
| ACTIVATING | The subscription is in the process of being set up and activated for use. |
| ACTIVE | The subscription is currently in effect and operational, allowing access to the subscribed services. |
| CANCELED | The subscription has been terminated and will no longer be active. |
| CANCELING | The process of canceling the subscription is in progress, but it has not been officially terminated yet. It can be resumed at a later time. |
| CHANGED | The subscription has been changed from one plan to another. |
| CHANGING | The subscription is currently in the process of being changed. |
| FUTURE START | The subscription is scheduled to begin at a future date, and it is not currently active. |
| IN TRIAL | A trial period during which customers can access limited or free services before deciding on a full subscription. |
| NO SUBSCRIPTION | The customer currently does not have an active subscription, indicating the absence of any available subscribed plans. |
| PAUSED | The subscription has been temporarily paused but is not canceled. It can be resumed at a later time. |
| SUSPENDED | The subscription has been temporarily suspended and it is not currently active. |
Creating a New Customer
A customer can be created through the web interface (Subsbase Site) in three ways:
Through the Customers page
You can create a new customer through the Customers page on the Admin Portal by clicking on the "New Customer" button at the top right side, filling in the required fields, then "Save."
Through the Draft Invoices page
You can also create a new customer through the Draft Invoices page on the Admin portal. While creating a new Draft Invoice, you have the option to create a new customer instead of choosing from existing ones. So, by clicking on "Create a new One" under the Customer field, you can add a new customer.
Through the Payment Schedules page
You can also create a new customer through the Payment Schedules page on the Admin portal. While creating a new Payment Schedule, you have the option to create a new customer instead of choosing from existing ones. So, by clicking on "Create a new One" under the Customer field, you can add a new customer.
Managing Customer Profiles
As an admin, you have complete access to your customers' information via the Customer Profiles. By navigating to the Customers page on the Admin Portal and selecting a customer from the list, you can preview their profile. To access comprehensive details, edit information, update subscription status, or modify plans, click on the "View Profile" button.
Profile Summary
- Outstanding Balance: This section shows the total outstanding amounts the customer owes per currency, based on all their invoices and payment schedules.
Note that the Outstanding Balance is always a negative amount.- The Outstanding Balance is calculated as follows:
Outstanding Balance = ∑ Outstanding Balances on All Invoices + ∑ Scheduled Payments Due- Outstanding Balances on All Invoices: This is the sum of all outstanding invoices that are neither voided nor related to scheduled payments or payment schedules. It includes invoices with a date earlier than or equal to today's date and those that have not been fully paid.
- Scheduled Payments Due: This is the sum of all scheduled payments that are due, excluding those that are voided or scheduled for a future date. It includes payments with a due date earlier than or equal to today's date and those that have not been fully paid.
- The Outstanding Balance is calculated as follows:
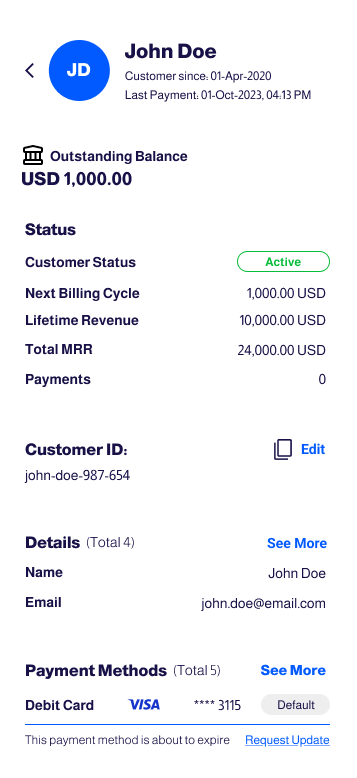
- Status: This section displays customer status, next billing cycle, invalid date, lifetime revenue, total MRR, and payments.
- Customer ID: This section displays the Customer ID and you can customize it by clicking on "Edit."
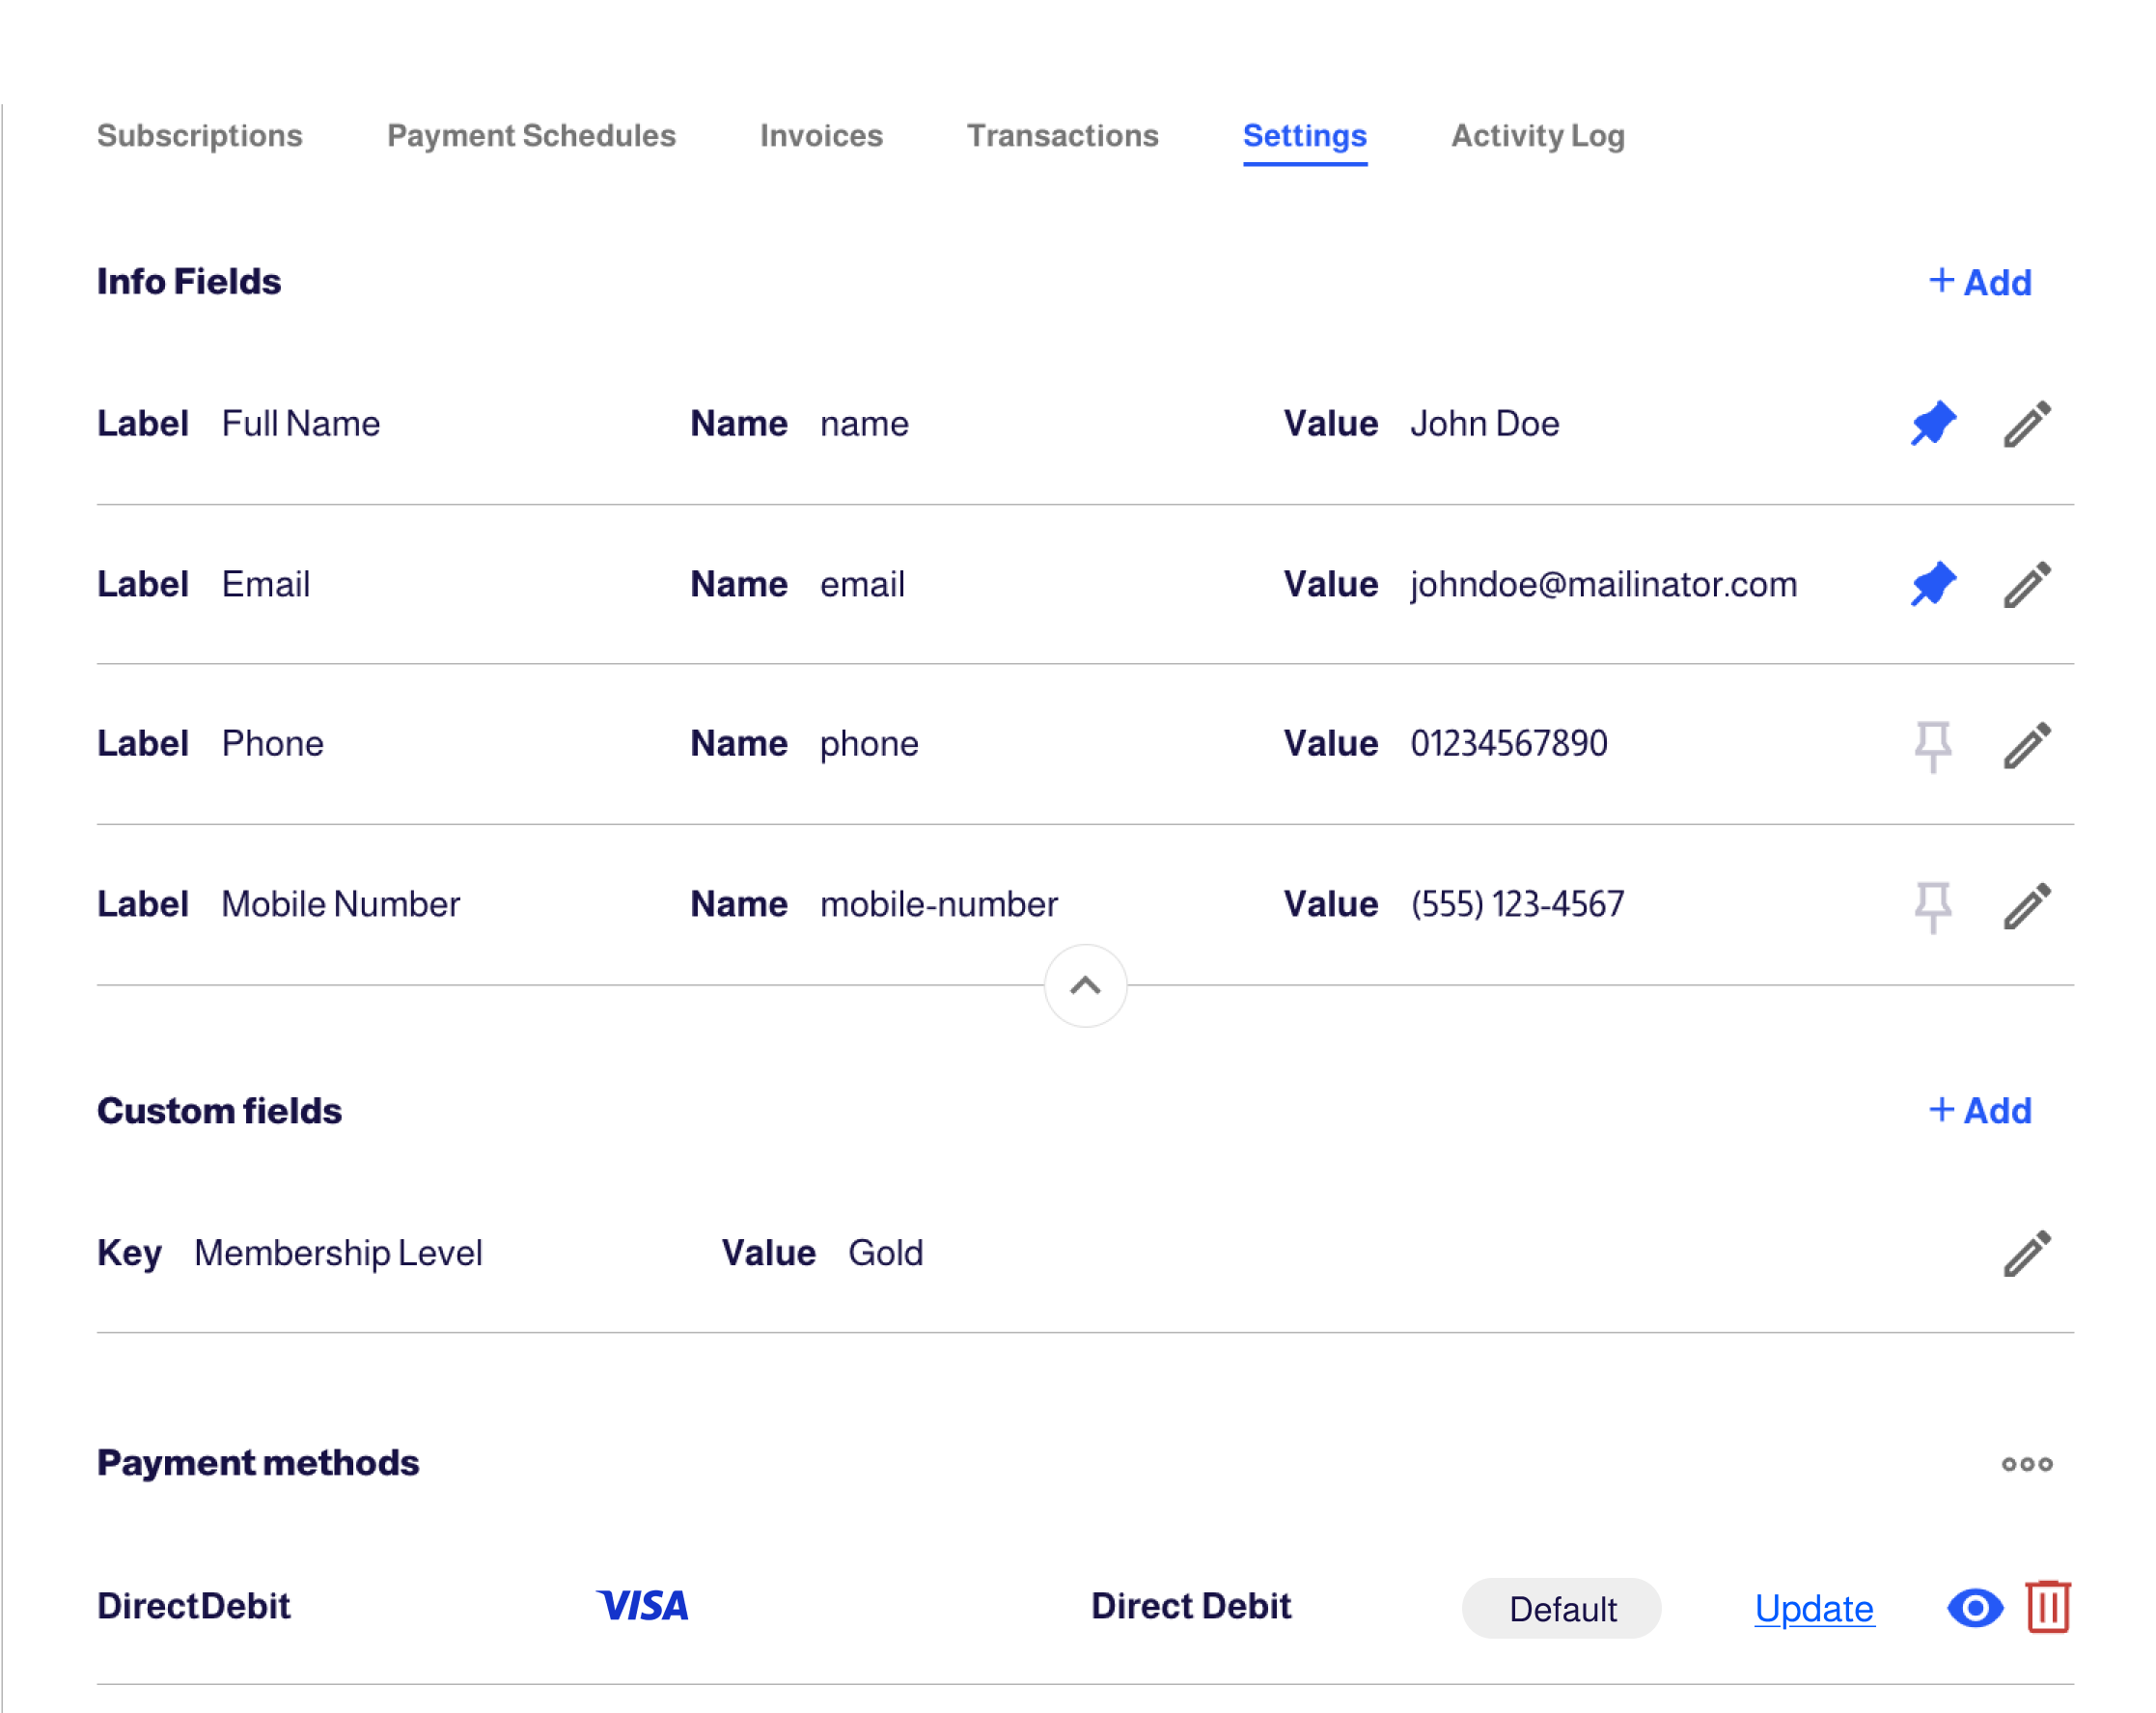
- Details Section: Shows the customer's details you specified on the "Settings" tab.
- Pinning Important Info Fields: Pin or unpin important customer details in the Details Section for quick access by using the pin icon in the "Settings" tab.
- Payment Methods: Displays the default payment method associated with the customer's profile. You can also add, delete, or request new payment methods through the "Settings" tab.
Additionally, when the card is about to expire, you can request an update from your customer from the "Payment Methods" section in the Profile Summary or update it from the "Settings" tab.
You can request customers to add and update their payment methods through APIs.
- If the admin needs to request a new payment method from the customer, they can click "Request New" to initiate the request. When this option is selected, the admin is prompted to choose the desired currency for the customer’s payment.
The available currency options are restricted to those configured as "Allowed Currencies" in the Management Portal.
- These configured currencies can be found in the Admin Portal under Site Settings > Currency Settings > Reporting Currency section > Default Currency dropdown. This setup ensures that all requested payment methods align with predefined currency requirements, promoting consistency with organizational standards.
Customer Report
- In the Profile Summary tab within the Customer Profile, you can download a Customer Report by clicking the Download icon next to the customer's name. This report provides a comprehensive overview in a single document and includes the following sections:
- Account Statement: A summary of all transactions related to the customer’s account.
- Wallet Movements: A detailed record of wallet activities.
- Customer Balance: A total of account and wallet balances for a complete financial summary.
Customization Options
When downloading a Customer Report, you have the following customization options:
- Currency: Select one or multiple currencies for the downloaded report.
- Narrative Template: Apply a predefined narrative template that fits your reporting requirements.
- File Format: The Customer Report is always downloaded in PDF format.
- The Customer Report is also available for export via APIs.
Subscriptions
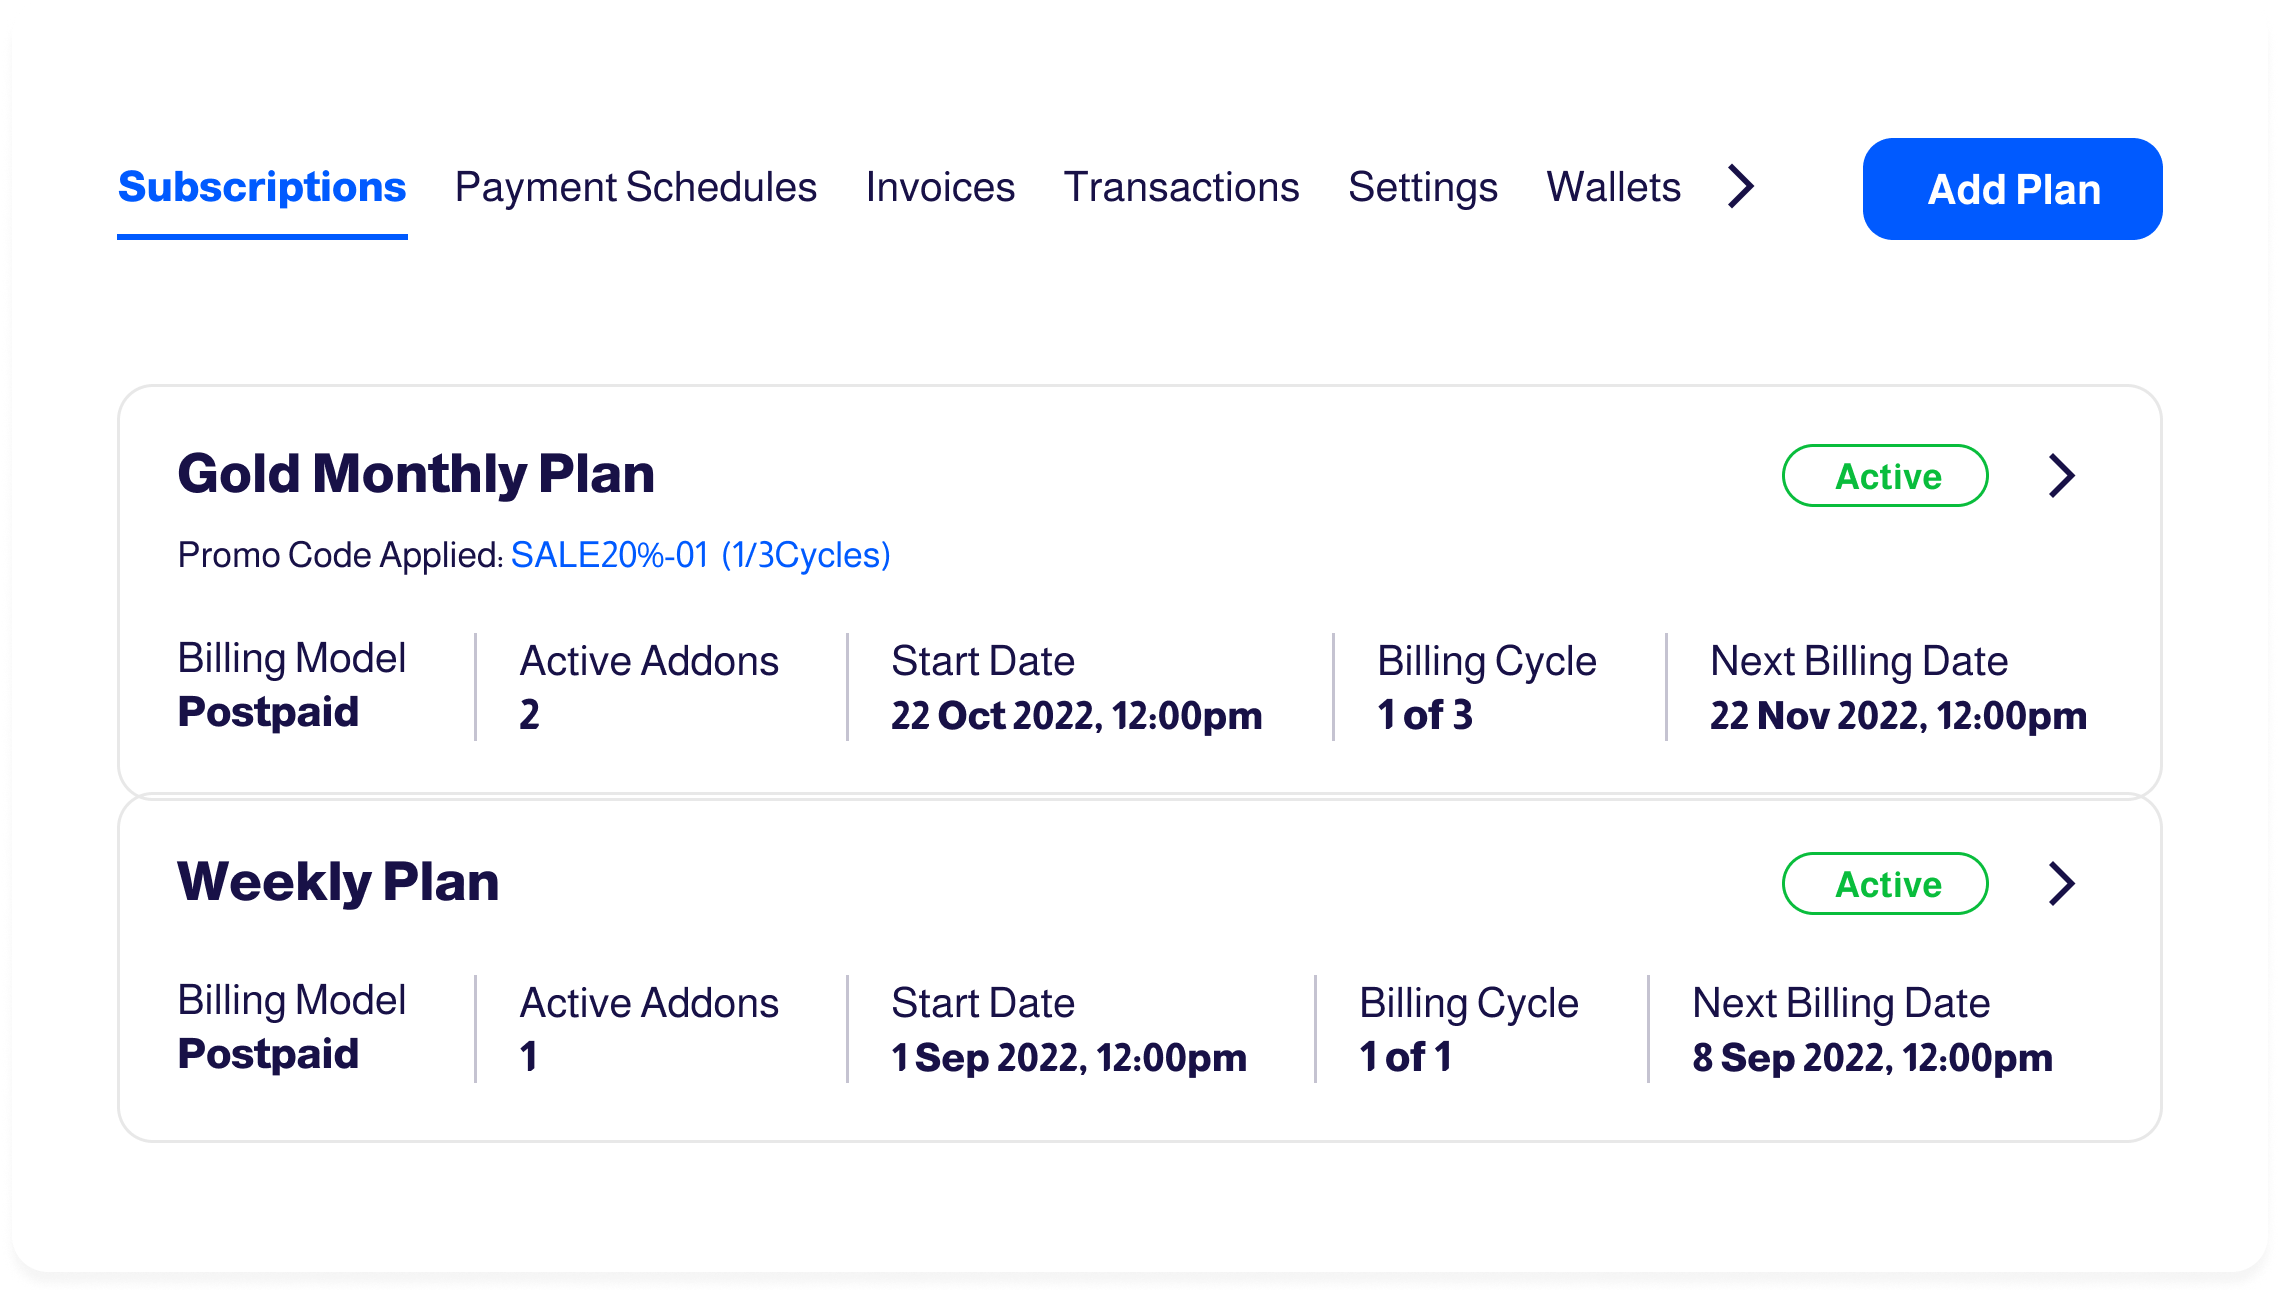
Navigate to the Subscriptions tab in the Customer Profile to manage a customer’s subscriptions.
A subscription is created when a customer subscribes to a plan or when an admin adds a plan.
- Add plans directly to customers by selecting the Add Plan button.
- Subscription cards appear within the Subscriptions tab; click any card to view and manage the subscription.
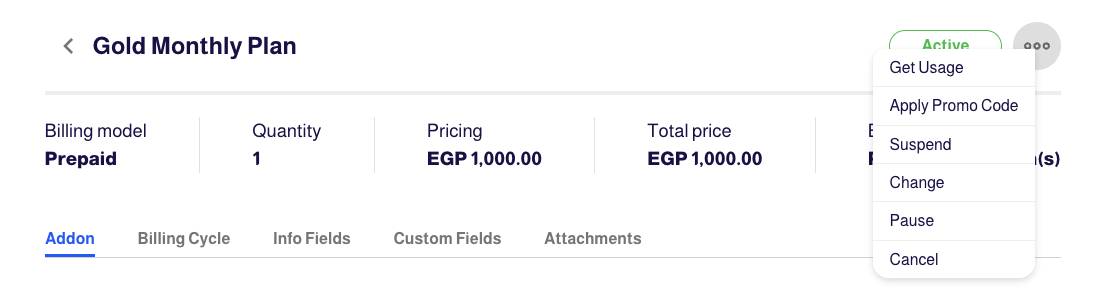
- When you open a subscription, use the ellipsis (...) menu for actions like Get Usage, Suspend, Pause, Resume, Change, or Cancel the subscription.
- You can choose to cancel a subscription immediately or at the end of the billing cycle.
- If canceled at the end of the billing cycle, you may resume it later. However, subscriptions canceled immediately cannot be resumed.
When you open a subscription, you can also access additional sections to perform various actions:
- Addons: Manage subscription addons.
- Billing Cycle: View and manage billing cycle details, including Surcharge, Usage Query Result, and Manual Usage Entry.
- Info and Custom Fields: Manage and update info and custom fields for subscription information.
- Attachments: Add or view files associated with the subscription.
Edit Addons
- Admins can also adjust the quantity of plan addons a customer is subscribed to right from the Addons section. This allows them to easily increase or decrease addon quantities based on their needs.
- Following this adjustment, the "Addons have changed" event notification will be sent to the customer, informing them of the change in addon quantity.
Please note that customers will not be notified until the event is configured to send a notification. - Adjusting the quantity of plan addons can also be done through the API.
Quantity Changes and Invoicing
- If the quantity is increased, the modification takes effect immediately. Accordingly, an invoice is promptly generated to reflect the updated subscription details after prorating the difference. The old quantity's status will be "Changing," and the new quantity's status will be "Activating." Once the invoice is paid, the old quantity's status will change to "Changed," and the new quantity's status will be "Active."
If the invoice is not paid, the admin cannot make any more changes to the quantity until paying.
- If the quantity is decreased, the modification is scheduled to take effect at the end of the billing cycle. Consequently, an invoice reflecting the change will be generated at that time. The old quantity's status will be "Changing," and the new quantity's status will be "Activating." Once the billing cycle ends and the invoice is paid, the old quantity's status will change to "Changed," and the new quantity's status will be "Active."
- If the quantity is decreased to zero (cancel), the modification is scheduled to take effect at the end of the billing cycle and the old quantity's status will transition to "Canceling." Once the billing cycle ends, the old quantity's status will change to "Canceled."
Edit Addons Permission
- Admins can manage whether customers have the ability to edit the addons for their subscribed plans via the Admin Portal. This option is available under Settings > Customer Portal Settings > Allow Edit Addons.
- For additional information, refer to the Customer Portal Subscriptions guide.
Download Proforma Invoice
- You can download proforma invoices on demand.
- Proforma invoices are preliminary invoices that enable admins to review a customer's billing details for post-paid items before the end of a billing cycle. These invoices provide an overview of upcoming charges, helping admins to anticipate and understand future payments more clearly.
The download button is available exclusively for the current billing cycle that includes post-paid items, enabling admins to determine the amount a customer will pay at the time of viewing the proforma invoice.
Add Info Fields and Custom Fields
- You can add info fields and custom fields to subscription profiles within the "Subscriptions" tab. Since customers may have multiple subscriptions, it is important to have subscription-specific fields. Therefore, we provide the ability to add info and custom fields specifically for each subscription profile within the "Subscriptions" tab.
It is essential to distinguish between customer info fields and subscription info fields. Subscription info fields pertain to individual subscriptions and not to the customer profile as a whole, so these should be added in the "Subscriptions" tab.
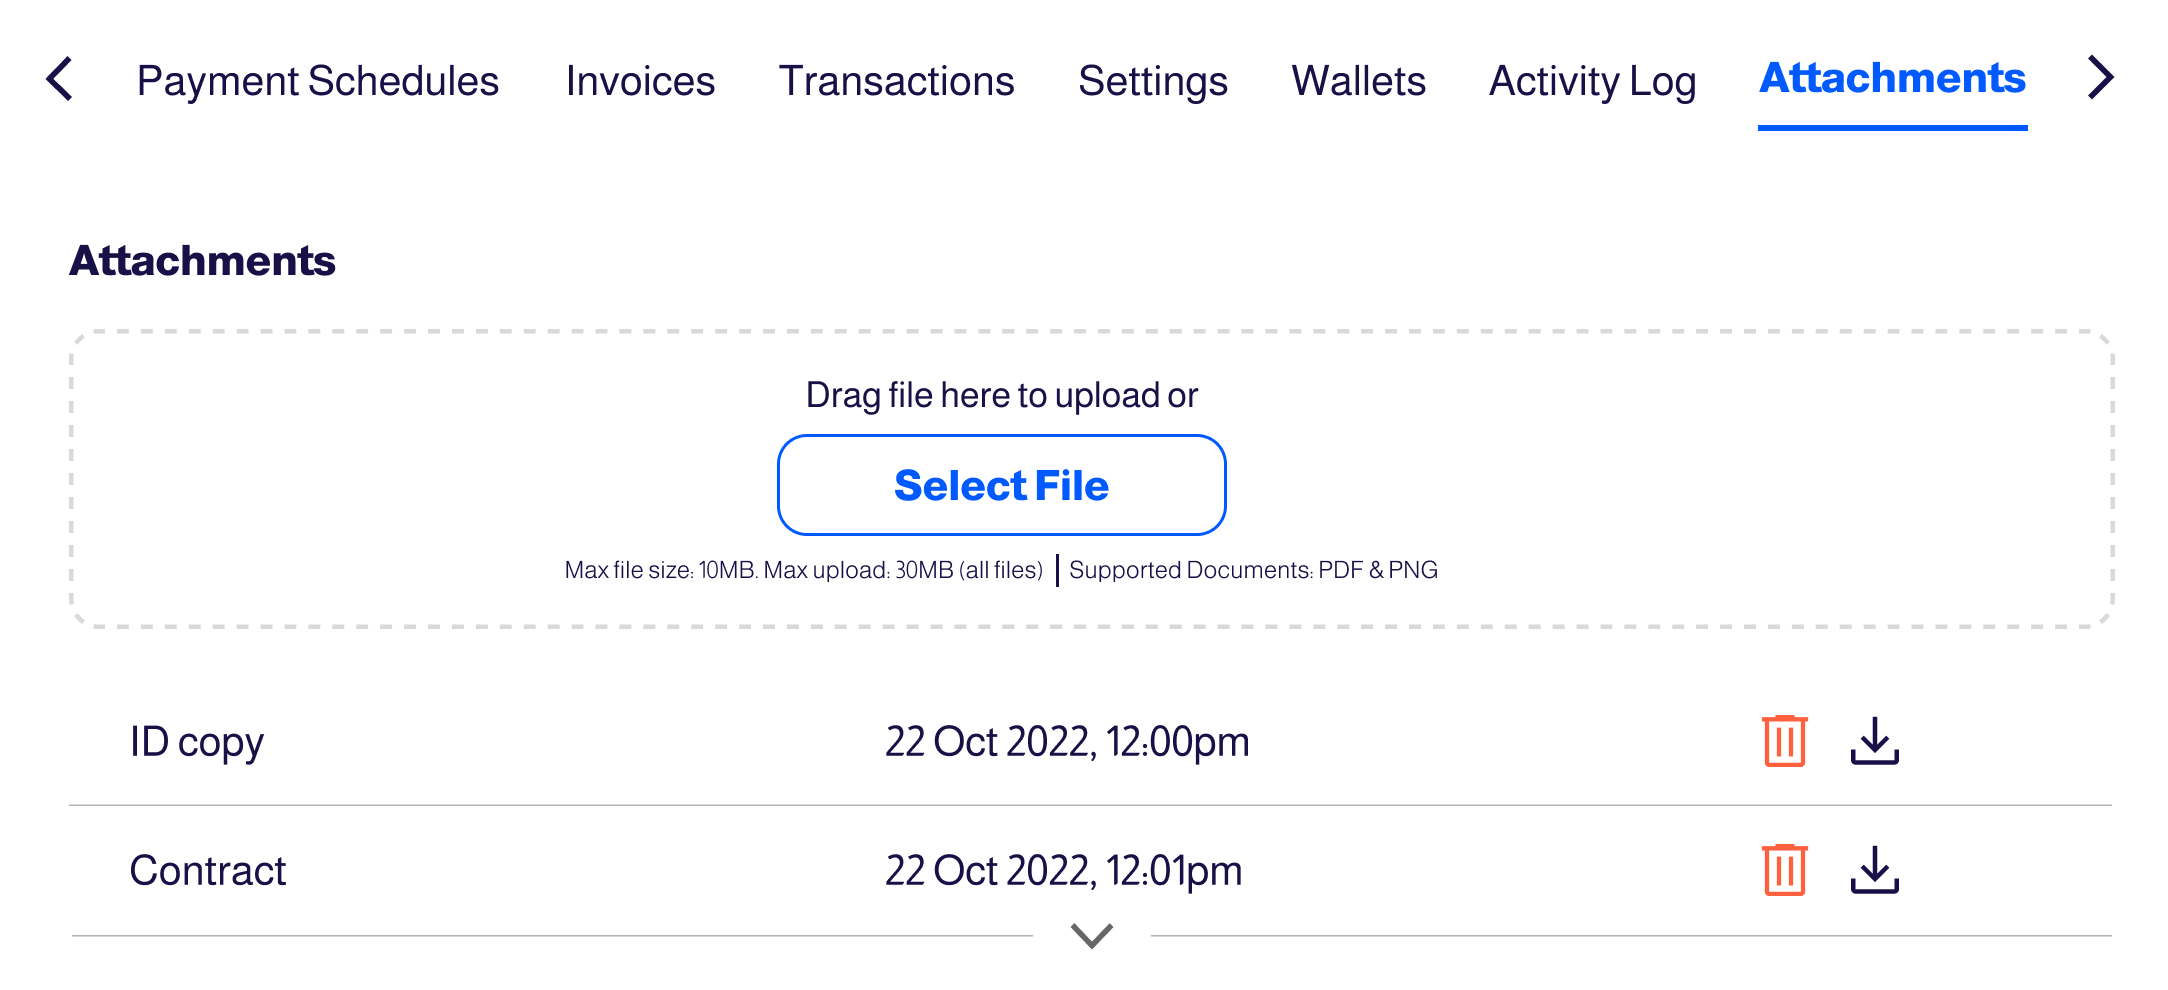
Attachments
- Admins have the ability to attach files directly to a customer's subscription card in the Subscription tab. This feature facilitates the inclusion of supporting documents or additional information related to the customer's subscription. Each attachment is subject to a maximum size of 10MB and supports the following formats: PDF, PNG, and JPEG.
- For group uploads, the total size must not exceed 30MB. You can attach multiple files, each within the 10MB limit, without any cumulative size limitations.
- Additionally, attachments can be managed via Attachments APIs and Subscriptions APIs.
Payment Schedules
- Access the "Payment Schedules" tab within the Customer Profile to manage customers schedules efficiently, including the ability to create new schedules directly from the profile interface.
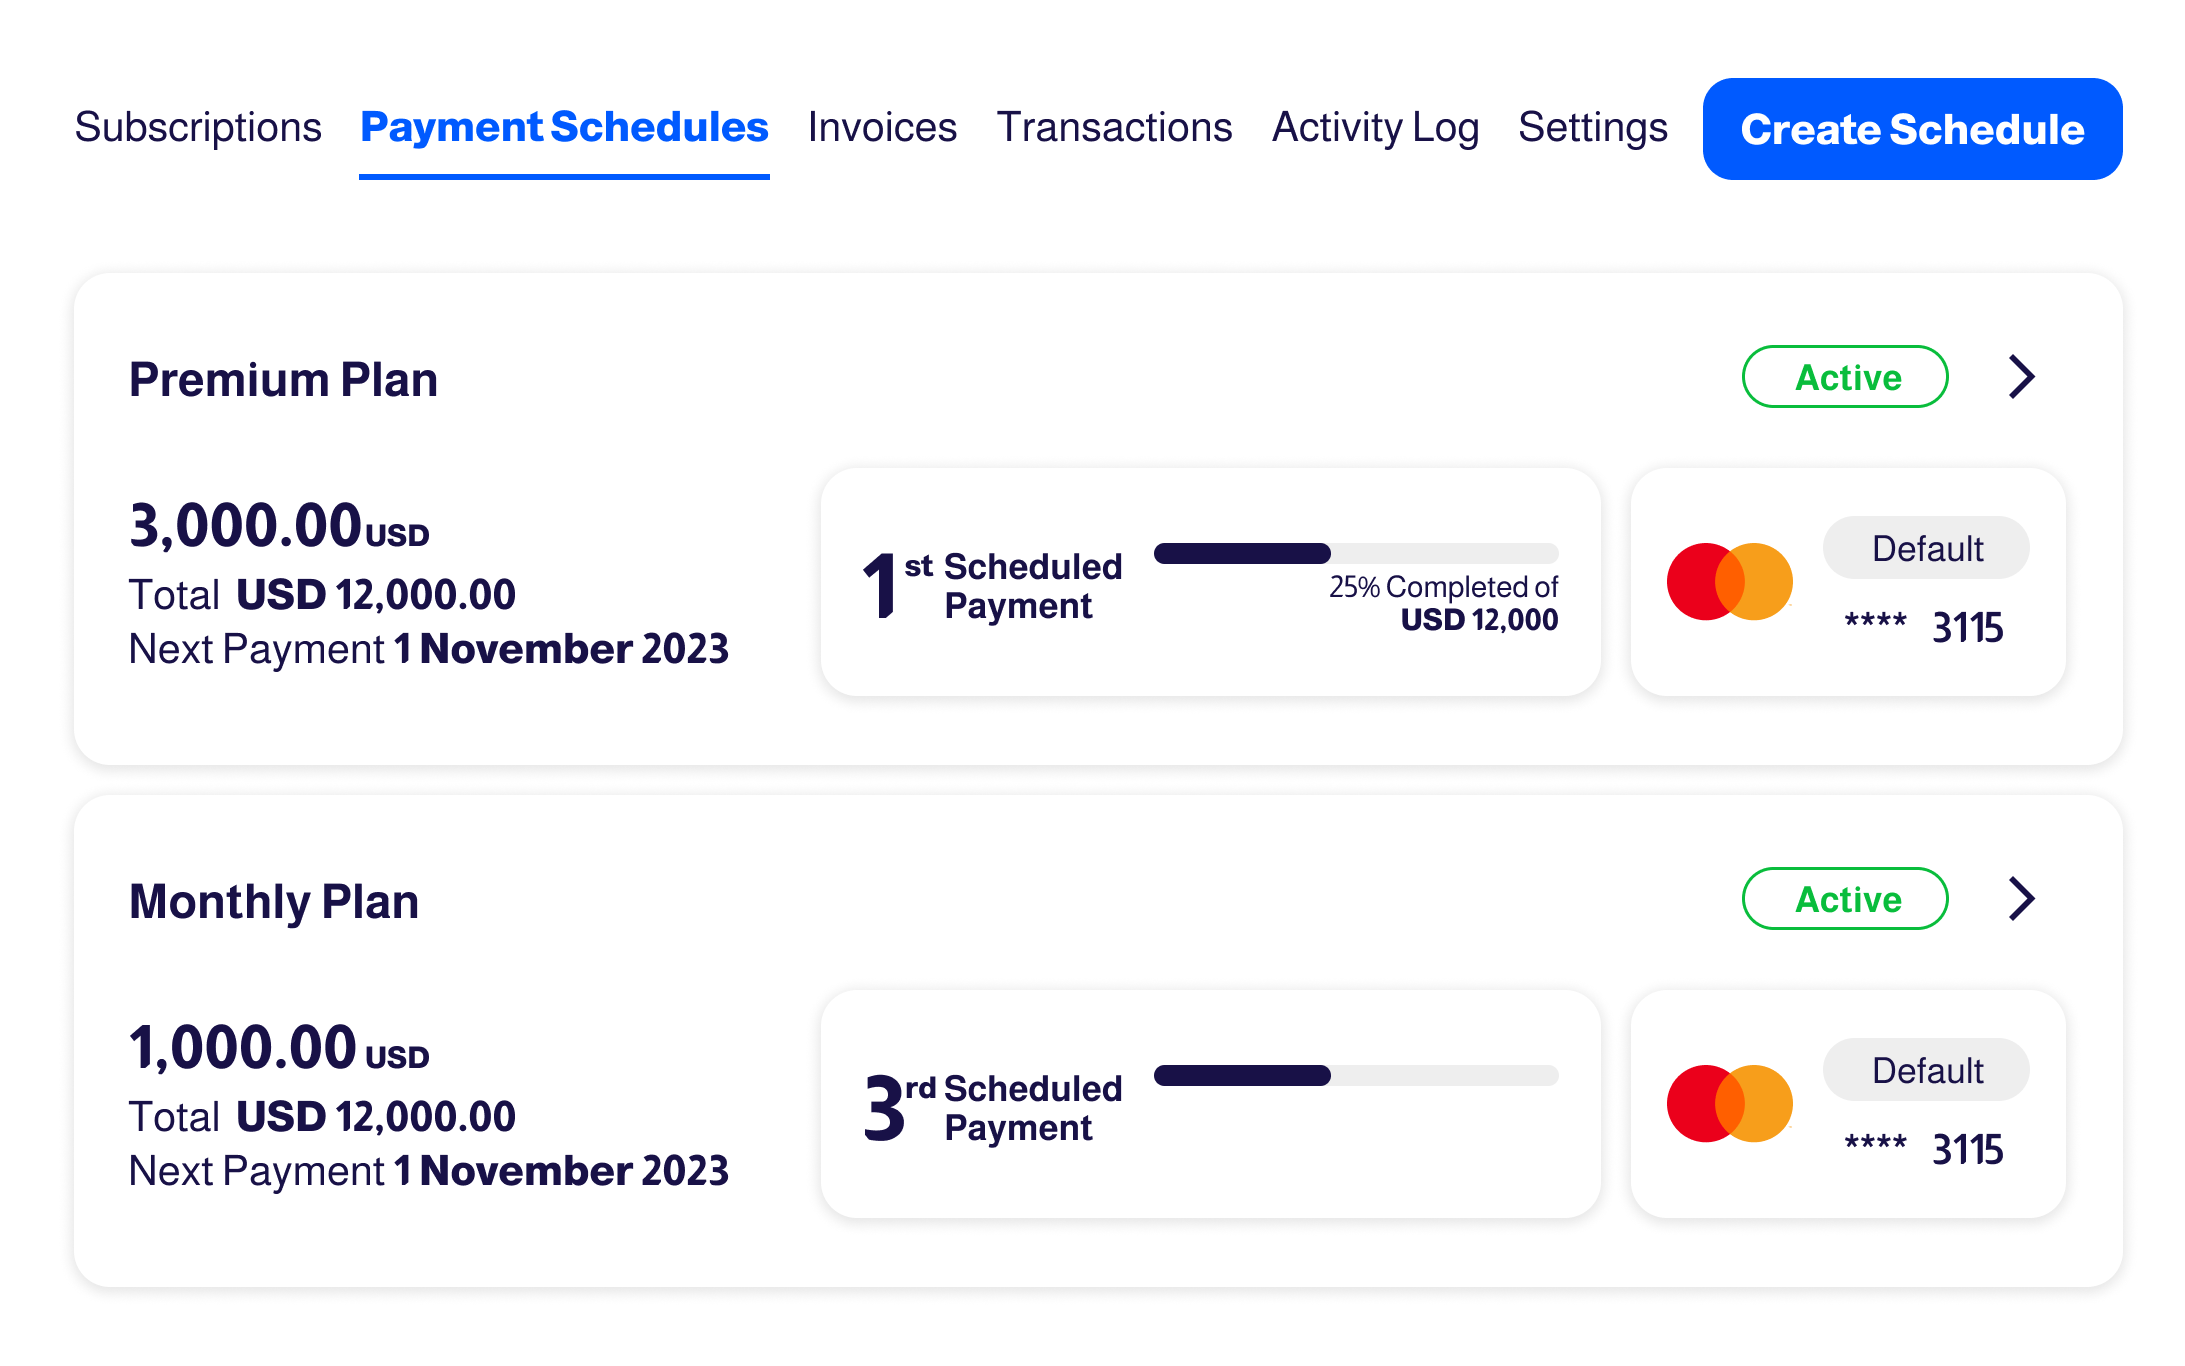
- Clicking on a schedule card opens the Scheduled Payments list for further details. Within the list you have the ability to:
- Keep track of the amounts need to be paid on a schedule.
- Send a payment link to your customer for a scheduled payment.
- Add a new payment to your schedule if the invoicing configuration is set to "No Invoicing" or "Per Payment Invoice."
- Export, Mark as Paid, or Delete any of your scheduled payments.

Invoices
Settle Invoices
- You can automatically settle customer invoices using their available balance by clicking the "Settle Invoices" button in the Invoices tab on the Customer Profile.
- Invoices with the status "Open" will be settled sequentially from oldest to newest. This process continues until the balance is fully consumed or all invoices are settled.
- When settling invoices using the customer balance, each invoice is settled in full. This means that the entire amount of each invoice is paid off completely. Partial payments are not supported in this automatic settlement process.
- If you need to make a partial payment on an invoice, you can do so manually by selecting "Manual Payment," then choosing "Use Balance" and specifying a custom amount.
Auto-Settlement on Top-Up
- When the customer balance is increased through a top-up, the system can automatically apply the auto-settle process. This means that any invoices with the status "Open" will be settled according to the same rules as when manually triggered.
- You can configure this feature in Wallet Settings by navigating to Auto-Settle on Top-Up, where you can enable or disable the automatic settlement option.
Auto-Settlement on Renewals
1. Renewals with Wallet Balance and Saved Payment Method
In auto-payments, such as subscription renewals or scheduled payments, the system will first attempt to use the wallet balance and, if needed, the saved payment method to cover the invoice amount.
Scenario 1: Successful Capture
For an open invoice of 100 EGP:
- The system will hold 40 EGP from the wallet balance and attempt to capture the remaining 60 EGP from the saved card.
- If the capture is successful, the 40 EGP and 60 EGP transactions will be applied to the invoice, and the invoice will be marked as successfully settled.
Scenario 2: Failed Capture
If the capture attempt for the 60 EGP fails:
- The system will unhold the 40 EGP from the wallet balance.
- The process will be reset, requiring the system to hold the 40 EGP again and try to capture the 60 EGP from the saved card once more.
2. Renewals with Wallet Balance and Manual Payment Methods
For renewals where the wallet balance and manual payment methods (such as POS or other methods) are used:
- There is no holding of amounts. Instead:
- The admin or customer will manually choose to use the available balance.
- The wallet balance is not automatically debited; it is up to the admin or customer to decide how much of the balance to apply.
Wallets
The Wallets tab provides detailed information about the customer's wallet(s) and their movements history.
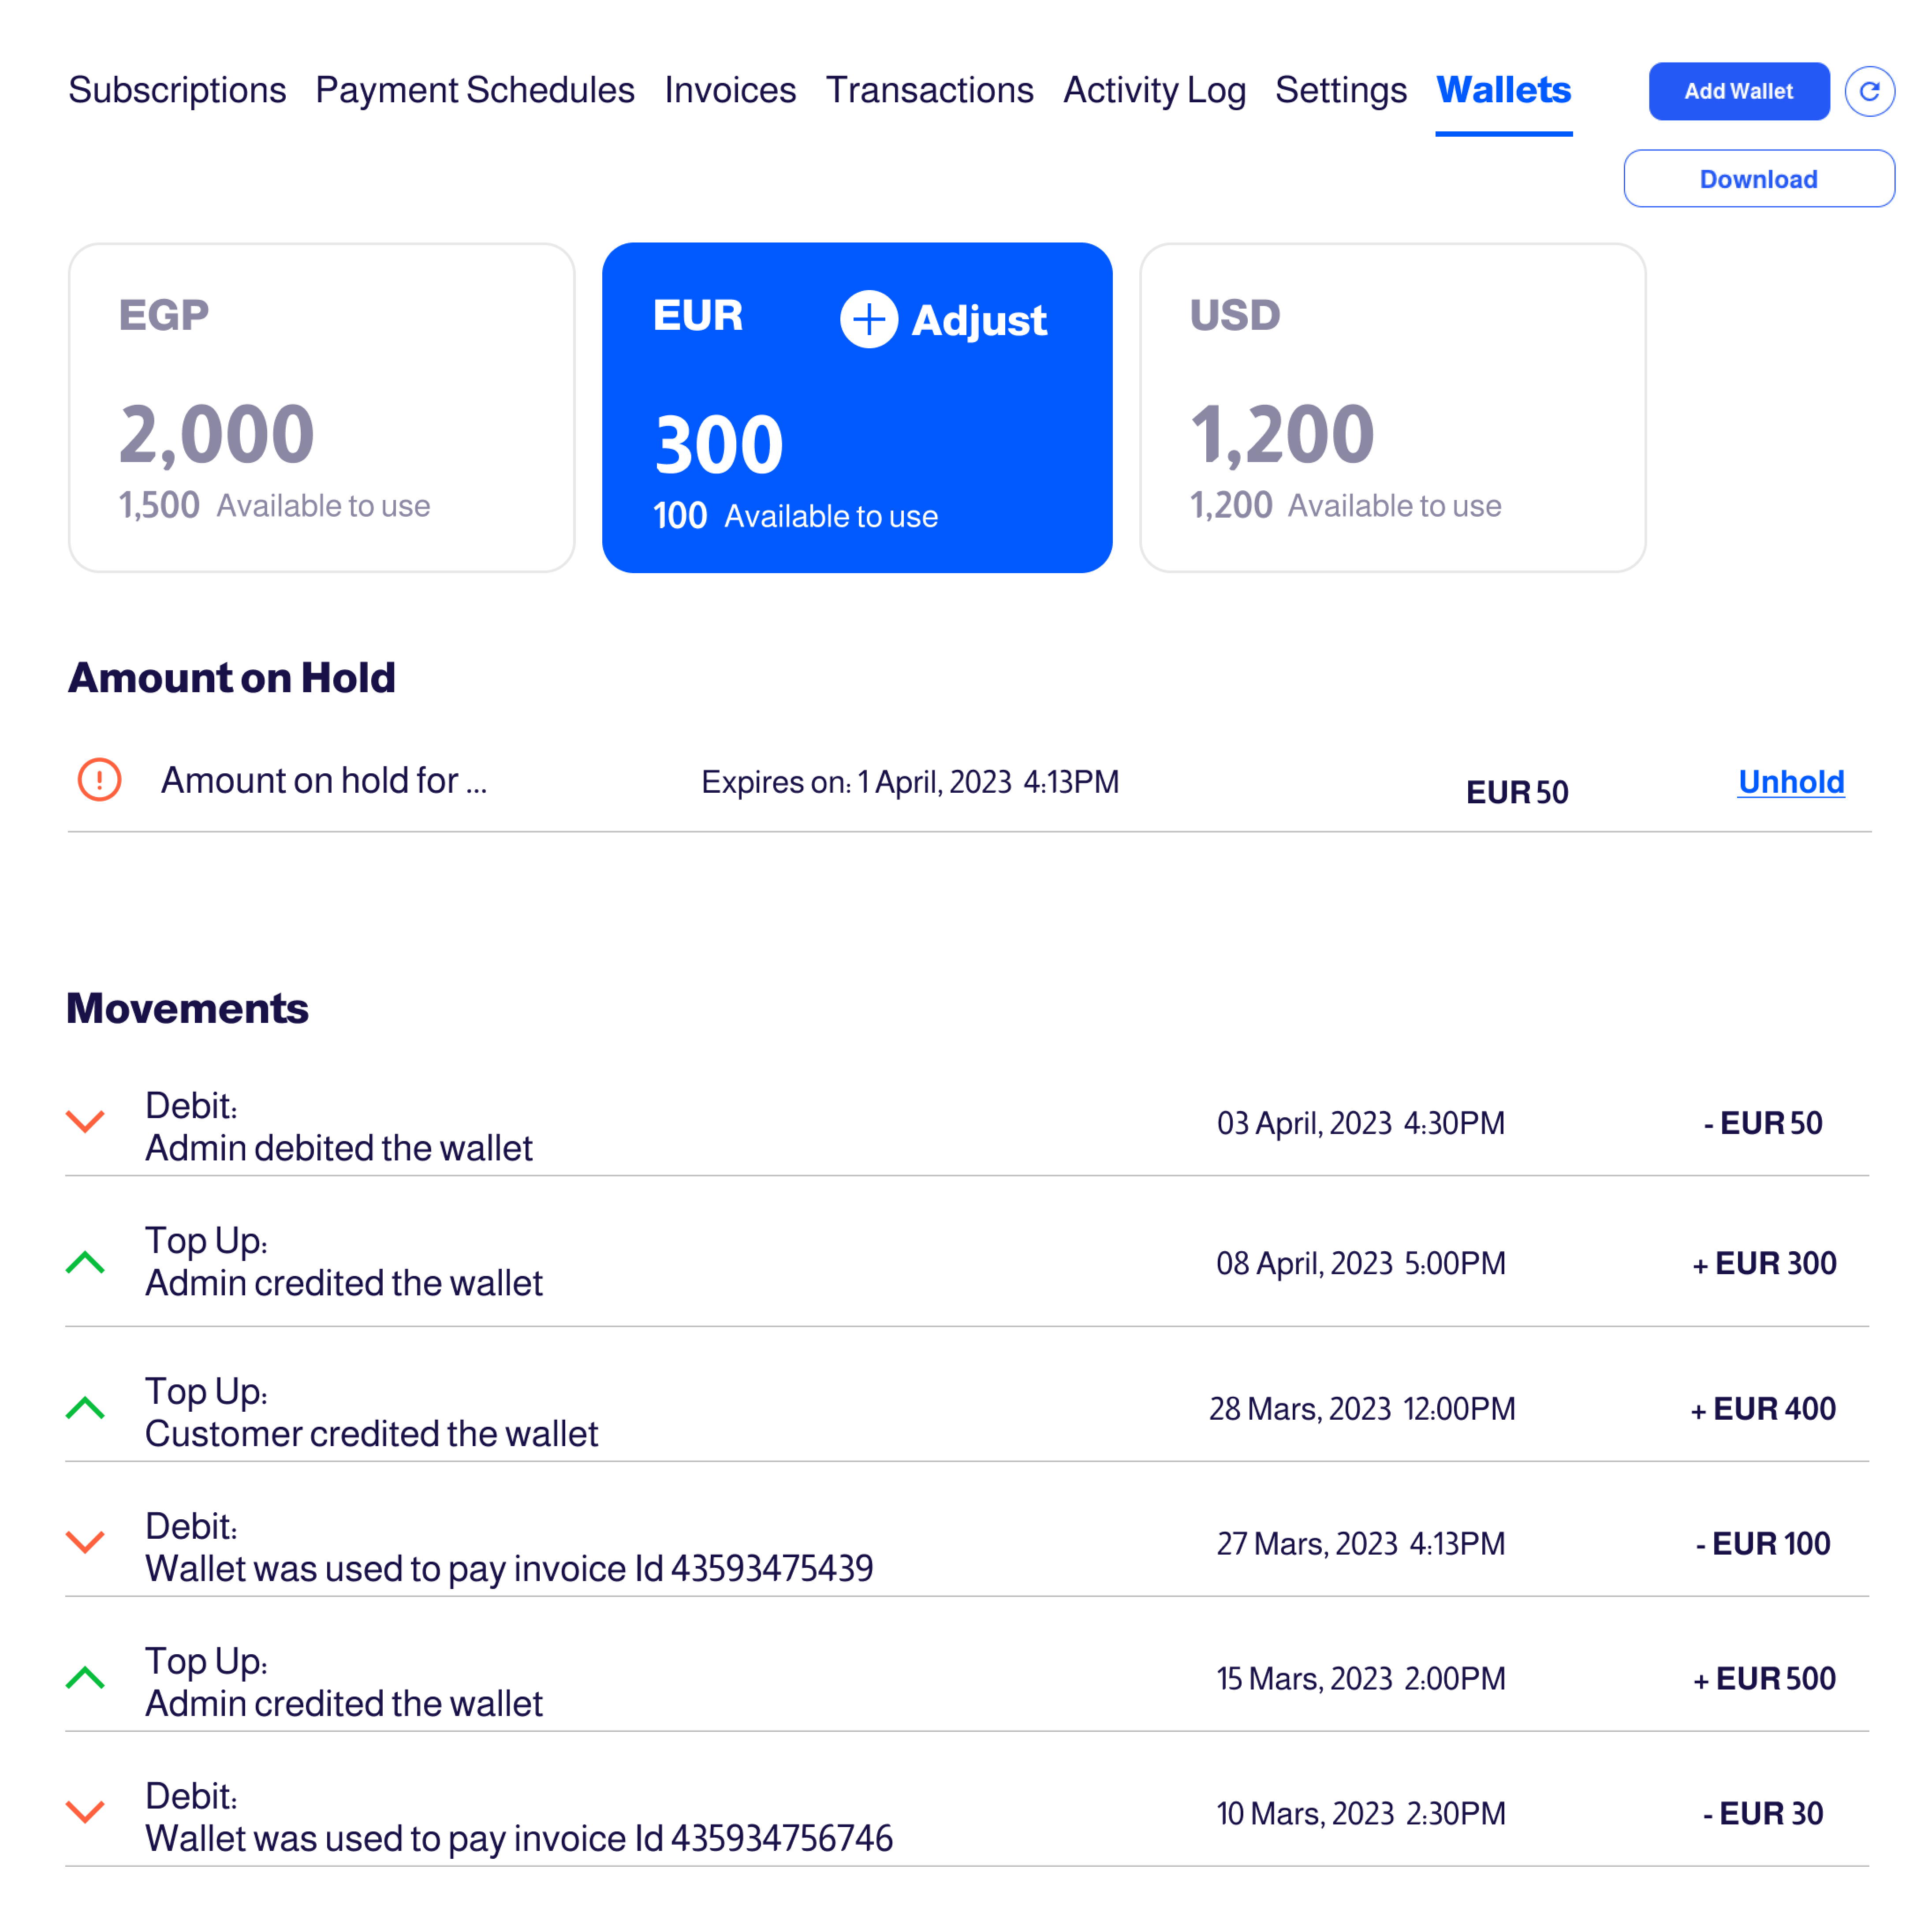
Each wallet includes the following:
- Balance: The total amount of money the customer has in the wallet.
- Hold: The amount of money currently on hold, typically due to ongoing payment processes. This amount is released once the transaction is completed.
- Available to Use: The balance minus the hold amount, indicating the funds available for transactions.
- Adjust: Admins can credit / add funds to the customer's wallet using the "+Adjust" feature.
Amount On Hold Section: This section shows the amount currently on hold in a wallet, which can be released by clicking "Unhold."
Movements Section: This section displays all movements within the wallet, including credited and debited amounts.
How Wallets are Created
1. Automatic Creation
- Automatic Creation with Subscription: When a subscription is created, the system automatically generates a wallet for the customer in the same currency as the subscribed plan, if the customer does not already have a wallet in that currency.
- Automatic Creation with Wallet Transfer: If an admin transfers funds to a customer’s wallet in a currency they do not already have, the system will automatically create a new wallet in that currency to receive the transferred funds.
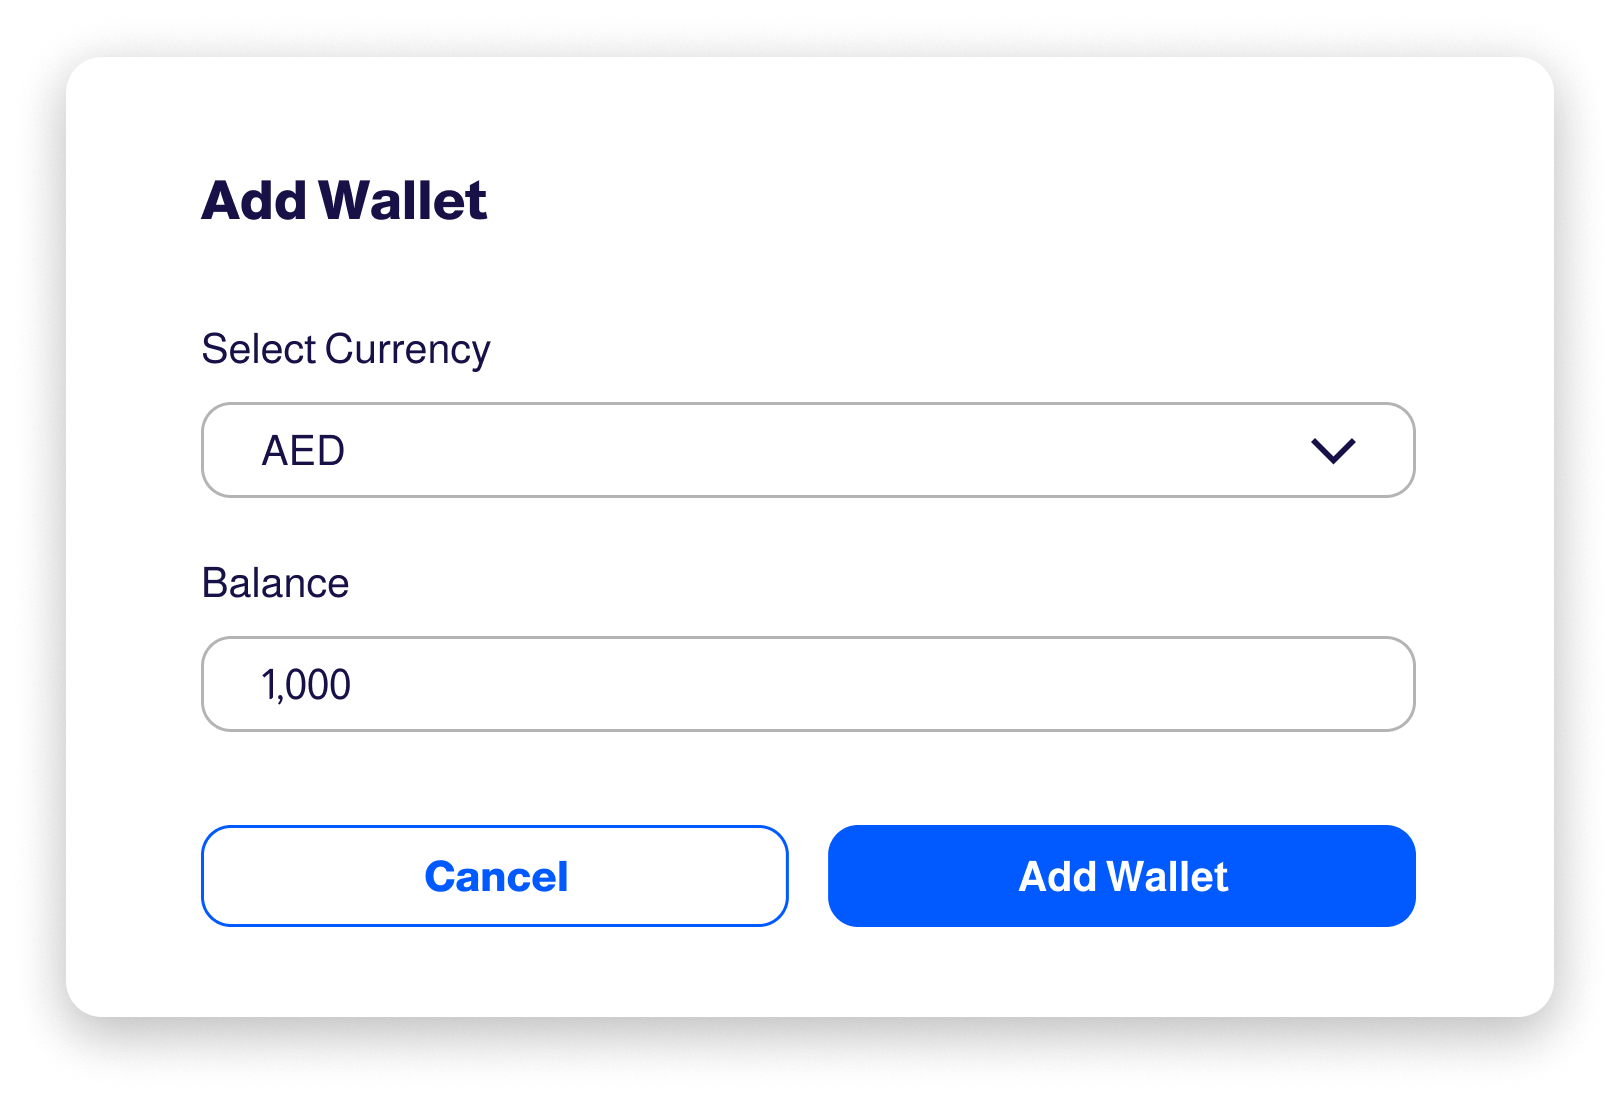
2. Admin Adds Wallets
- Admins can manually add a wallet for a customer in any of the allowed currencies on the site using the "Add Wallet" button.
- Wallets can also be added through APIs.
Wallet-to-Wallet Transfer
Admins can transfer funds between wallets within the site, either via APIs or by following the steps:
- Navigate to the Customer Profile and select the Wallet Tab.
- Choose the wallet from which the funds will be transferred.
- Click the Transfer button.
- Configure the transfer details, including:
- From (Sender’s wallet) and To (Receiver’s wallet).
- Amount to transfer, Currency (either the same as the sender’s wallet or a different currency), and the Conversion rate—either choosing auto-fill from the API or entering it manually as needed (if the currencies differ).
Example:
If the admin wishes to transfer funds from a customer’s USD wallet to another customer’s EGP wallet, the system will automatically apply the current conversion rate for the transaction.
What if?
If the admin wishes to transfer funds from a customer’s USD wallet to another customer’s EGP wallet, the system will apply the current conversion rate for the transaction based on the configured Conversion rate.
Automatic Wallet Creation
If the receiving customer does not already have a wallet in the transferred currency (e.g., EGP), the system will automatically create one to receive the funds. This applies whether the transfer is between two different customers or within the same customer's wallets.
Limitation on Negative Balances
If a wallet's balance reaches zero, admin cannot debit the wallet further (debiting refers to reducing or withdrawing from the wallet balance).
- For example, if an admin attempts to bill a customer 150 EGP but the balance is insufficient, the transaction will fail due to insufficient funds.
How Wallets are used in Auto-Payments
- Wallets are automatically used as the primary payment method to settle auto-payments, such as subscription renewals or scheduled payments.
- In cases where the wallet does not have sufficient balance to cover the full payment, the system utilizes the available balance in the wallet first, and then charges the remaining amount from the customer's saved payment method.
- To learn more about how wallets are used in auto-payments, please check out Auto-Settlement of Invoices on Renewals.
How Wallets are used in Checkout
- Customers can pay using both the wallet and a payment method (either a saved one or a new one added during checkout).
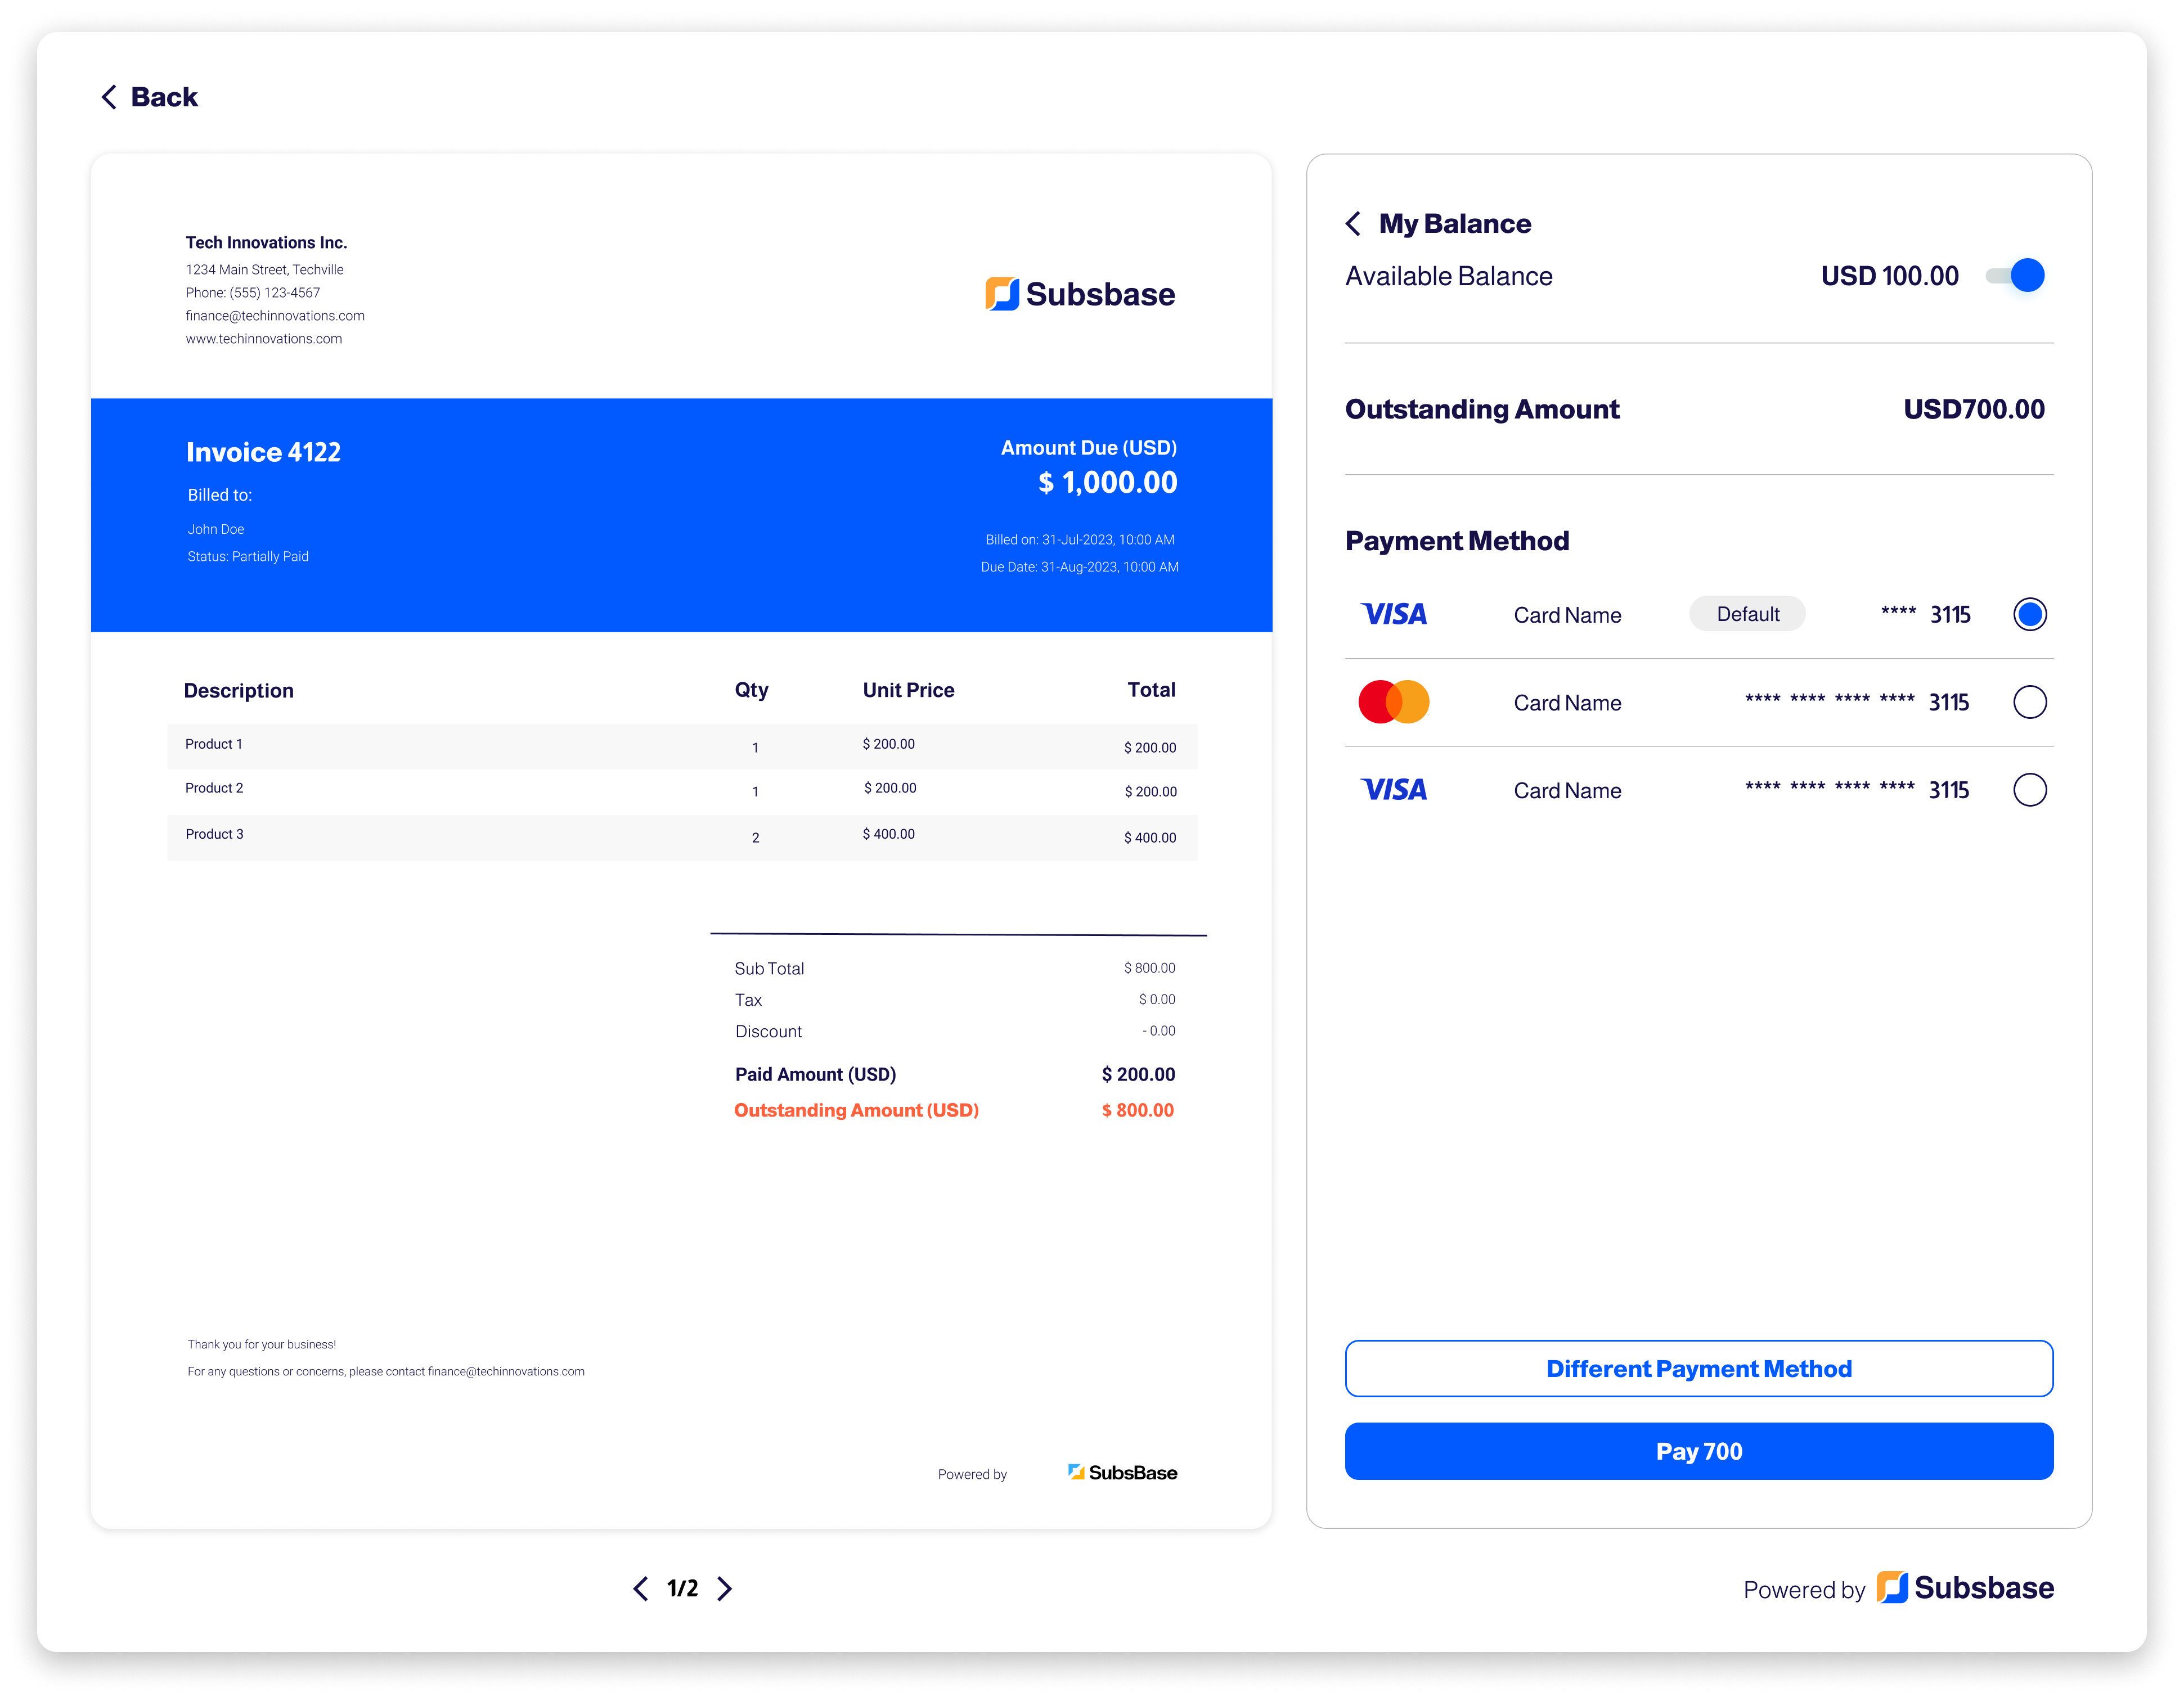
Checkout Using the Wallet + Payment Method
- Customers can enable the "Available Balance" toggle to use their wallet balance for payment.
- The "Outstanding Amount" will be updated based on the enablement or disablement of the balance.
- Customers can select a payment method from the list of "Payment Methods."
- If the invoice amount that must be paid is equal to the wallet balance, the list of "Payment Methods" will not be displayed.
- Customers can also choose to add a different payment method to be use with the wallet during the checkout experience.
- If the customer adds a new payment method during checkout, it will be considered an on-session payment.
When the toggle is enabled, the wallet will be on hold until the transaction is made or the toggle is disabled.
- If another auto-payment (such as auto-renewal on a subscription) is using the wallet, the wallet will be on hold.
- If the customer enables the "Available Balance" toggle during the auto-payment hold, an error message will be shown because the wallet is on hold.
Wallet Settings
As an admin, you need to configure the prefilled top up amounts in the Wallet Settings.
- When customers top up their wallets from the Customer Portal, they will have two options:
- Enter a specific amount.
- Choose from the prefilled amounts you have configured.
Download the Wallet Movements Report
- You can easily download the wallet movements by clicking the "Download" button.
Customization Options
When downloading the wallet movements, you have several customization options:
- Currency: Select one or multiple currencies for the downloaded wallet movements.
- Narrative Template: Choose a predefined narrative template that best suits your reporting needs.
- File Format: You can select the format for the downloaded file CSV or PDF.
- Wallet Movements are also available for export via APIs in both formats: CSV and PDF.
Attachments
- Admins have the ability to attach files directly to a customer profile through the Attachments tab. This feature facilitates the inclusion of supporting documents or additional information related to the customer, such as identification documents, contracts, or service agreements.
- Each attachment is subject to a maximum size of 10MB and supports the following formats: PDF, PNG, and JPEG.
- For group uploads, the total size must not exceed 30MB. You can attach multiple files, each within the 10MB limit, without any cumulative size limitations.
- Furthermore, attachments can be managed using the Attachments APIs and Customer Attachments APIs.
Settings
Localization Settings
- You have the ability to translate info fields in your customer profiles, allowing your customers to seamlessly switch between languages across the Admin Portal, Checkout, and Customer Portal pages.
- Any field marked with the localization icon can be customized to different languages.

- Click the icon to access the Localization Settings, where you can enter translations for each language.
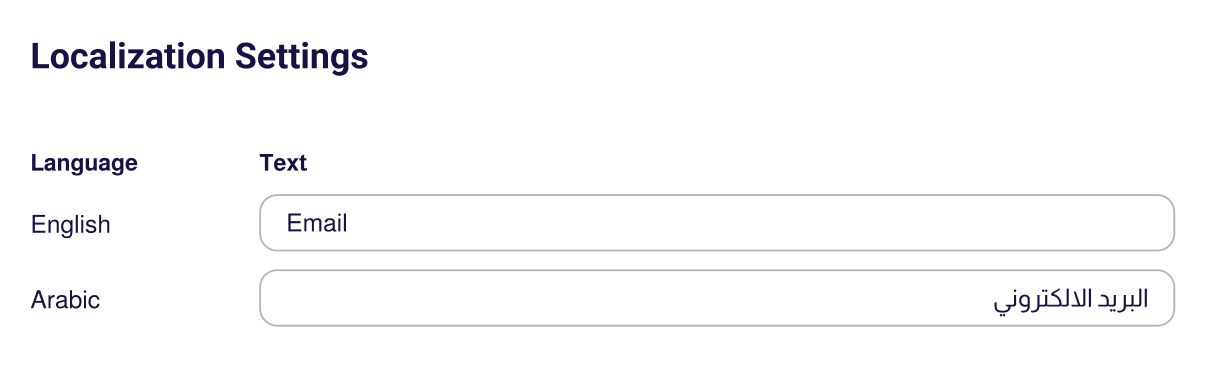
To enable localization, admins must first set the site's language preferences in the Admin Portal under Site Settings > Language Settings. This step ensures that the Localization Settings work properly across all interfaces.
Statement
- In the Statement tab within the Customer Profile, you can track all invoices, invoice transactions, and scheduled payments for a customer in one convenient location.
Account Statement by Currency
- The statement is displayed based on the currency you select from the "Statement Currency" dropdown menu.
Download the Account Statement Report
- You can easily download the account statement by clicking the "Download" button.
Customization Options
When downloading a statement, you have several customization options:
- Currency: Select one or multiple currencies for the downloaded statement.
- Narrative Template: Choose a predefined narrative template that best suits your reporting needs.
- File Format: You can select the format for the downloaded file CSV or PDF.
- Account statements are also available for export via APIs in both formats: CSV and PDF.
More Customer Information
- Each customer's profile offers a wealth of details. Navigation is facilitated through tabs at the top, including Subscriptions, Payment Schedules, Invoices, Transactions, Settings, Wallets, and more.
- Detailed information can be gained by clicking on specific invoices or transactions.
Add Plan
Subsbase allows you to directly add plans to your customers without requiring any input from them to complete the plan subscription process. When adding a plan, the admin has the option to fill in any missing information, make customizations, or request the customer to provide the necessary details.
How to Add Plan
Adding a plan can be through the Admin Portal, the Customer Portal, or the API.
Add Plan through Admin Portal
To add a plan to a customer, open the customer's profile from the "View Profile" button > click on the "Add Plan" button at the top right side in the customer's Subscriptions tab > navigate through the Plan Picker to pick a plan, then click "Ok" to proceed with the subscription process or "Cancel" if you choose not to continue.
The Plan Picker contains all the existing plans on your site and can be filtered by day, week, month, quarter, or year; and sorted by price.
- If all required information for the plan you picked is already available (saved on the customer's profile), the admin will be able to directly add the plan to their customer.
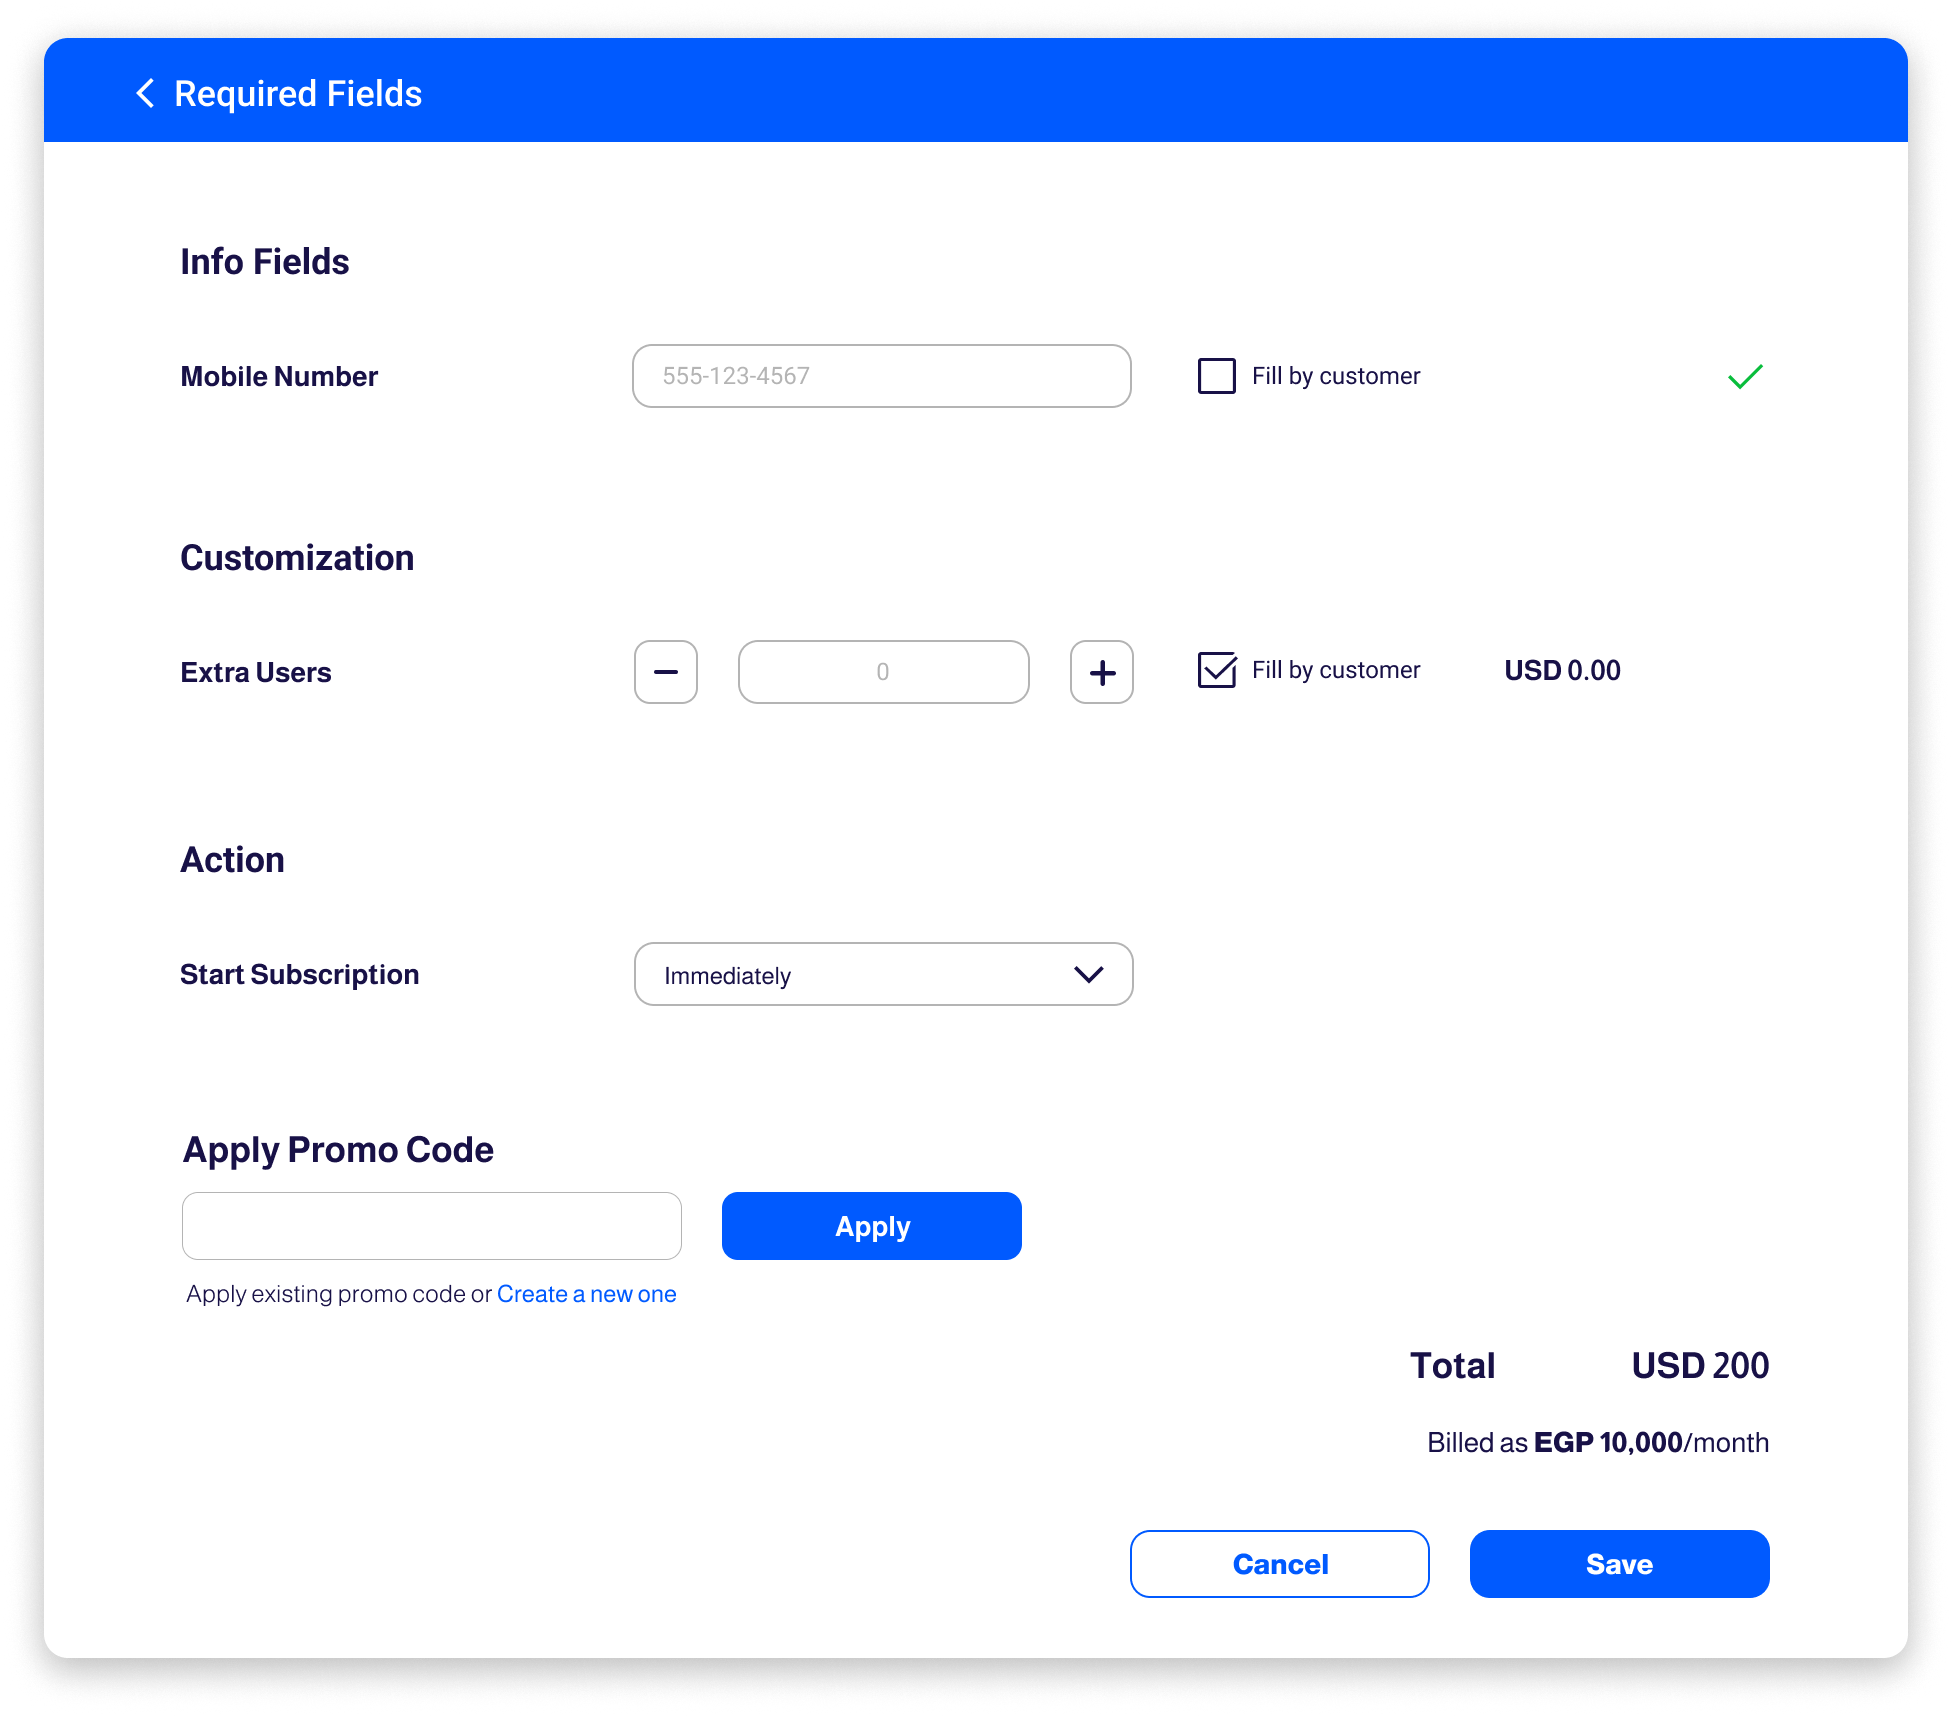
- However, if there is any missing information, the admin is enabled to fill them in through the "Required Fields" pop-up box that will appear once they click "Ok" on the plan they picked to be added to a customer.
- If the admin require essential information from the customer for a chosen plan, they can mark the necessary info fields by checking the "Fill by customer" checkboxes, then "Save." Subsequently, we will automatically notify the customer to complete the plan subscription process by providing the required information.
- A validation rule is in place to indicate the input's validity: valid inputs will be denoted with a green checkmark, while invalid inputs will display a red warning icon. For instance, if a number is required in a specific info field and the customer enters text instead, the input will be flagged with a red marker.
::
- Info Fields: Contains the required info fields associated with the newly picked plan the admin wants to add to a customer. The fields are empty to be filled in by the admin or the customer, as per the above-mentioned steps.
- Customization: Contains the info fields that are related to the plan configuraiton set by the admin during plan creation.
- For instance, this may involve details about addons or plans with variable pricing, such as tiered plans.
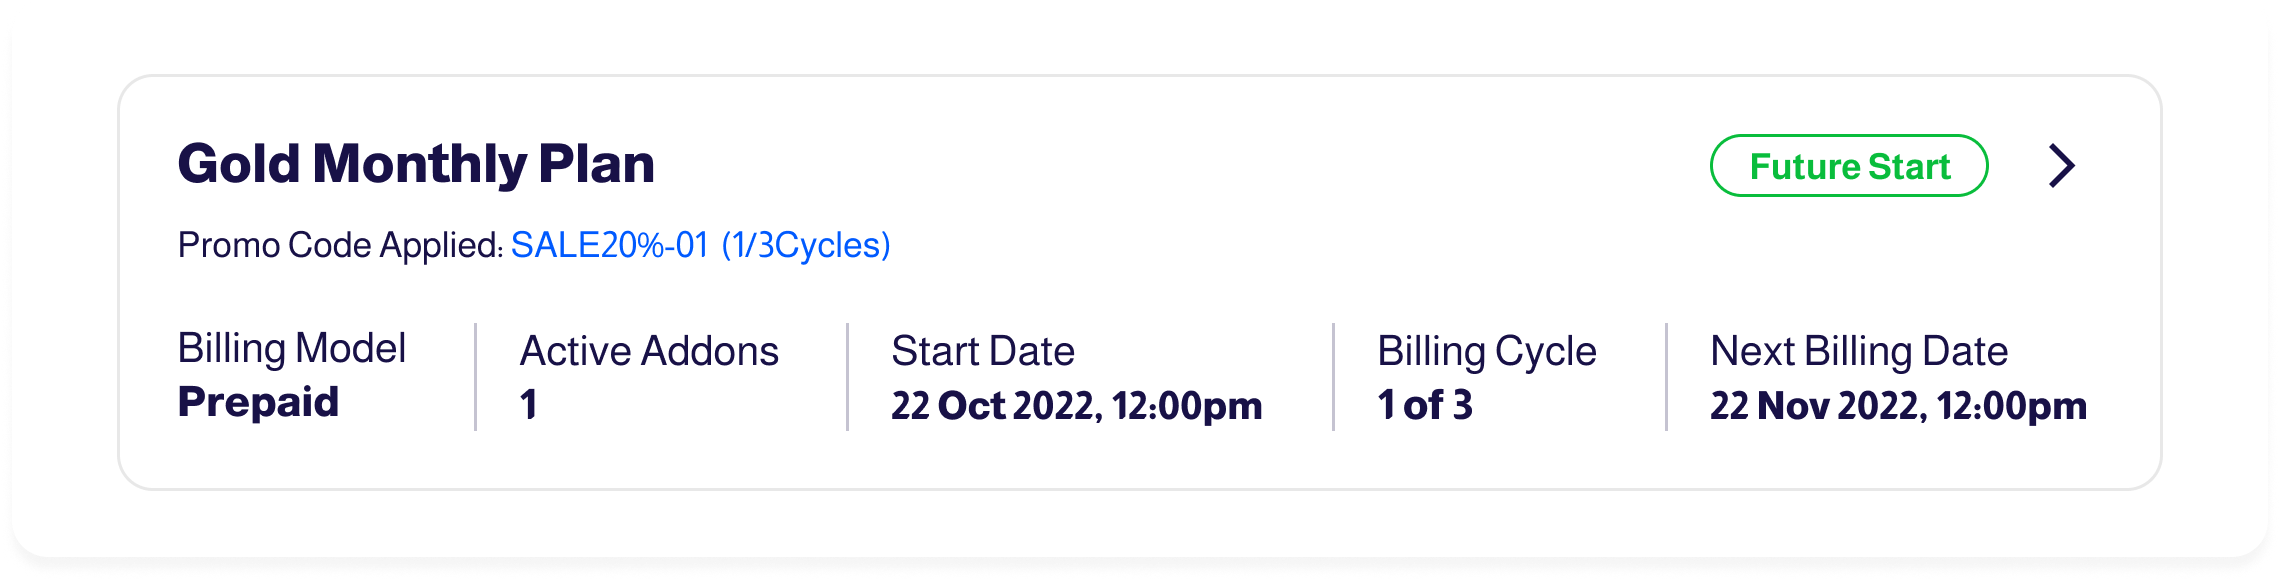
- Future Start: Contains a value field that indicates the number of days after which a subscription will start. So, if the admin enters 20 in the Future Start field, the plan will be added to the customer right away, but the plan subscription will start after 20 days.
- Apply Promo Code: You can choose from existing promo codes or create a new one when adding a plan to your customer.
- If you decide to create a new promo code during the process, a new campaign will automatically be created, and you will be prompted to fill out the following details:
- Type: Select the discount type, either a Fixed Amount (e.g., $50 off) or a Percentage (e.g., 20% off).
- Value: Specify the discount value, whether it is a fixed amount or a percentage.
- Usage Limit: Define how many billing cycles the discount will apply to, such as for two renewals, or leave it as unlimited for ongoing renewals.
By default, the redemption count for the new promo code is set to 1.
- If you decide to create a new promo code during the process, a new campaign will automatically be created, and you will be prompted to fill out the following details:
Once the new promo code is created, it will be associated with a new campaign, which can be found on the Campaigns page within the Admin Portal.
If a subscription displays a "Future Start" status, it indicates that the subscription is planned to start at a future date and is not currently active.
Add Plan Subscription
You can add plans for a customer with a start date set to today, in the past, or in the future. All plans assigned through the Admin Portal follow the plan’s billing cycle configuration and proration settings.
- Historic Plans
These are plans that start before today’s date.- The plan start time is always 09:00 UTC when assigned from the Admin Portal.
- Billing cycle invoices are calculated according to the plan’s configured billing interval.
- If an end date is added, it also defaults to 09:00 UTC.
- If no end date is added, the plan’s end date follows the configured interval and billing cycle setup.
- If the end date is earlier than the billing cycle interval end, proration settings are applied.
- Plans Added on the Same Day
When a plan is added with a start date equal to today, the plan start time reflects the exact moment of assignment.- Example: If the plan is added on October 13th at 13:43, the plan starts at October 13th, 13:43.
- Billing cycle invoices follow the plan’s configured billing intervals.
- If an end date is provided, it defaults to 09:00 UTC.
- If no end date is provided, the plan’s end date follows the configured interval and billing cycle setup.
- If the end date is set before the billing cycle interval ends, proration rules apply.
- Future Start Plans
If a plan’s start date is set in the future (later than today), the plan start time defaults to 09:00 UTC when assigned through the Admin Portal.- Billing cycle invoices follow the plan’s configured intervals.
- If an end date is added, it defaults to 09:00 UTC.
- If no end date is added, the plan end date follows the interval and billing cycle configuration.
- If the end date is set before the billing cycle interval ends, proration settings apply.
For plan subscription cancellations, invoices are generated according to the plan’s configuration.
- Pre-Paid Plans
- If the plan is configured to generate credit notes, a credit note is created based on the remaining active days within the billing cycle.
- Post-Paid Plans
The behavior depends on whether the Aggregate Daily option is enabled or not.- When Aggregate Daily is enabled:
- Set End Date: Generates a prorated invoice calculated using the daily rate, where the end date is excluded from the billing period.
Example: For a $300 monthly plan running from the 1st to the 5th (start and end at 12:00), the invoice covers 4 days:($300 / 30) × 4 = $40. - Cancel Immediately: Ends the plan at the moment of cancellation, calculating consumed days up to that time.
Example 1: Canceled at 11:40 → 4 days →$40.
Example 2: Canceled at 18:40 → 5 days →$50. - Cancel at End of Billing Cycle: Ends the plan on the billing cycle end date, generating the full invoice amount but preventing renewal.
- Set End Date: Generates a prorated invoice calculated using the daily rate, where the end date is excluded from the billing period.
- When Aggregate Daily is disabled:
- Set End Date: Cancels the subscription at the selected date and generates an invoice for the full plan price.
- Cancel Immediately: Cancels the plan immediately and generates an invoice for the full plan price.
- Cancel at End of Billing Cycle: Cancels the plan at the end of the current billing cycle and generates a full invoice amount.
- When Aggregate Daily is enabled:
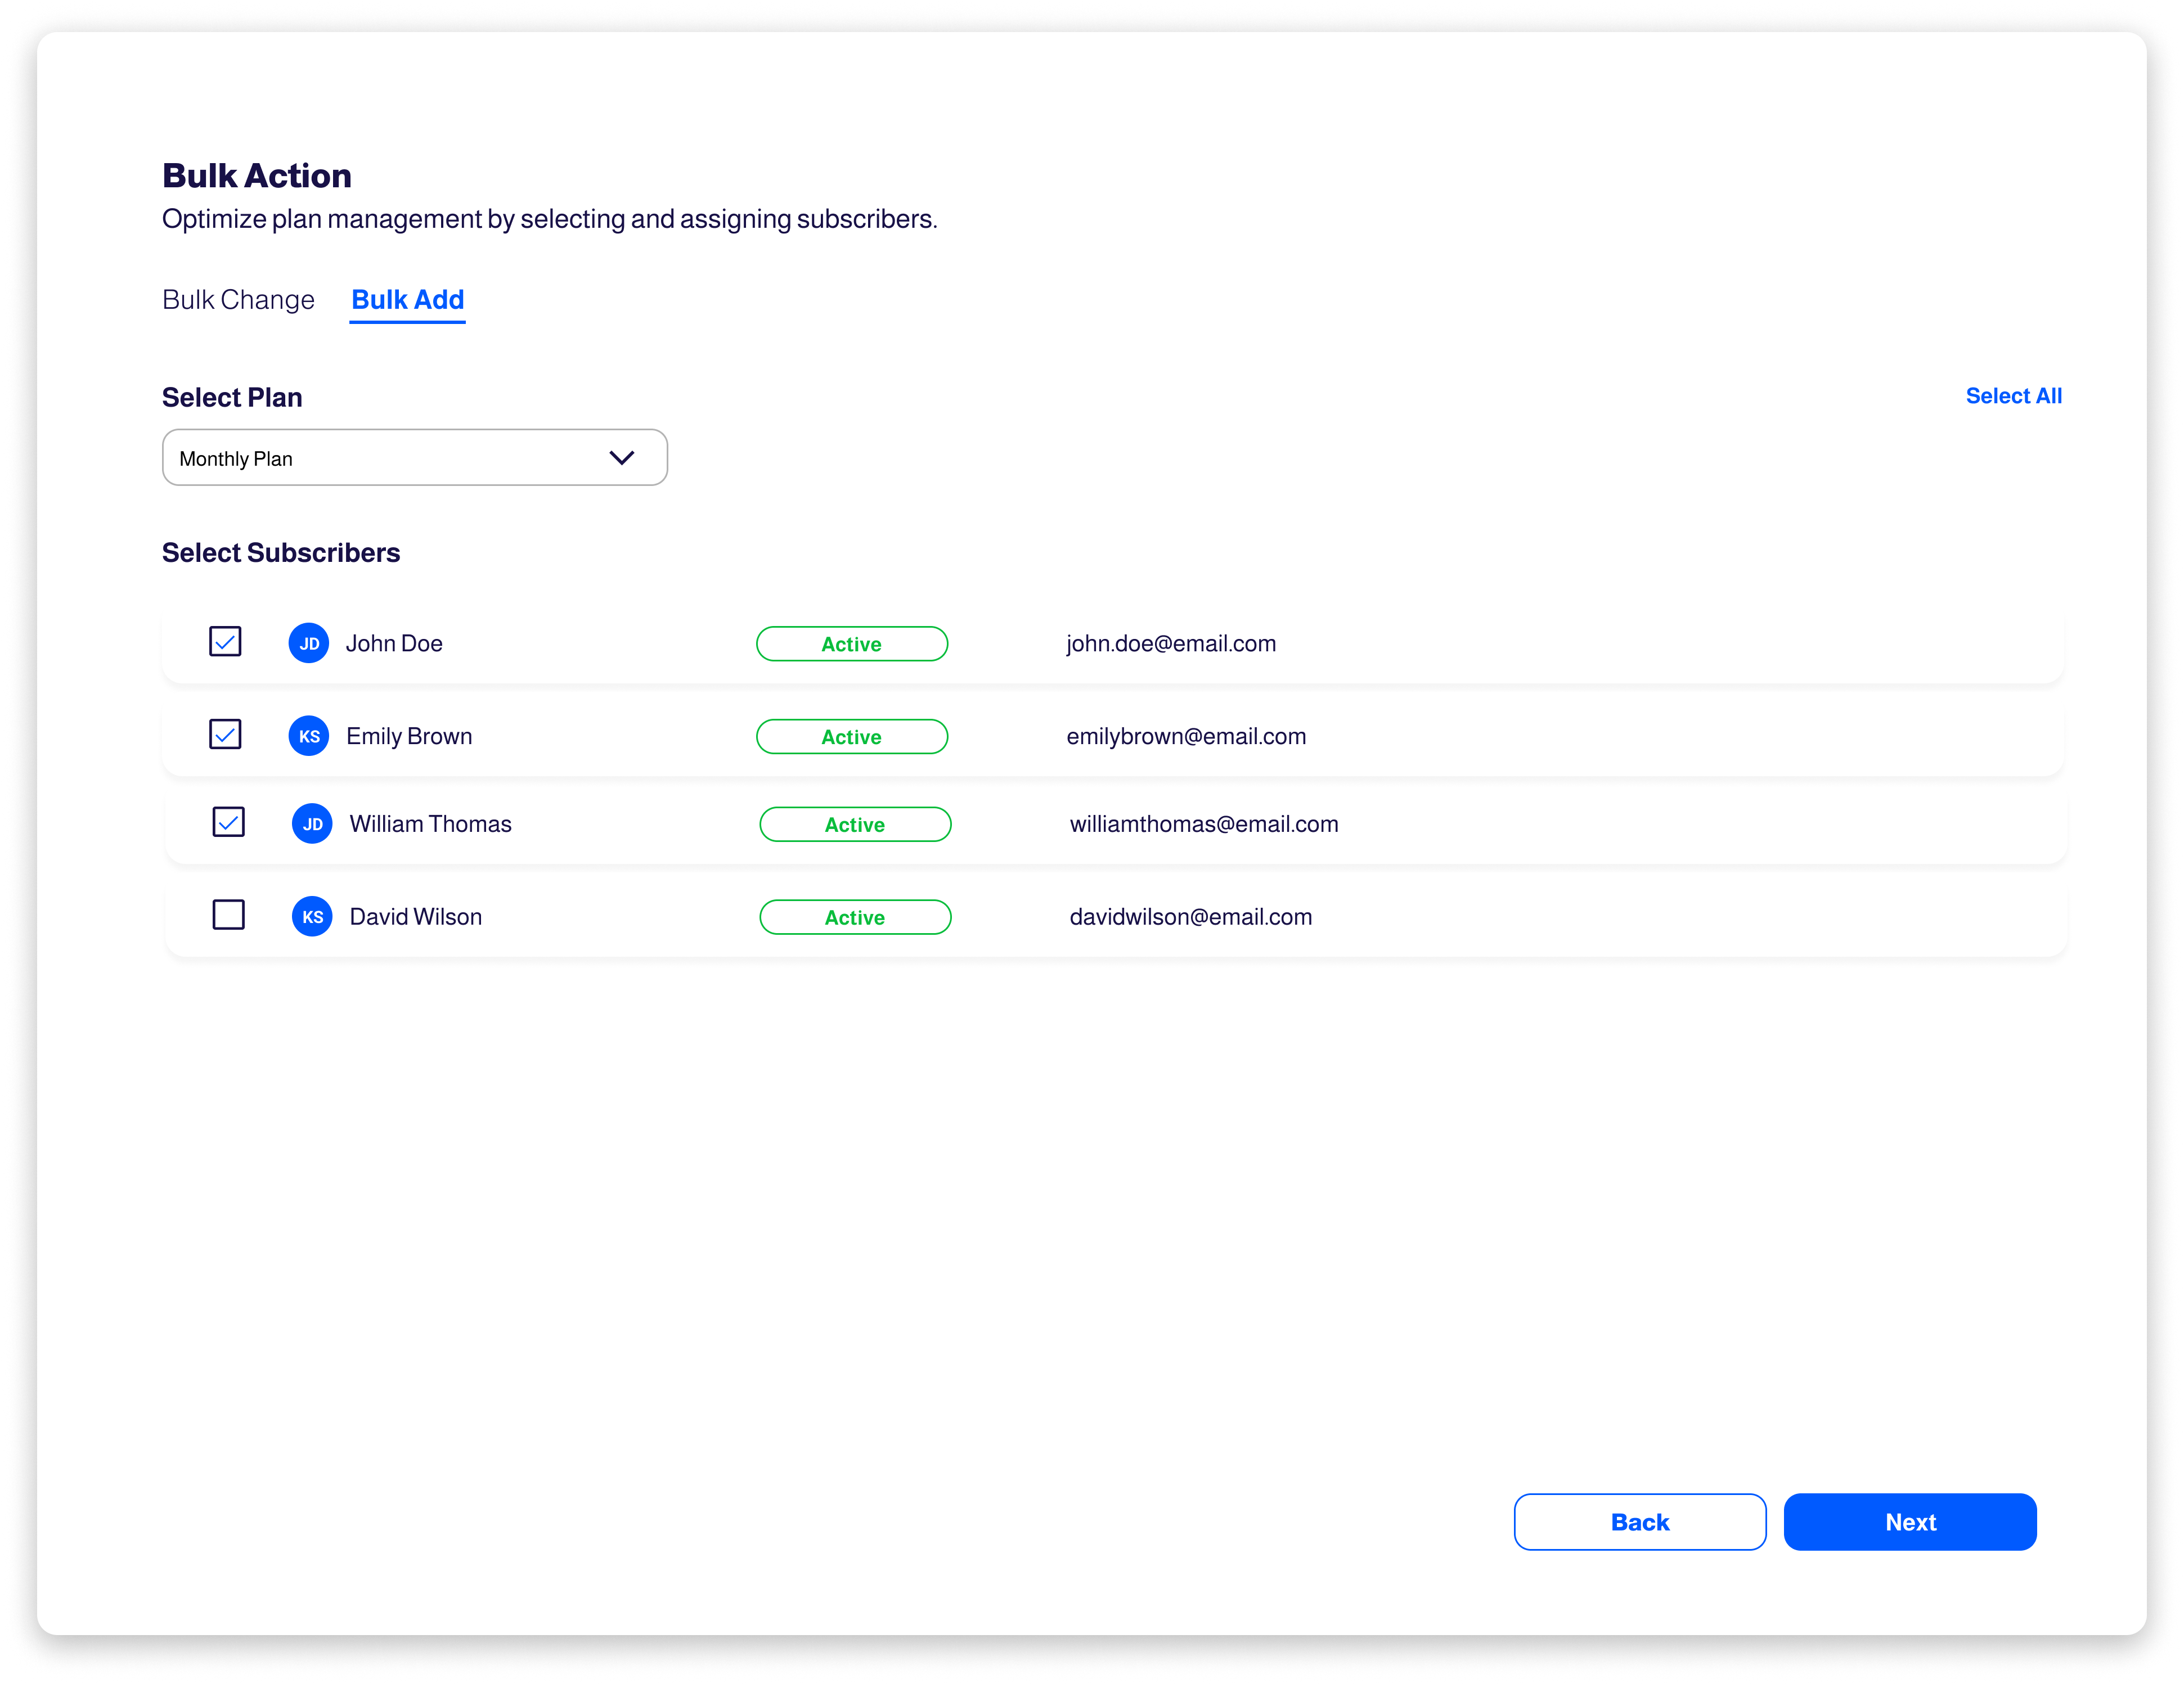
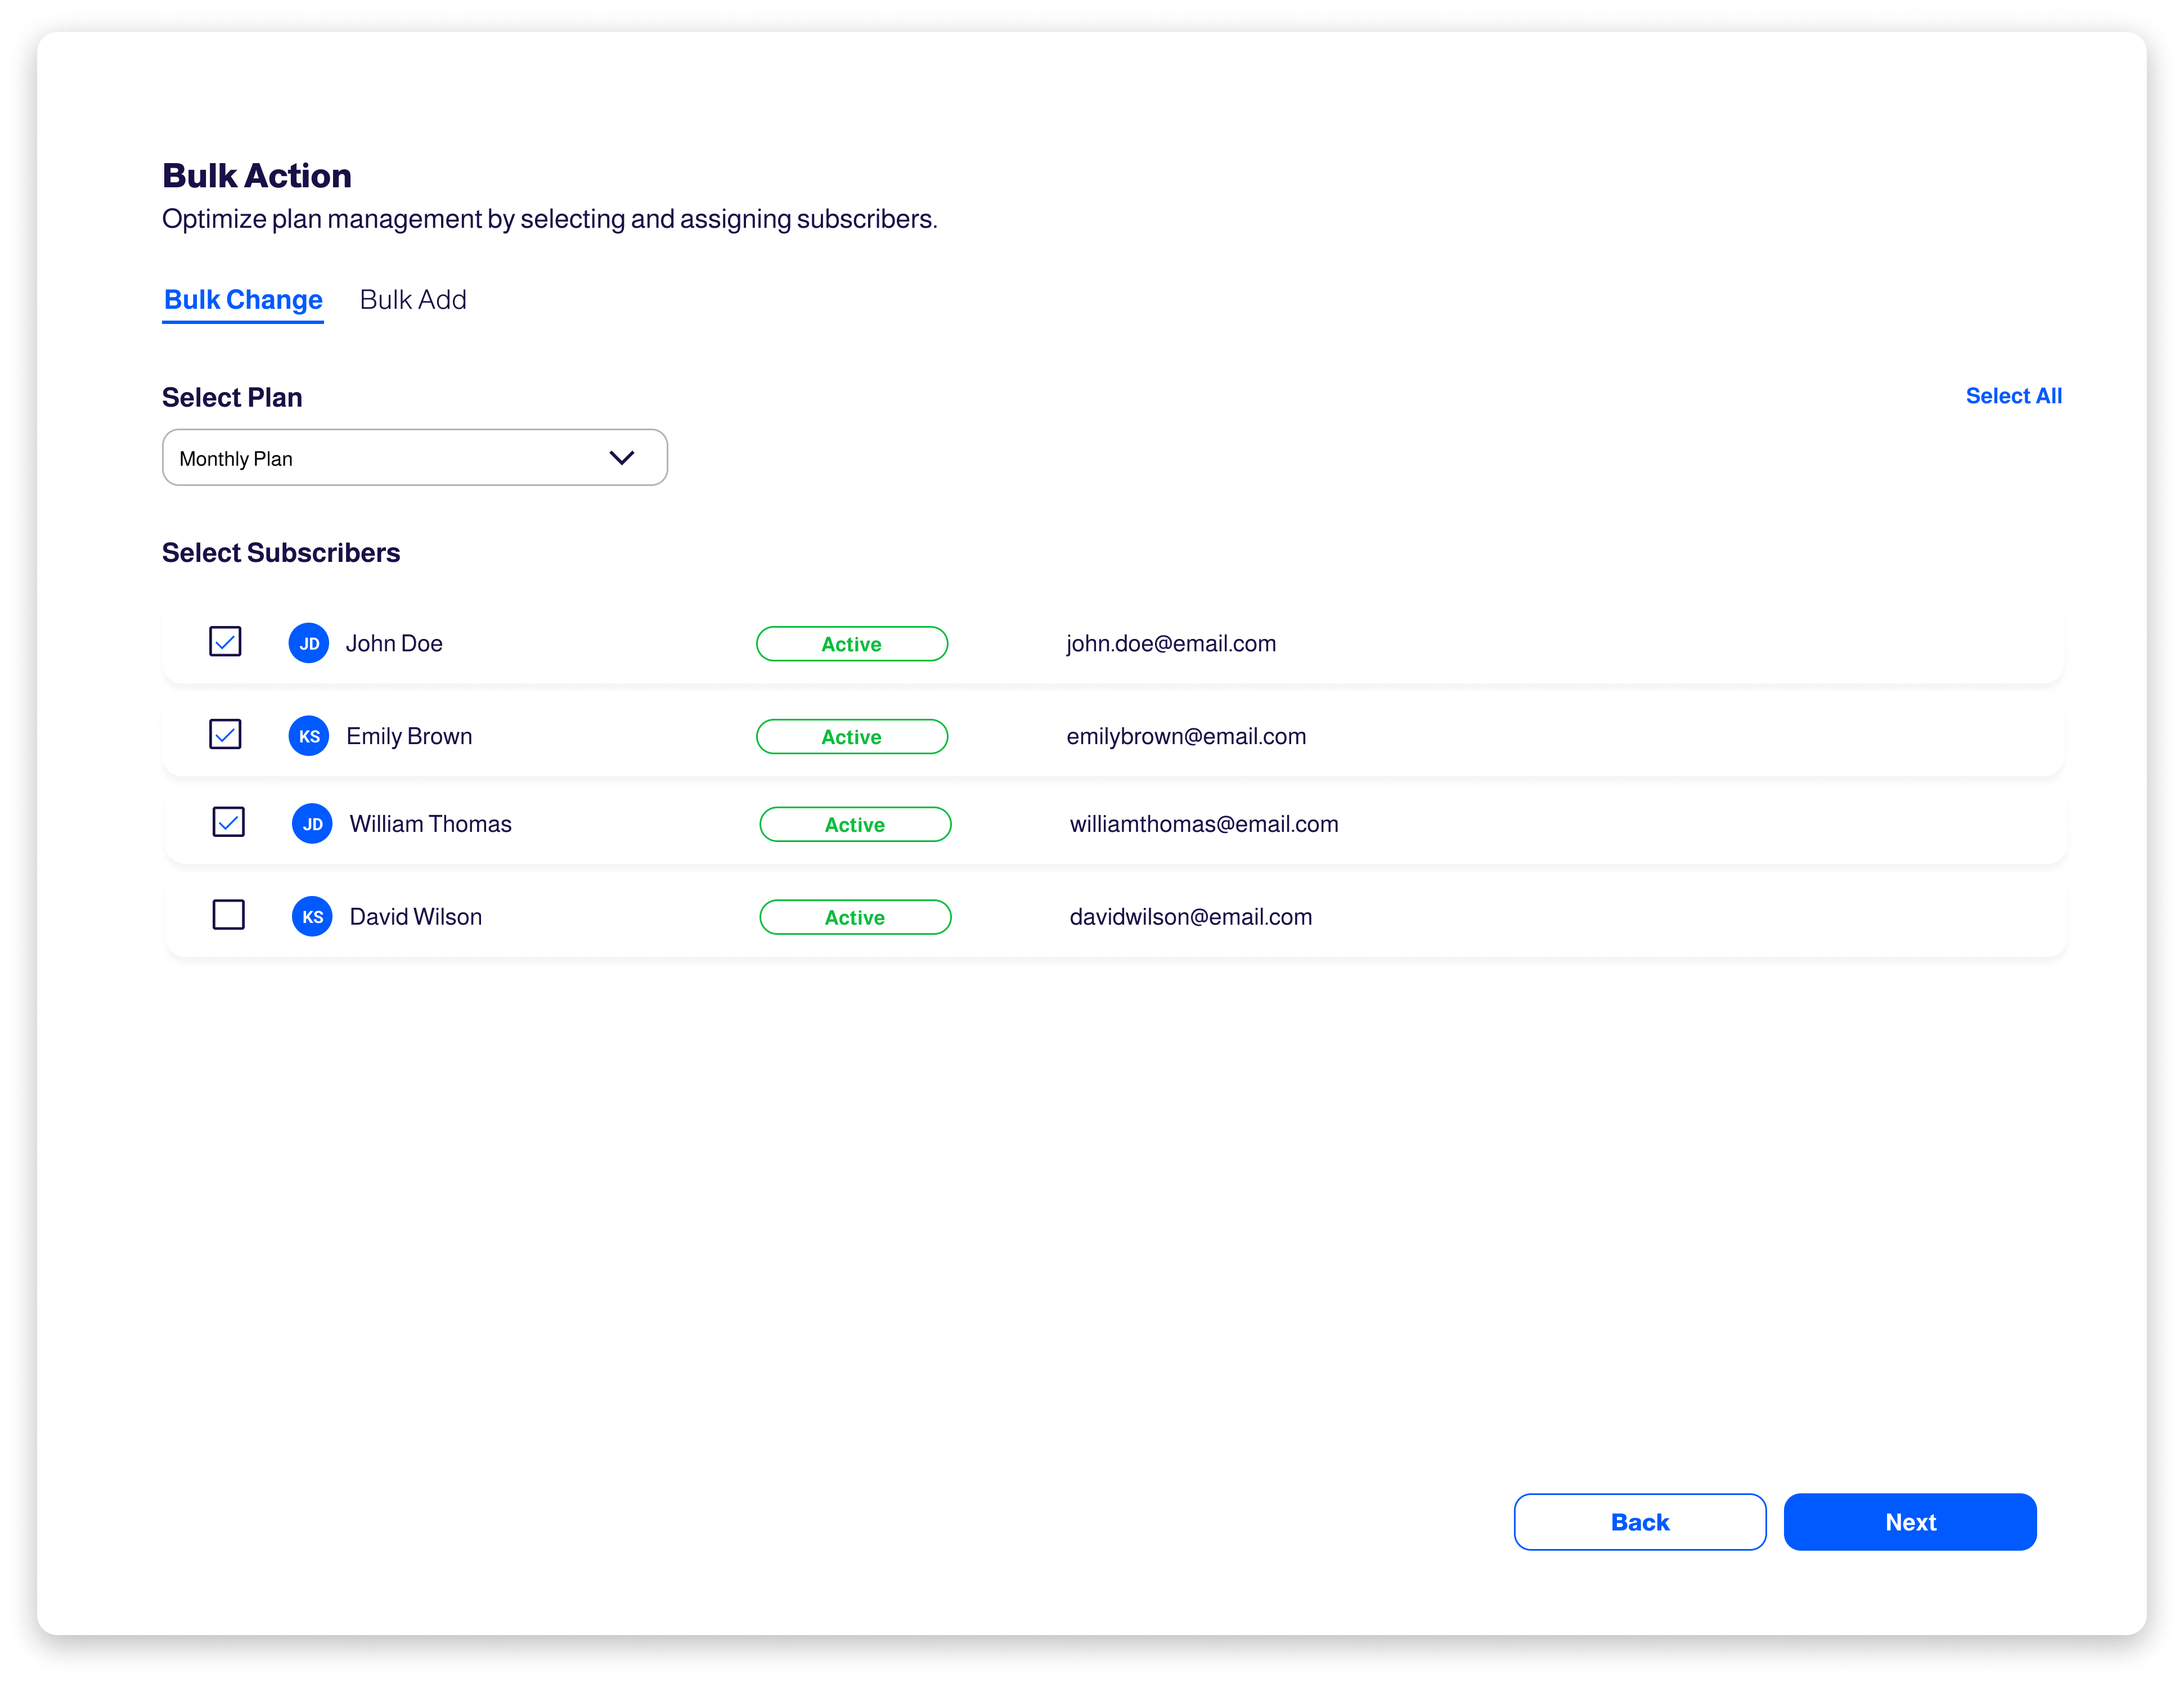
Bulk Add
You can select multiple customers and perform a bulk add plan action for them. This can be done through the "Bulk Action" button on the Customers Page within the Admin Portal.
To learn more about how customers manage their subscriptions, please check out Customer Portal.
Change Plan
Subsbase allows you to change your customers' plans by easily moving from one plan to another. Plans can be changed immediately or at the end of the billing cycle.
How to Change Plan
Changing a plan can be through the Admin Portal, the Customer Portal, or the API.
Change Plan through Admin Portal
To change a plan to a customer, open the customer's profile from the "View Profile" button > go to Subscriptions tab and click on the ellipsis (...) then choose "Change" > navigate through the Plan Picker to pick a plan, then click "Ok" to proceed with the subscription process or "Cancel" if you choose not to continue.
The Plan Picker contains all the existing plans on your site and can be filtered by day, week, month, quarter, or year; and sorted by price.
- If all required information for the plan you picked is already available (saved on the customer's profile), the admin will be able to directly change the plan to their customer.
- However, if there is any missing information or needed customization, the admin is enabled to fill them in through the "Required Fields" pop-up box that will appear once they click on "Ok" on the plan they picked for their customer.
- If the admin require essential information from the customer for a chosen plan, they can mark the necessary info fields by checking the "Fill by customer" checkboxes, then "Save." Subsequently, we will automatically notify the customer to complete the plan subscription process by providing the required information.
- A validation rule is in place to indicate the input's validity: valid inputs will be denoted with a green checkmark, while invalid inputs will display a red warning icon. For instance, if a number is required in a specific info field and the customer enters text instead, the input will be flagged with a red marker.
- Info Fields: Contains the required info fields associated with the newly picked plan the admin wants to add to a customer. The fields are empty to be filled in by the admin or the customer, as per the above-mentioned steps.
- Customization: Contains the info fields that are related to the plan configuration set by the admin during plan creation.
- Action: Contains two options to choose from while changing your customer's plan, either to change the plan immediately or at the end of the billing cycle.
- Apply Promo Code: You can choose from existing promo codes or create a new one when changing a plan to your customer.
- If you decide to create a new promo code during the process, a new campaign will automatically be created, and you will be prompted to fill out the following details:
- Type: Select the discount type, either a Fixed Amount (e.g., $50 off) or a Percentage (e.g., 20% off).
- Value: Specify the discount value, whether it is a fixed amount or a percentage.
- Usage Limit: Define how many billing cycles the discount will apply to, such as for two renewals, or leave it as unlimited for ongoing renewals.
By default, the redemption count for the new promo code is set to 1.
- If you decide to create a new promo code during the process, a new campaign will automatically be created, and you will be prompted to fill out the following details:
Once the new promo code is created, it will be associated with a new campaign, which can be found on the Campaigns page within the Admin Portal.
Change Timing
A plan can be changed immediately or at the end of the billing cycle.
Change Plan Immediately
- Immediate plan change will bill the customer for the change right away.
- The customer will be charged for the difference in cost immediately. This means an invoice will be created and a transaction will be made using the Payment Method listed in the customer's profile.
- In the case of the prepaid billing model of a plan, the customer is only charged for what they used. So if there is any portion of the subscription that a customer has paid for but will not use due to the immediate change to another plan, we credit them for that amount. As they will not be using the product or service for the remainder of the billing cycle, this portion is returned as a credit and applied as a discount on their new subscription bill.
- In the case of the postpaid billing model of a plan, the customer is charged for what they used or consumed.
Change Plan at the End of the Billing Cycle
- When a plan's change action is set to "End of Billing Cycle," Subsbase saves the change and switches the subscription's status to "Changing." And when the change is applied at the end of the billing cycle, the subscription's status updates to "Changed."
- A "Changed" subscription is like a "Canceled" one, its plan can not be edited.
- In the case of changing the plan at the end of the billing cycle, there is no need to prorate the amounts. We will make the necessary adjustments to the subscription and then create an invoice for the customer reflecting the new amount.
Bulk Change
You can select multiple customers within a specific plan and perform a bulk change action for them. This can be done through the "Bulk Action" button on the Customers Page within the Admin Portal.
To learn more about how customers manage their subscriptions, please check out Customer Portal.
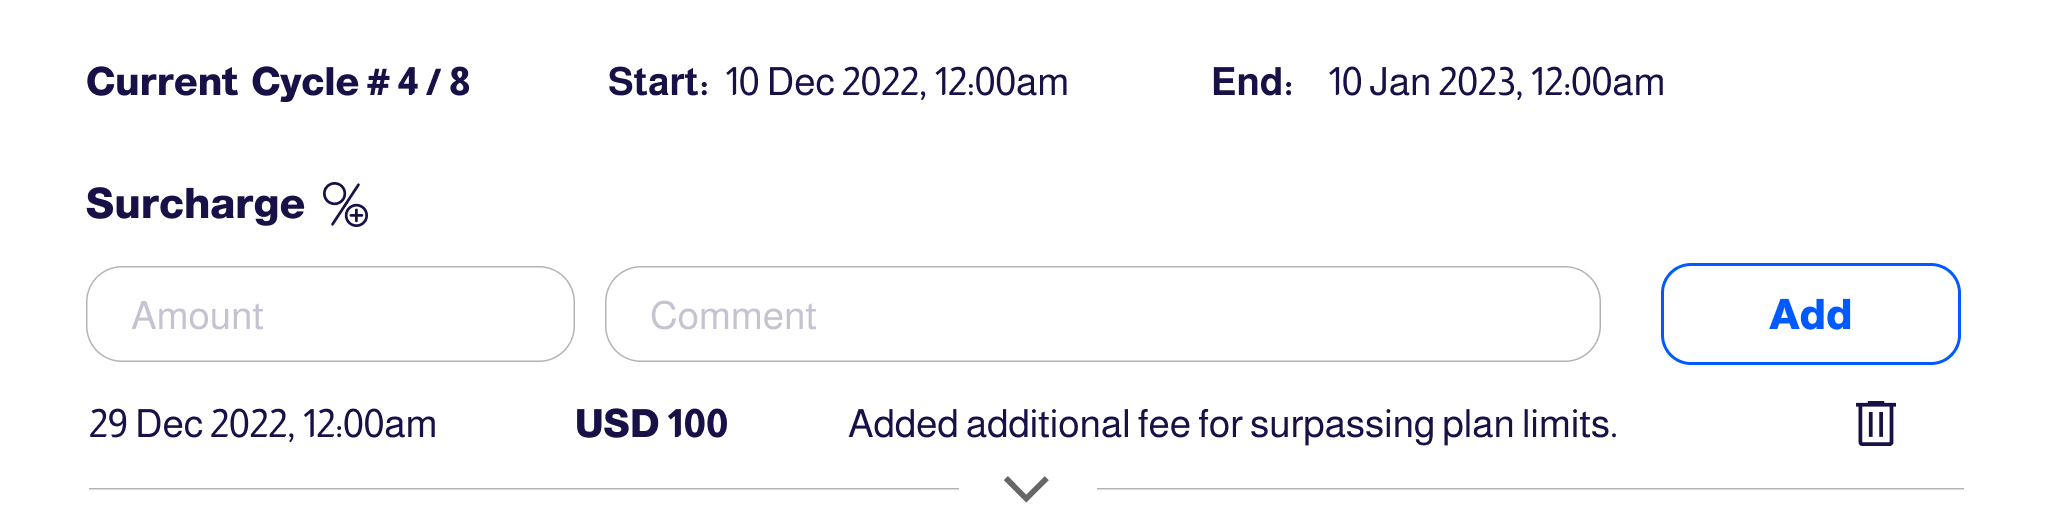
Surcharge
A surcharge, an extra fee within a billing cycle, covers specific costs or expenses associated with your services or products.
- It only applies to the current billing cycle for both prepaid and postpaid plans.
- When added, surcharges generate separate invoices at the end of the billing cycle.
- Taxes, if applicable, are imposed on the surcharge invoices.
Add Surcharge to Billing Cycle
You can add surcharges in two different ways:
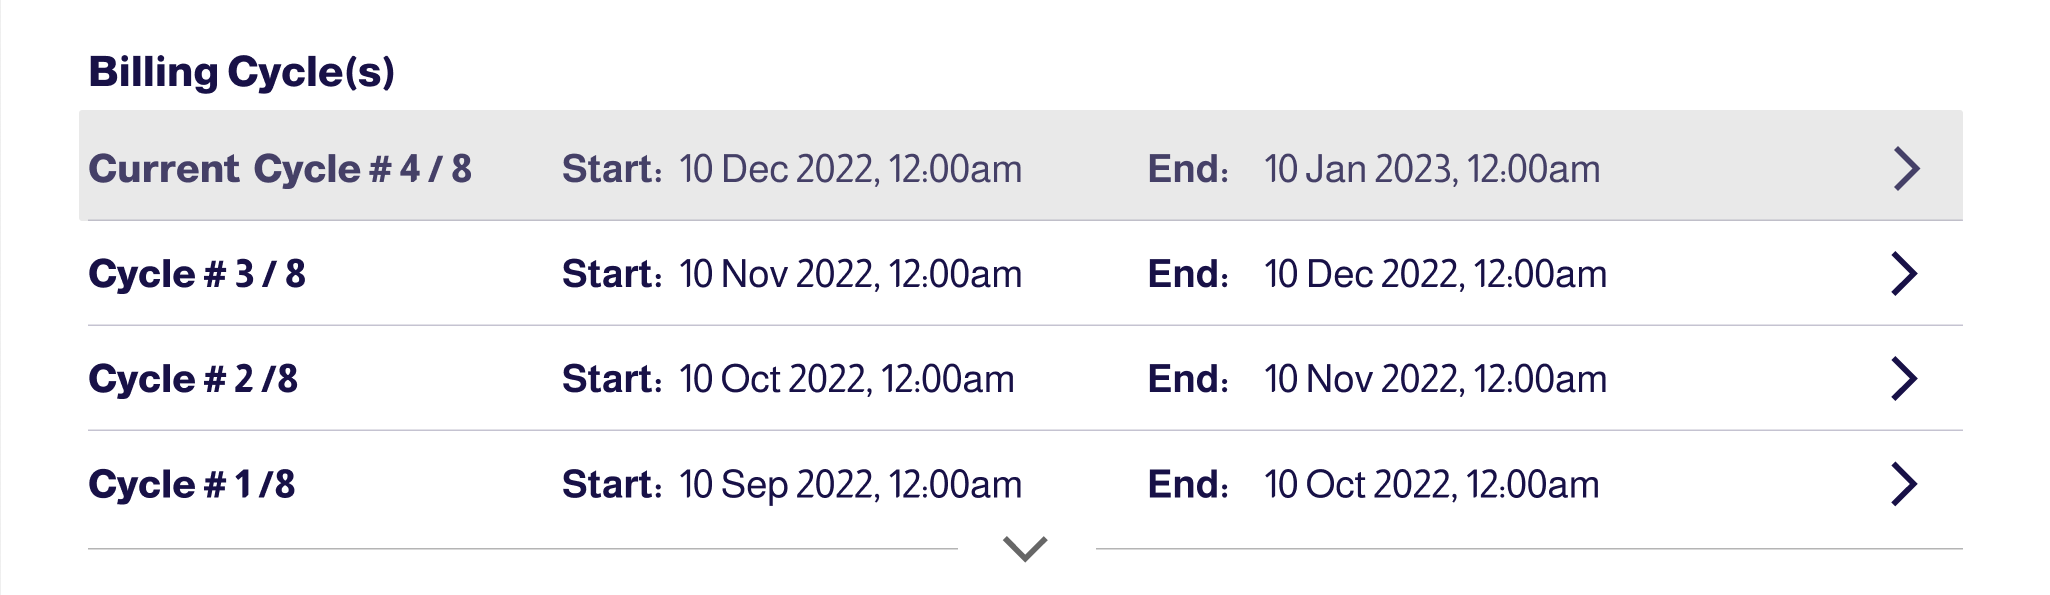
- Admin Portal: Within the Customer Profile's Subscriptions tab, select the current billing cycle from the list. In the Surcharge section, you can add the desired surcharge.
- Billing Cycles API: Utilize this API Add Surcharge to Billing Cycle to integrate surcharges into a current billing cycle.
Remove Surcharge from Billing Cycle
You can remove surcharges in two different ways:
- Admin Portal: Within the Customer Profile's Subscriptions tab, select the current billing cycle from the list. In the Surcharge section, you can remove the desired surcharge.
- Billing Cycles API: Utilize this API Remove Surcharge from Billing Cycle to remove surcharges from a current billing cycle.
Usage Query Result
The default setting for the usage query is Both (manual entries and automatic queries). You have the option to adjust these settings through the "Usage Calculation" settings.
Get Usage
- You can manually fetch usage data through the "Get Usage" button.
- It retrieves usage data from the start of the current billing cycle up to the moment it is clicked.
- It is only available for current billing cycles.

Response
- It retrieves a single endpoint response for the usage query triggered at the end of the billing cycle.
Retry
- The retry option is only displayed when querying usage at the end of a billing cycle results in a failure response. This occurrence does not involve manual triggering and is limited to old billing cycles.
- You can also initiate this action using the Billing Cycles API Retry Post Billing
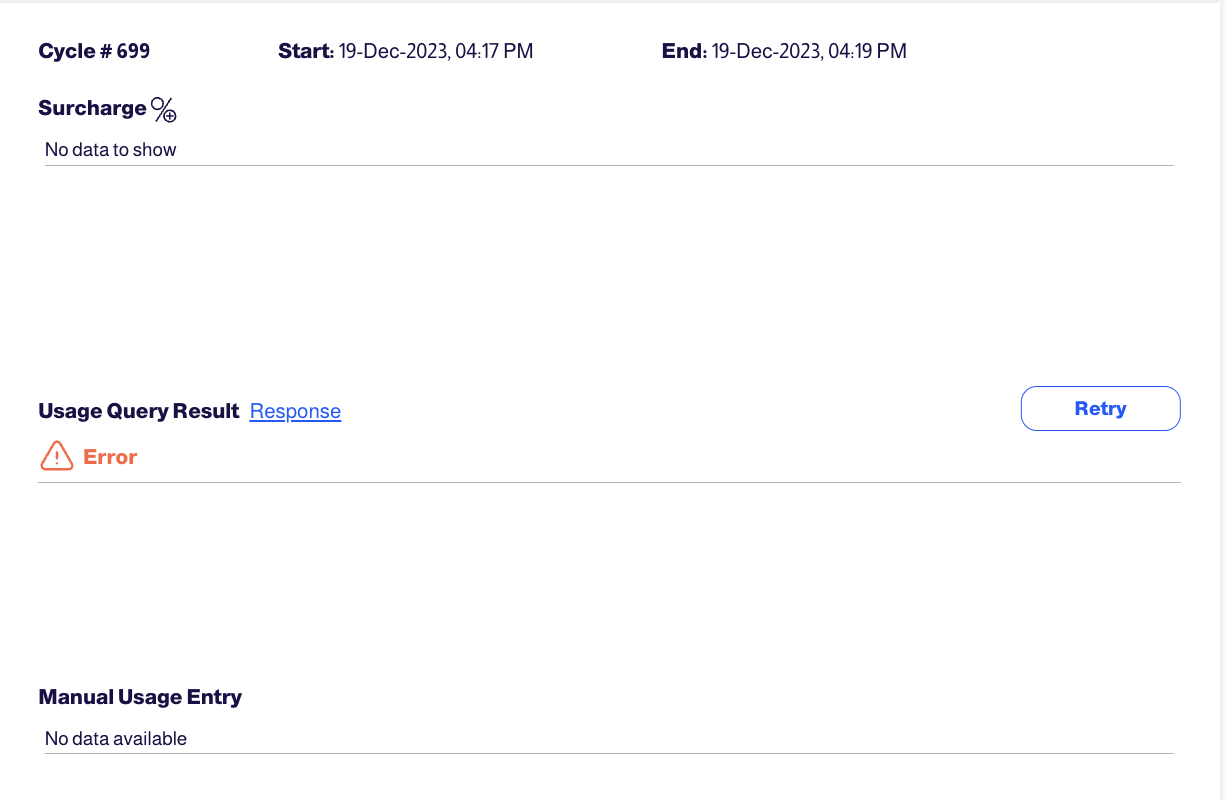
Manual Usage Entry
- Admins can manually add or delete usage data within a billing cycle.
- It only applies to the current billing cycle for plans with post billed items (plan and/or addons).
- There are two methods to edit manual usage entry:
- Admin Portal: Navigate to the Customer Profile, then access the Subscriptions tab. Within the Billing Cycles list, select the current billing cycle and manage manual usage entry by adding or deleting entries in the dedicated section.
- Billing Cycles APIs: Manual usage entry can also be accomplished through Add Usage Entry and Delete Usage Entry.
Listing Page Actions
Export CSV
By clicking the "Export CSV" button, you can view a comprehensive list of all customers present on your site.
View Settings
Through the "View Settings" icon, you can customize the way your customers list is displayed according to your preferences.
Search and Filters
Search
- Customers can be searched by Name and email.
Filters
You can filter your customer subscriptions in two ways:
- The Quick Filters, found at the top of the Customers page, where you can filter subscriptions by groups: All Subscriptions, Active Subscriptions, or Inactive Subscriptions.
- The Filter icon, found at the top right side next to the "View Settings" icon, where you can filter by Subscription Status, Active Plan, and/or Joined Between.
Sort by
- You can sort subscriptions by Name, Email, or First Joined (date).
- And by clicking on the arrows next to them, you can switch between ascending and descending orders.