Plans
Overview
A plan defines how often and how much to charge your customers. Plans can be created with free trials, optional products (called addons), setup fees, and more.
Your main Plans page contains a list of plans defined in your Subsbase account. You can select any plan name to view its detailed information, edit it, or change its active status.
Creating a New Plan
- Follow these steps to create a new plan in your Subsbase site: Go to the Plans page in your Admin Portal, click the New Plan button, and complete the Basic Info, Addons, Billing Cycle, and Info Fields sections.
- Once the plan is created, explore various tabs in the Plan Profile to access or input additional information.
Basic Info
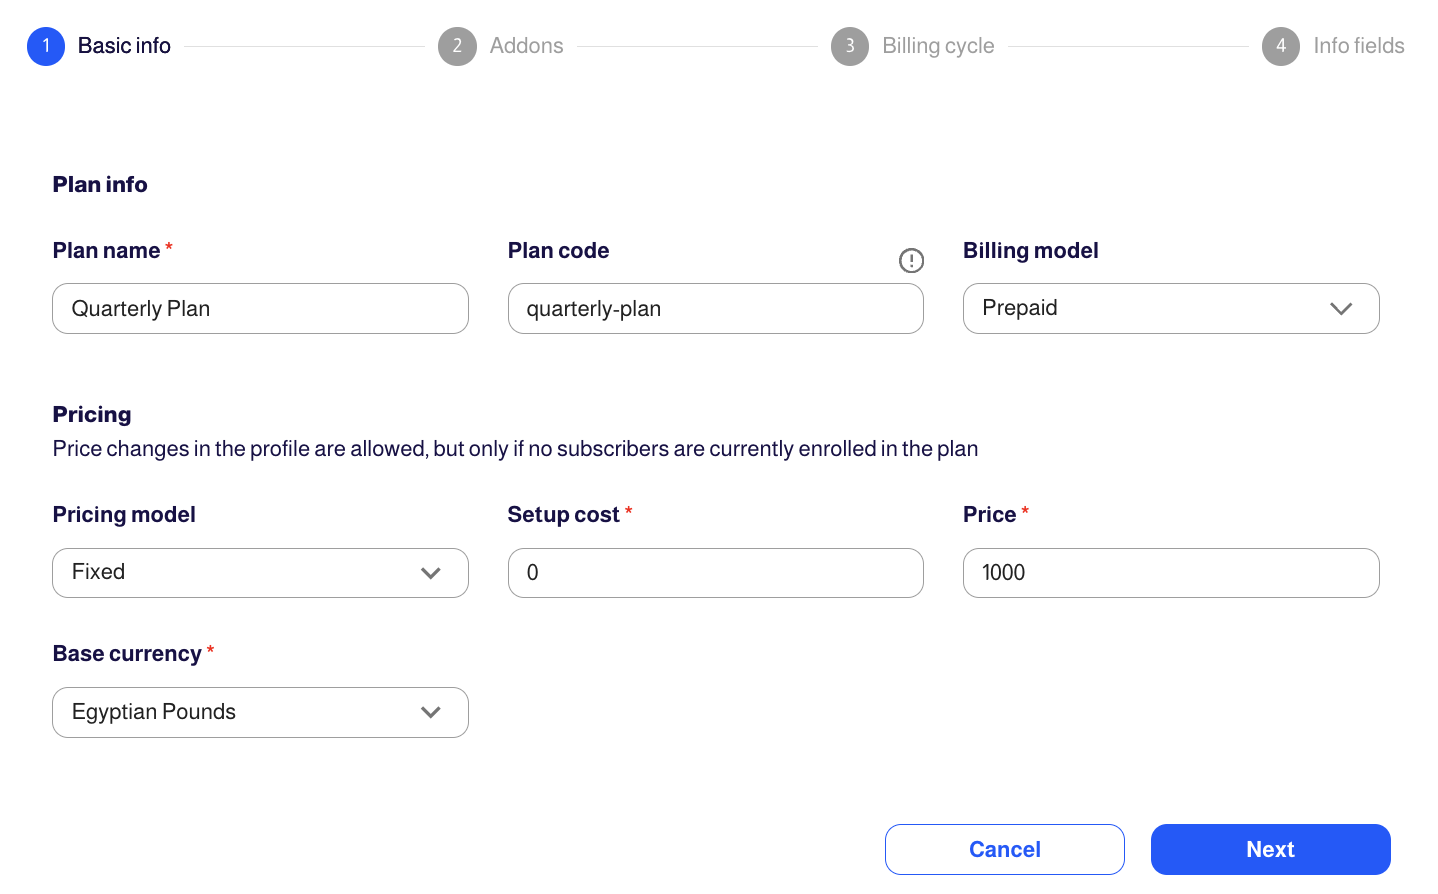
Plan Info
Plan Name
This name describes your plan and will appear on the admin portal, customer portal, and the customer/subscriber's invoice.
Plan Code
- The plan code is the unique identifier of the plan. It is automatically generated based on the plan name that you specify.
- For example, if the plan name is "Plan 01", the plan code will be "plan-01".
- You can also modify this plan code as required. However, make sure it is written in lowercase alphanumeric characters only.
- The plan code is important for the following uses:
- Embedding: It serves as the unique identifier used in embedding your plan into other platforms or services.
- URL Generation: The plan code is included at the end of the URL during the checkout process, ensuring the correct plan is referenced.
Billing Model
Prepaid
- You can charge your customers/subscribers in advance for your products and services that will be delivered regularly.
Postpaid
- You can charge your customers/subscribers based on the usage or consumption of your products and services. Apart from a base charge, they pay for what they use when exceeding the base limit included in their subscription, at the end of each billing cycle.
- Details of the usage/consumption are shown in a Payload: ➤
{...}in the Usage Query in the Billing Cycle section, like the following example
{
siteId:"test-site",
customerId:"12345",
subscriptionId:"67890",
startDate:"2022-01-01T00:00:00.000Z",
endDate:"2022-01-31T00:00:00.000Z",
codes: [
     "plan-01",
     "addon-1",
     "addon-2"
   ]
}- The payload only includes the details of the postpaid plans or addons.
- For example, if you created a prepaid plan with postpaid addons, the payload will only include the codes of the postpaid addons.
Pricing
The price of the plan is set according to the pricing model you choose for your plan.
Price changes are allowed if no subscribers are currently enrolled in the plan.
Pricing Model
Subsbase offers you six pricing models that can be used: Free, Fixed, Per Unit, Tiered, Volume, and Stair Step.
Fixed
- The fixed pricing model is for plans that have a fixed recurring charge at the end of each billing cycle.
- However, you may want to add addons, which are additional charges you can include in your plan, whether regularly (recurring) or for only one time.
Per Unit
- The per-unit pricing model is used in plans where you charge your customers/subscribers for one unit of a product or service, at the end of the billing cycle.
- For example, you may be offering a product for $10 per user per month, where the unit is the user, and the billing cycle is one month.
- You may also charge your customers/subscribers $25 for 2GB per month. In this example, the charge is based on user consumption, where the unit is 2GB, and the billing cycle is one month.
Tiered
- The tiered pricing model is used in plans where you sell your products and services within a specific price range (tier). Once your customers/subscribers fill up a tier, they move to the next one and they will be billed according to the number of purchases they make in those respective tiers.
- Your customers/subscribers move to the next tier only when one tier is completely filled, where units are purchased from consecutive tiers, starting from the lowest. - For example, you sold 60 units to your customer/subscriber, and your tiered pricing model is as follows:
Tiered Pricing Model Price / 1 month 0-10 units $40 11-30 units $25 31 units onwards $15
So, you will charge the first 10 units at $40, the following 20 units will be charged at $25, and the remaining 30 units will be charged at $15.
The total monthly revenue would be: ($40x10) + ($25x20) + ($15x 30) = $1,350
Volume
- The volume pricing model is quantity-based, however, the price per unit depends on the range within which the total quantity falls. So in this model, you will charge the units based on the price of the highest range/tier reached. - Take the same example above, where you sold 60 units to your customer/subscriber, and your volume pricing model is as follow:
Volume Pricing Model Price / 1 month 0-10 units $40 11-30 units $25 31 units onwards $15
Here the total is calculated as ($15x60) based on the total number of units sold which falls under the 31 units onwards price range.
So the total monthly revenue would be: $15x60 = $300
Stair Step
- The stair step pricing model charges a fixed price according to the highest range/tier reached. - Using the same example, where you sold 60 units to your customer/subscriber, and your stair stp pricing model is as follows:
Stair Step Pricing Model Price / 1 month 0-10 units $40 11-30 units $25 31 units onwards $15
So the total here will be $15 per month, where you will charge a fixed price based on the range/tier of units a customer/subscriber buys, regardless of whether a customer/subscriber buys 30, 40, or 50 units, they will pay $15.
Setup Cost
- Setup cost is a one-time transaction charged at the beginning of a subscription billing cycle.
- If you do not want to include a setup cost in your plan, you just enter a zero (0).
Price
Based on the pricing model that you choose, you can specify the price for the plan's price point.
Base Currency
- The base currency is the default currency in which the plan's prices are set and managed.
- When you create a plan, you specify the base currency, and all pricing-related entries are entered in this currency.
Addons
- Addons are additional products or services that are not part of the base subscribed plan.
- These items are made available to customers/subscribers when they add/buy the addon along with their subscribed plan.
- A plan may contain one or more addons. You can either choose from existing addons that were already created and used across multiple plans, or you can create new ones that are specific to one plan and its subscriptions.
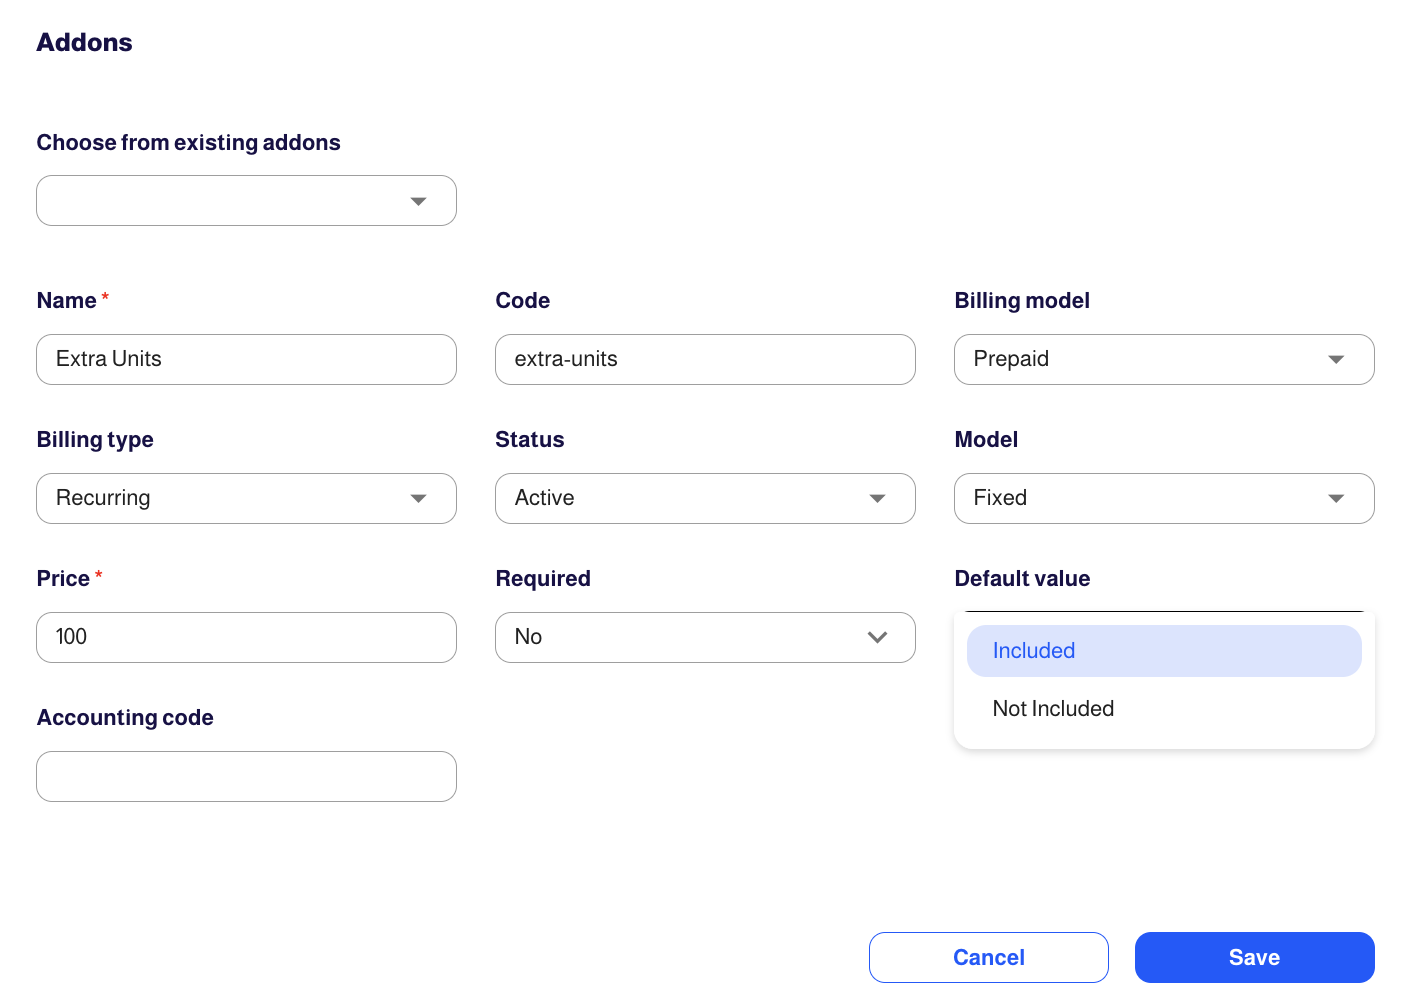
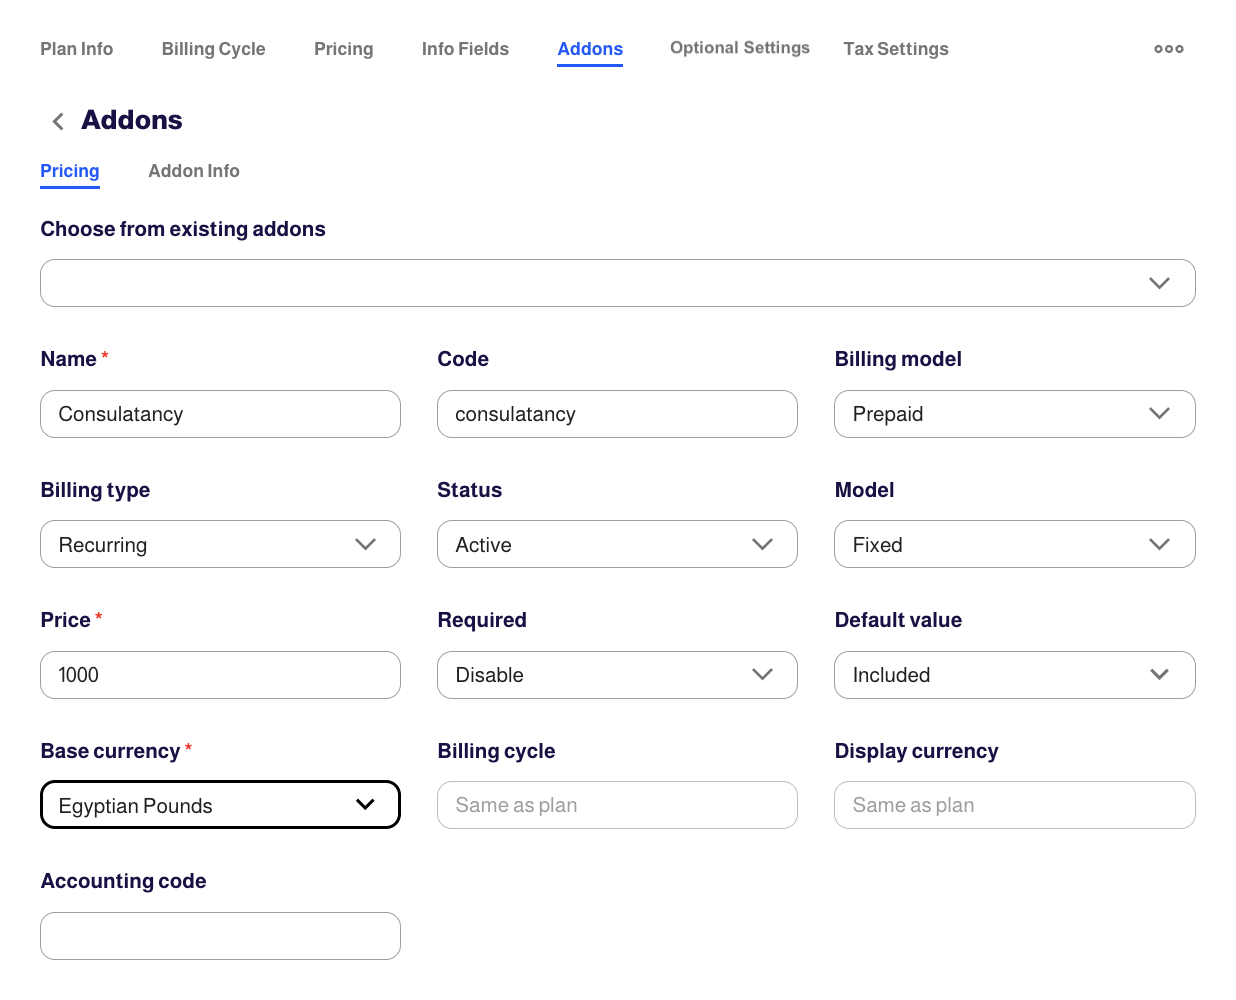
Name
This name describes your addon and will appear on the Admin Portal, Customer Portal, and the customer/subscriber's invoice.
Code
- The code is the unique identifier of the addon. It is automatically generated based on the addon name that you specify.
- For example, if the addon name is "Extra Units", the plan code will be "extra-units".
Billing Model
Addons can operate under two billing models:
- Prepaid: Charges for the addon are paid in advance.
- Postpaid: Charges for the addon are paid after usage.
Billing Type
Addons can have either of the following billing types:
- One-time: Charges for the addon are applied only once.
- Recurring: Charges for the addon are applied regularly.
Status
You can choose between two statuses for an addon:
- Active: The addon is currently available for selection and use.
- Inactive: The addon is temporarily unavailable for selection and use.
Model
You can choose one of the following models for your addon:
- Fixed: Charges for the addon remain constant regardless of usage.
- Per Unit: Charges for the addon are based on the quantity used.
- Tiered: Charges for the addon vary based on usage thresholds.
- Volume: Charges for the addon depend on the volume of usage.
- Stair Step: Charges for the addon change at distinct usage levels.
Required
- Select whether the addon should be mandatory or optional for customers.
- If "Required" is set to "No," the "Default Value" field will appear:
- Default Value: Choose "Included" to have the addon pre-selected at checkout, or "Not Included" to leave it optional for the customer.
Accounting Code
- Enter the relevant accounting code.
Billing Cycle
The billing cycle is the recurring date on which you issue invoices to your customers/subscribers.
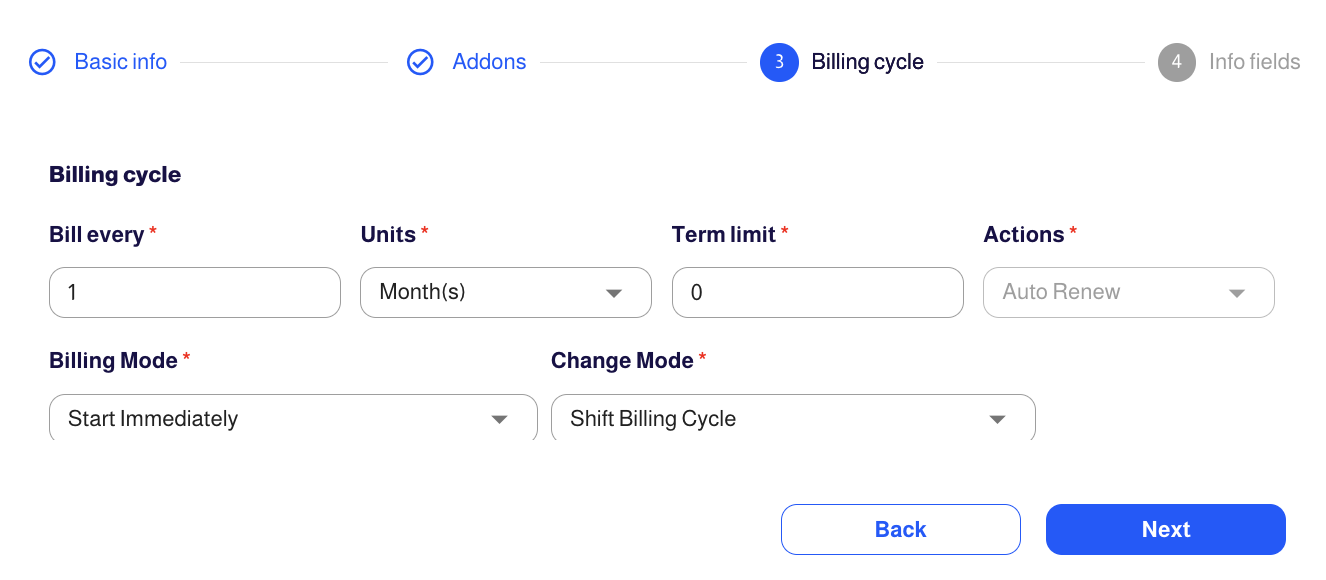
Billing Every
- Here you specify the billing period for when your customers/subscribers should be charged.
Term Limit
- Term limit determines whether the subscription will be automatically renewed for another billing cycle/term or canceled at the end of the current billing cycle/term.
- If you want the subscription to be automatically renewed, you just enter a zero (0) as a term limit, and the Actions field will be marked as "Auto Renew" by default, after saving your plan.
Actions
- These are the actions that will be taken if you specified the Term Limit with a value that is equal to or greater than one.
- Once the term limit is specified, there will be two available actions that you can choose from (Auto Renew or Cancel).
- So what is the difference between the "Auto Renew" action when your term limit is zero and when it is equal or greater than one?
- When the term limit is zero and the action is "Auto Renew", then the billing cycle will have unlimited auto-renewal until you or your customer/subscriber cancel the subscription.
- When the term limit is equal to or greater than one, and the action is "Auto Renew", the billing cycle will have unlimited auto-renewal, however, it will depend on the term limit you specified in the Term Limit field.
- For example, if you want to create a five-year contract that bills the customer/subscriber quarterly. You will specify your fields as follows:
- Bill Every: 3 months
- Term Limit: 5
- Actions: Auto Renew In the above example, the plan's subscriptions will be expired (and be marked as "Canceled") after the completion of the five terms. Then, the plan's subscriptions will be automatically renewed and added as new subscriptions on the same plan (and marked as "Active"). This process will be automatically renewed until you or your customer/subscriber cancel the subscription.
- For example, if you want to create a five-year contract that bills the customer/subscriber quarterly. You will specify your fields as follows:
Billing Modes
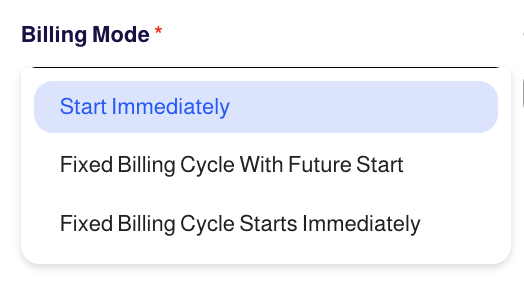
Option 1: Start Immediately
In the Start Immediately billing mode, your subscription begins as soon as you complete the checkout process. Your subscription starts immediately and ends based on the specified end date of the plan. This mode offers two options for changing plans:
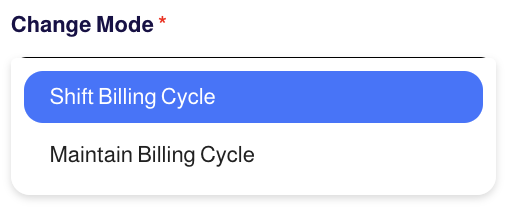
- Maintain Billing Cycle: This option allows you to change the plan immediately upon signup while maintaining the same billing cycle and prorates the charges until the start of the next billing cycle.
- For example:
| Current Date | March 1 |
|---|---|
| Signup Date | March 10 |
| Plan | Monthly subscription starting March 1 |
| Action | Change plan on March 10 |
| Result | Customer starts the new plan immediately upon signup on March 10 while maintaining the same billing cycle. They pay a prorated amount from March 10 to March 31 and continue with the new plan cycle from April 1. |
- Shift Billing Cycle
This is the default mode of changing plans. Choosing this option changes your plan immediately upon signup, and a new billing cycle begins. This means that the billing cycle aligns with the new plan's cycle, regardless of when you sign up during the current cycle. - For example:
| Current Date | March 1 |
|---|---|
| Signup Date | March 10 |
| Plan | Monthly subscription starting March 1 |
| Action | Change plan on March 10 |
| Result | Customer immediately switches to the new plan cycle on March 10, aligning with the new plan's billing cycle starting from March 10 to April 9. |
Option 2: Fixed Billing Cycle with Immediate Start
- It applies the configured billing cycle units immediately upon signup, ensuring that customers are billed according to the chosen cycle (weekly, monthly, quarterly, or yearly) from the moment they subscribe.
- For example:
| Current Date | March 1 |
|---|---|
| Signup Date | March 1 |
| Plan | Monthly subscription starting March 1 |
| Action | Signup for monthly subscription on March 1 |
| Result | Customer is immediately billed for the entire month from March 1 to March 31, according to the configured monthly billing cycle. |
Option 3: Fixed Billing Cycle with Future Start
- It allows you to specify a future date for the subscription to begin, aligning with the configured billing cycle units (weekly, monthly, quarterly, or yearly) from that future start date onwards.
- Additionally, if the billing unit is set to "Year(s)", you can select a specific day and month for the billing cycle to commence, and the Fixed Billing Cycle will prorate charges until the next full cycle, based on your configuration settings.
- For example:
| Current Date | March 1 |
|---|---|
| Signup Date | March 1 |
| Plan | Monthly subscription starting March 1 with a future start date of April 1 |
| Action | Signup for monthly subscription on March 1 with a future start date of April 1 |
| Result | Billing cycle aligns with the monthly cycle starting from April 1, and the customer is billed monthly thereafter. |
For Yearly Billing
- If the "Unit" field is set to "Year(s)", you can select a specific day and month for the subscription to begin, regardless of the signup date.
- For example:
| Current Date | March 1 |
|---|---|
| Signup Date | March 1 |
| Plan | Yearly subscription starting March 1 with a future start date of July 1 |
| Action | Signup for yearly subscription on March 1 with the billing cycle starting on July 1 |
| Result | Billing cycle starts on July 1, and the customer is billed annually from that date. Proration is automatically applied for the period from March 1 to July 1. |
Info Fields
- When creating a plan, you specify the required info fields (like name and email) that your customers/subscribers have to fill out during checkout.
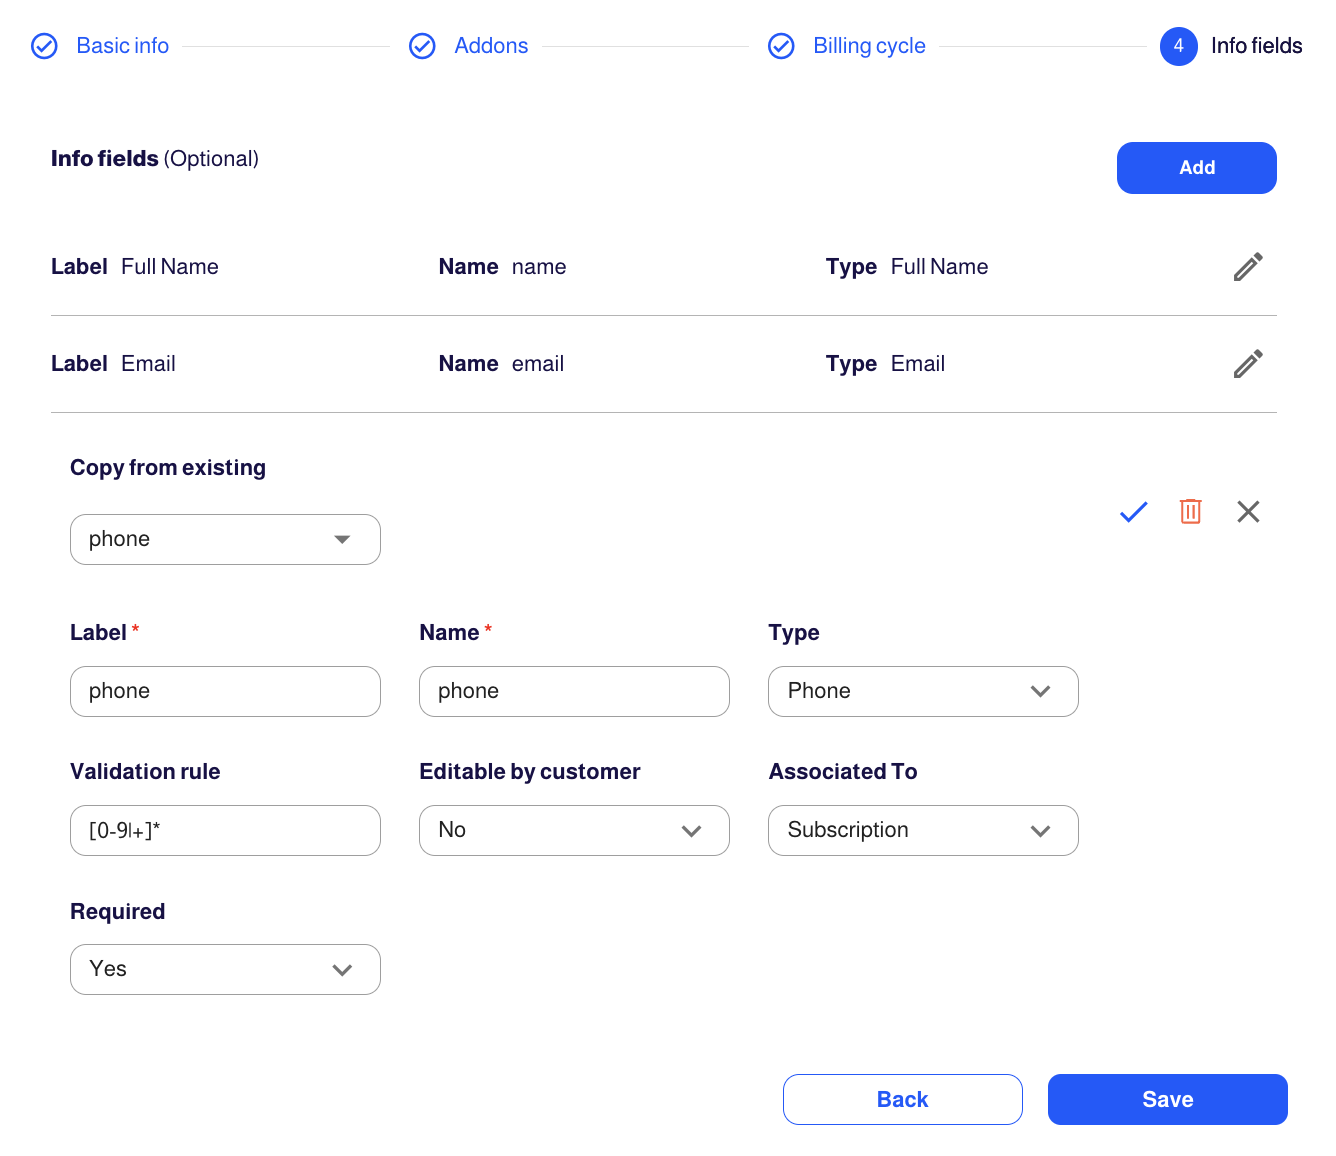
Info Field Types
You can add info field types through the "Add" button:
- Full Name
- Text
- Any Date
- Date and Time
- Dropdown
- Phone: a text field with auto-filled validation rules for a phone number.
- Checkbox: an interactive element that grants customers/subscribers the choice to mark or unmark. If the checkbox is required, it must be marked before proceeding, typically used for mandatory acceptance of terms and conditions or other policies.
Checkbox labels support basic HTML tags like strong and a to be able to highlight and link to external pages for terms and conditions or similar lengthy policies.
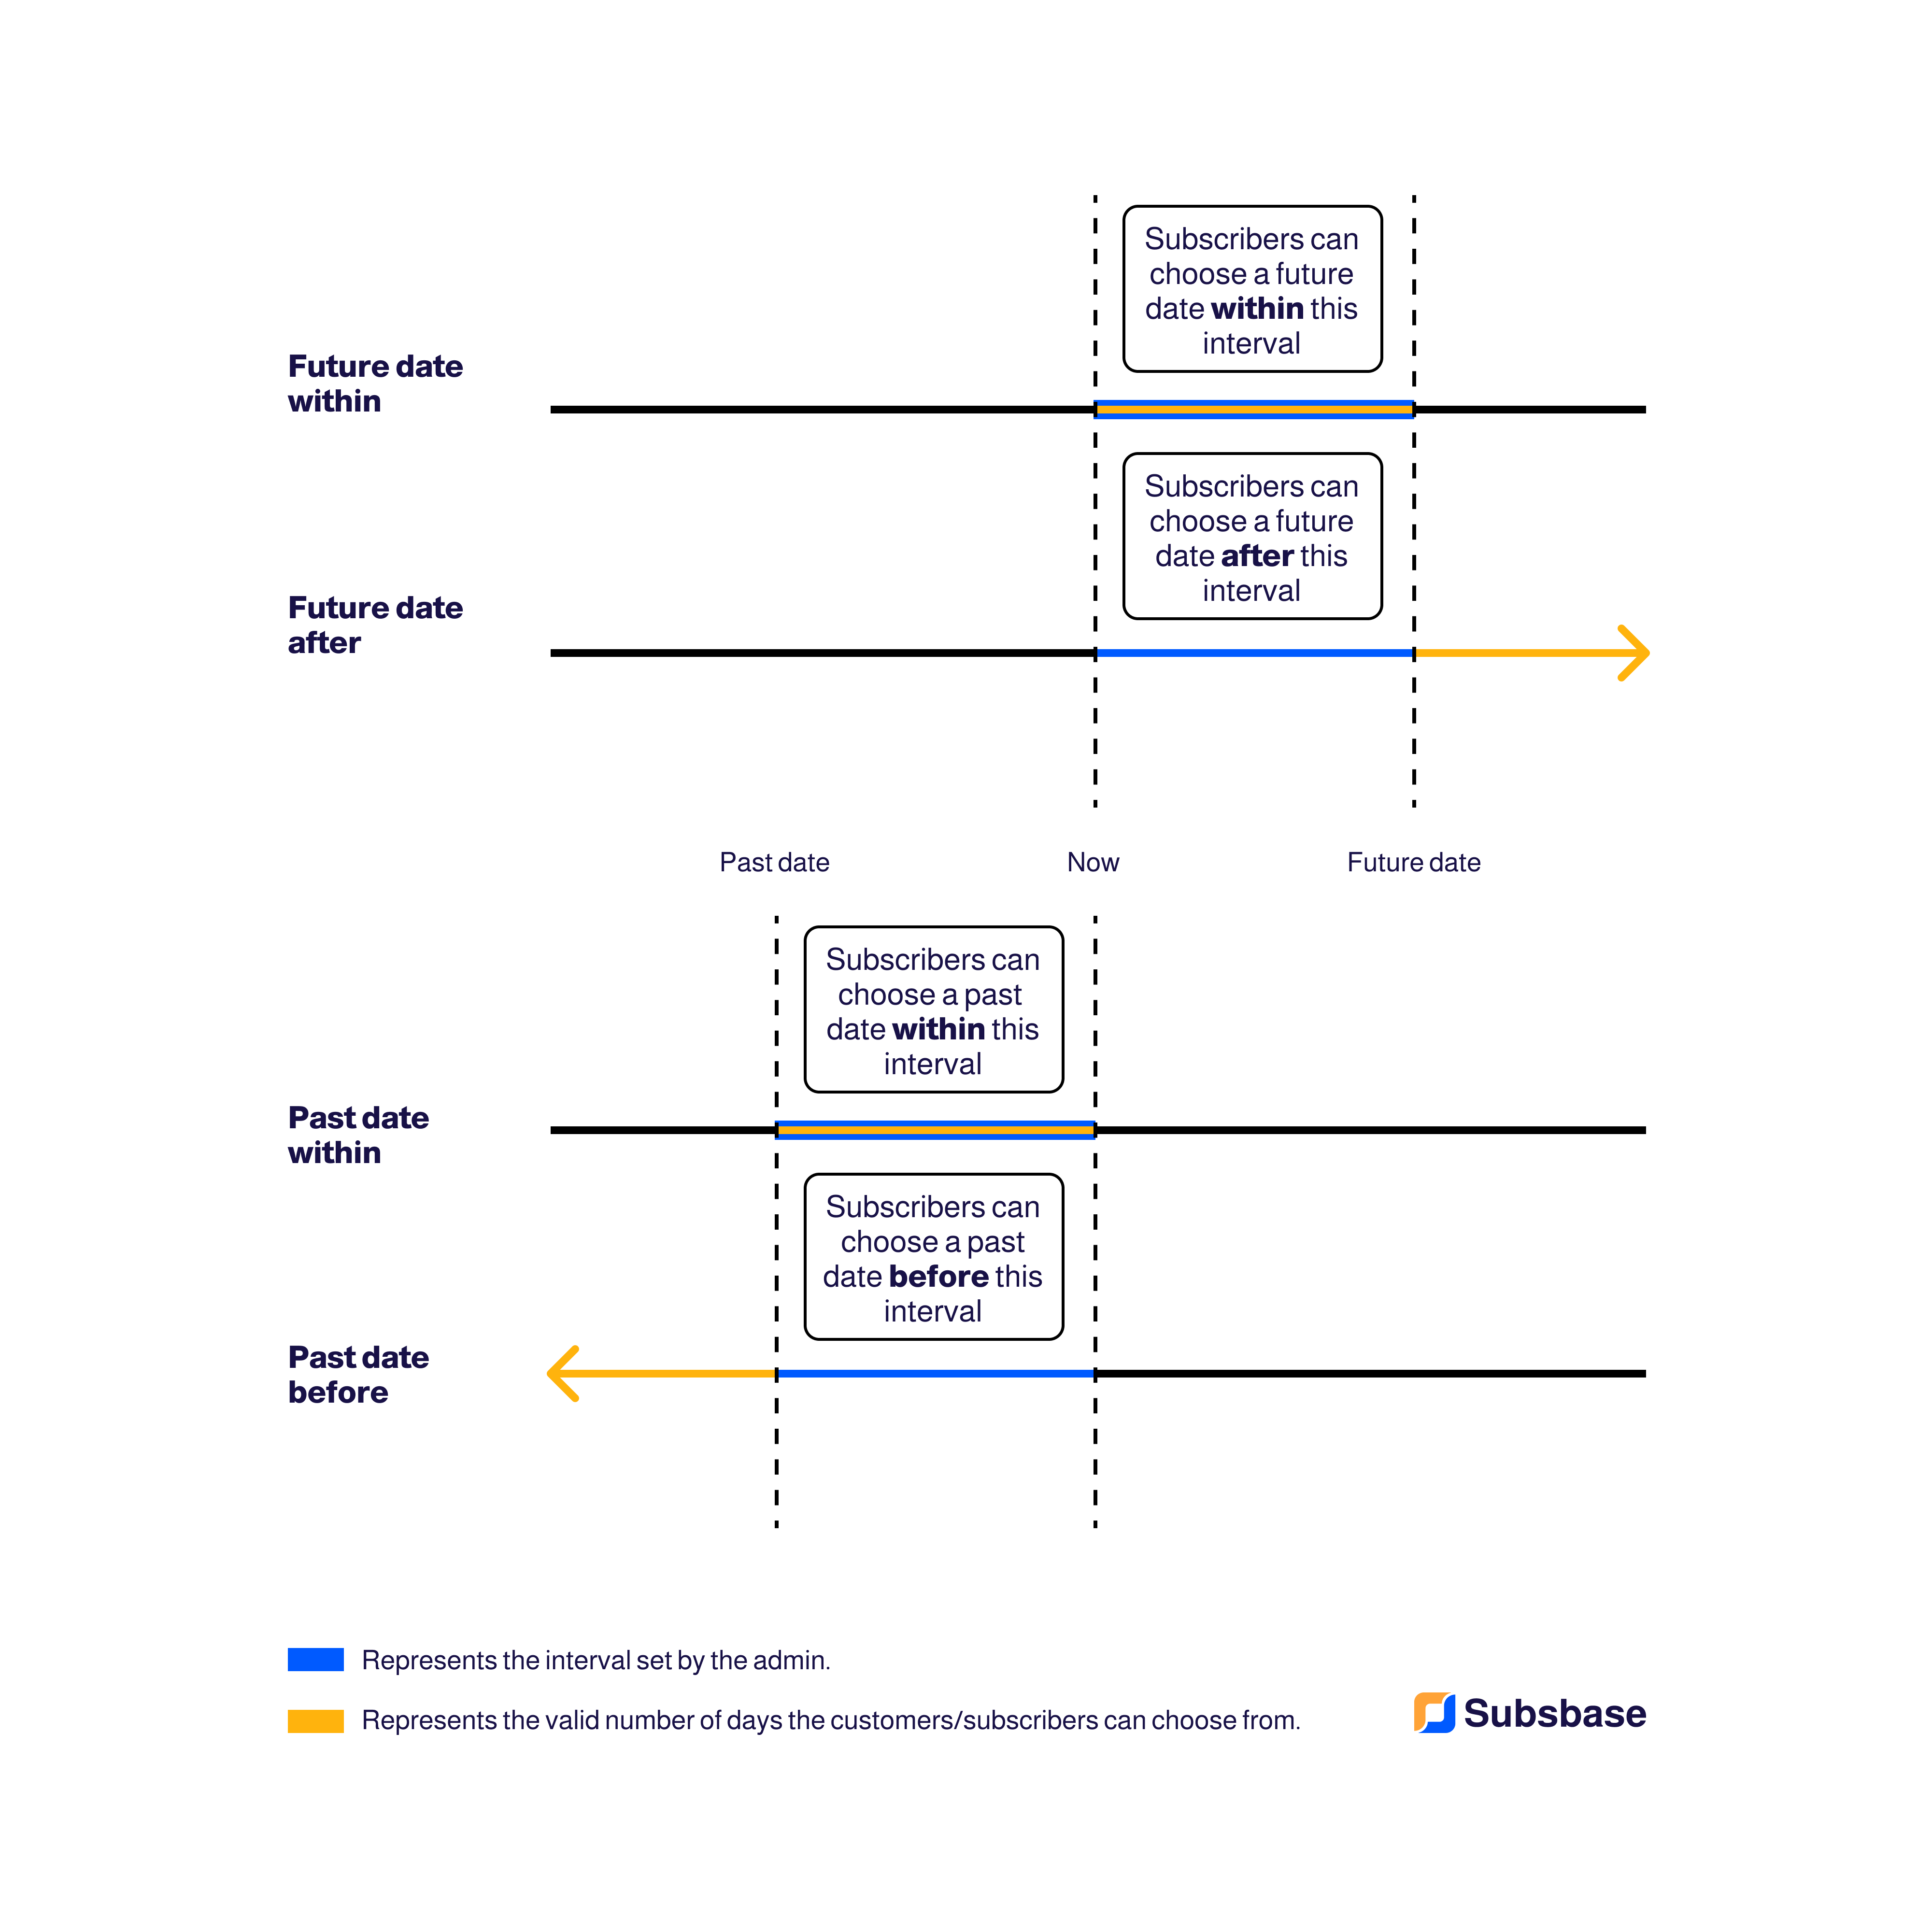
- Future Date Within: is an info field that asks the customers/subscribers to enter a date in the future. You can set an interval to represent the number of days in the future within which your customers/subscribers can choose from.
- Future Date After: is an info field that asks the customers/subscribers to enter a date in the future. You can set an interval to represent the number of days in the future after which your customers/subscribers can choose from.
- Past Date Within: is an info field that asks the customers/subscribers to enter a date in the past. You can set an interval to represent the number of days in the past within which your customers/subscribers can choose from.
- Past Date Before: is an info field that asks the customers/subscribers to enter a date in the past. You can set an interval to represent the number of days in the past before which your customers/subscribers can choose from.
Managing Plan Profile
- After completing the initial steps for creating a new plan, you can open the Plan Profile to configure additional details.
- The plan profile provides extensive information, with navigation facilitated through tabs at the top, covering various aspects like plan details, billing, invoice settings, pricing, and more.
Plan Info
In the "Plan Info" tab in your plan profile, you have the ability to set up additional rules, including the ones listed below.
Invoice Name
You have the option to define the title of the invoice that your customers/subscribers will view upon receipt. For example, you can opt to label it as a "Payment Receipt" instead of an "Invoice."
Accounting Code
- This value serves as an identifier for plans in internal invoice exports. When integrating with an accounting software, you can link the plan with its corresponding account, enabling you to track the plan's revenue using the accounting code.
- If you are integrating with an accounting software, it is crucial to ensure consistency by using the same "Accounting Code" both in your Subsbase site and within your account on the accounting platform.
Dunning Profiles
You can choose from the already created dunning profiles available in the drop-down menu, or create a new one in Settings > Dunning Profiles > New Dunning Profile.
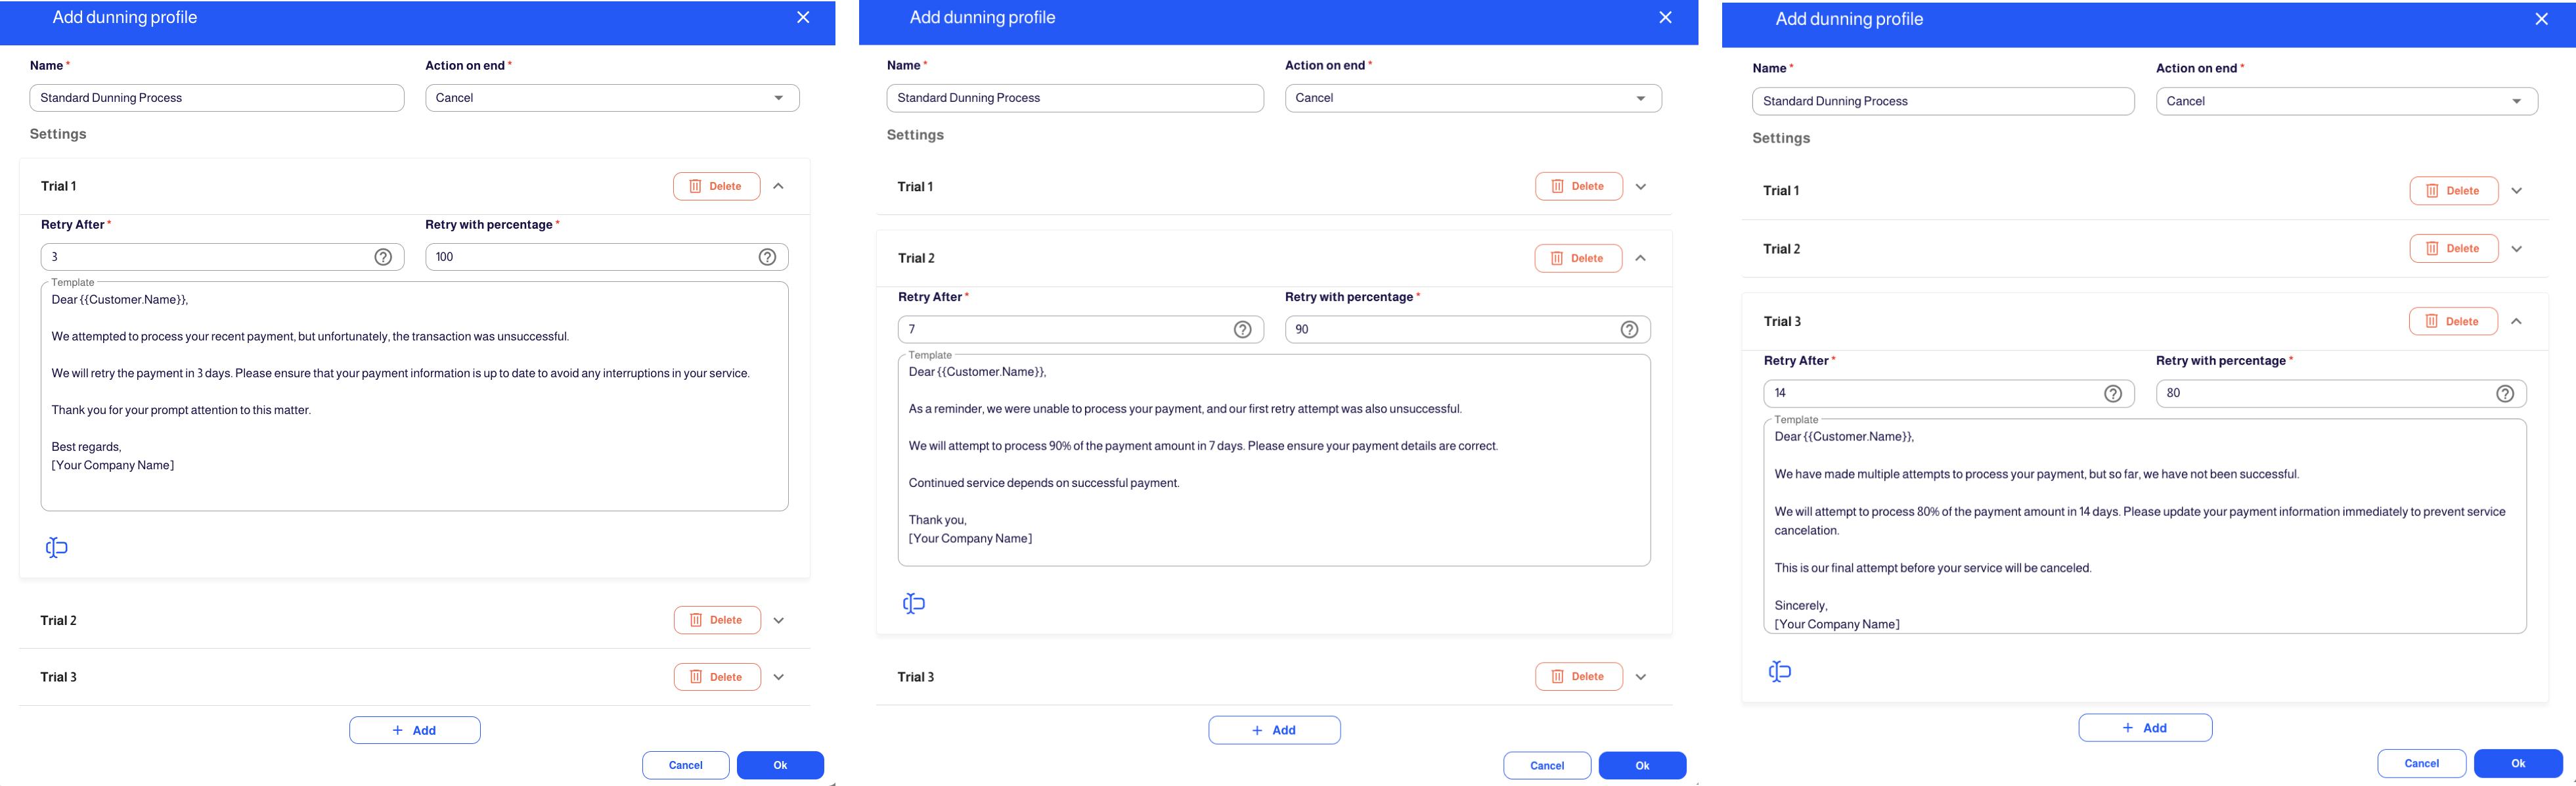
- A dunning profile is a configuration set in your plan info that dictates how and when retry attempts should be made for failed payment transactions. It automates the process of handling payment failures, typically by attempting to re-charge the customer after a certain period, and optionally, for a percentage of the original amount.
- You can choose from the already created dunning profiles available in the drop-down menu, or create a new one in Settings > Dunning Profiles > New Dunning Profile.
Dunning Profile Configuration Example:
- First Retry: Attempts full payment (100%) 3 days after the initial failure with a notification sent to the customer to update their payment information.
- Second Retry: Retries 90% of the payment amount 7 days after the initial retry, reminding the customer to ensure their payment details are correct.
- Final Retry: A last attempt to recover 80% of the payment is made 14 days after the second retry, warning the customer of potential service cancelation if the payment is not successful.
- Dunning profiles can be created and managed through APIs. Learn more here.
Require Email Verification
You can choose to ask your customers/subscribers to verify their emails during checkout in order to complete their payments.
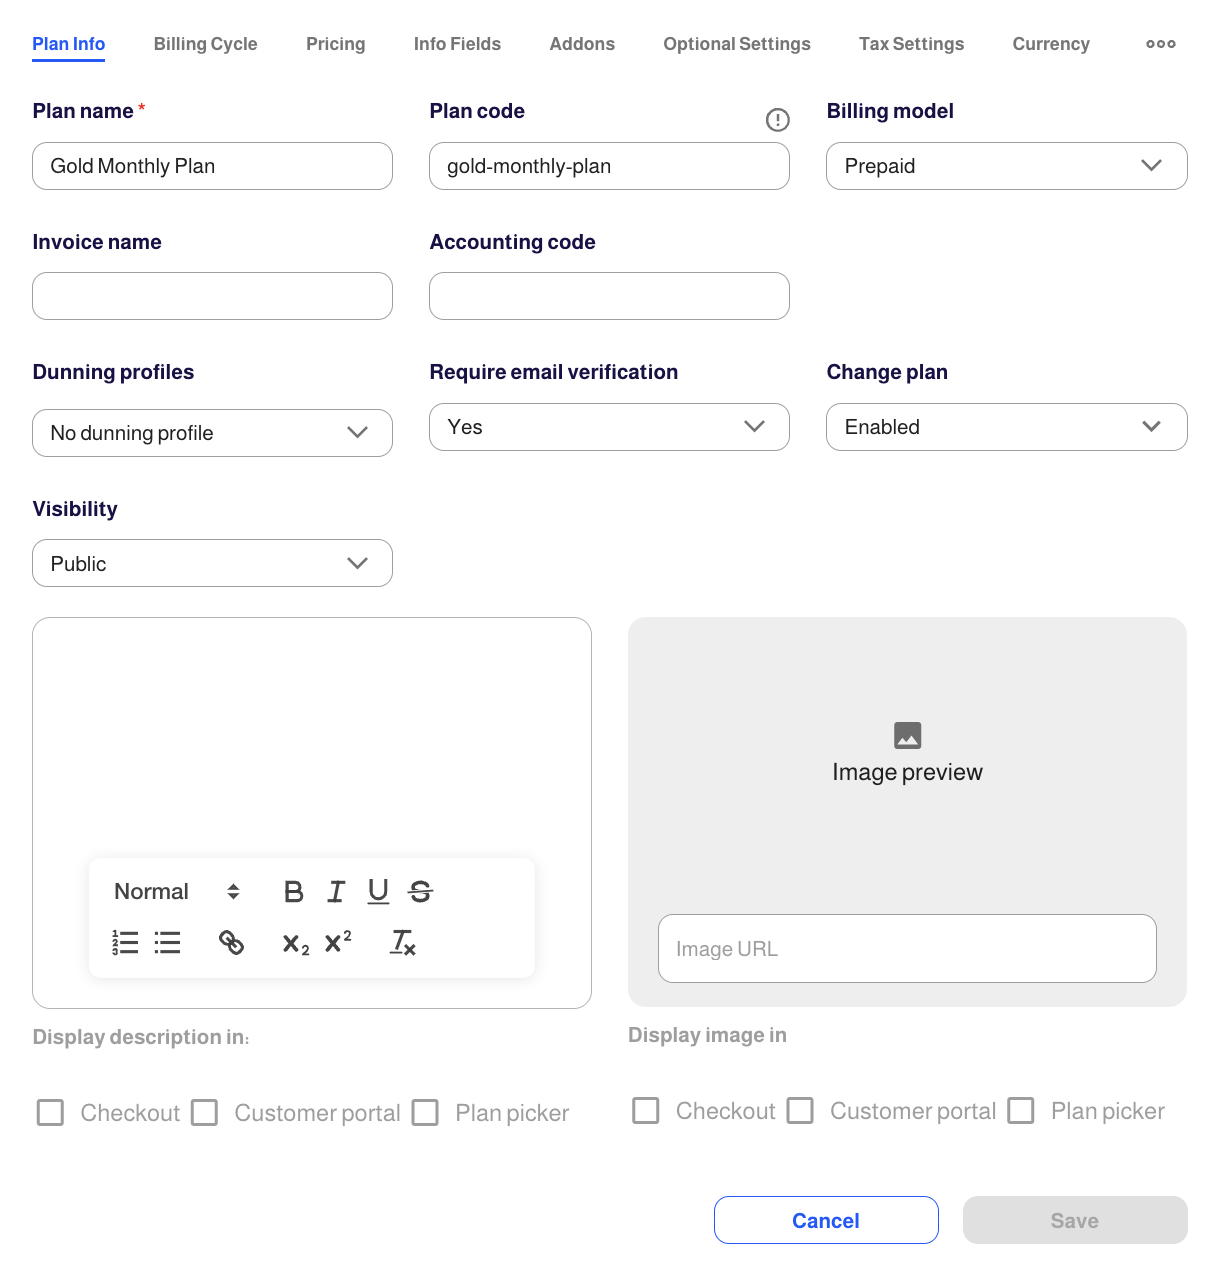
Enable or Disable Change Plan
- After plan creation, you can control customers' ability to change their plans on the Customer Portal.
- This control is accessible through the "Plan Info" tab within the Plan Profile.
- You can utilize the "Change Plan by Customer" dropdown to:
- Enable: Permits customers to change their plans.
- Disable: Restricts customers from changing their plans.
- If this setting is not configured, the default mode will be set to Enable, granting customers the ability to change their plans unless otherwise specified.
Enabling or Disabling the "Change Plan by Customer" feature can be done through the Plans API.
Description
This is the additional details about your plan. If you choose to configure a plan's description, it will be displayed on: Checkout, Customer Portal, or/and Plan Picker.
Image URL
If you choose to configure a plan's image, it will be displayed on: Checkout, Customer Portal, or/and Plan Picker.
Billing Cycle
In the "Billing Cycle" tab in your plan profile, you have the ability to set up additional rules, including the one listed below and here.
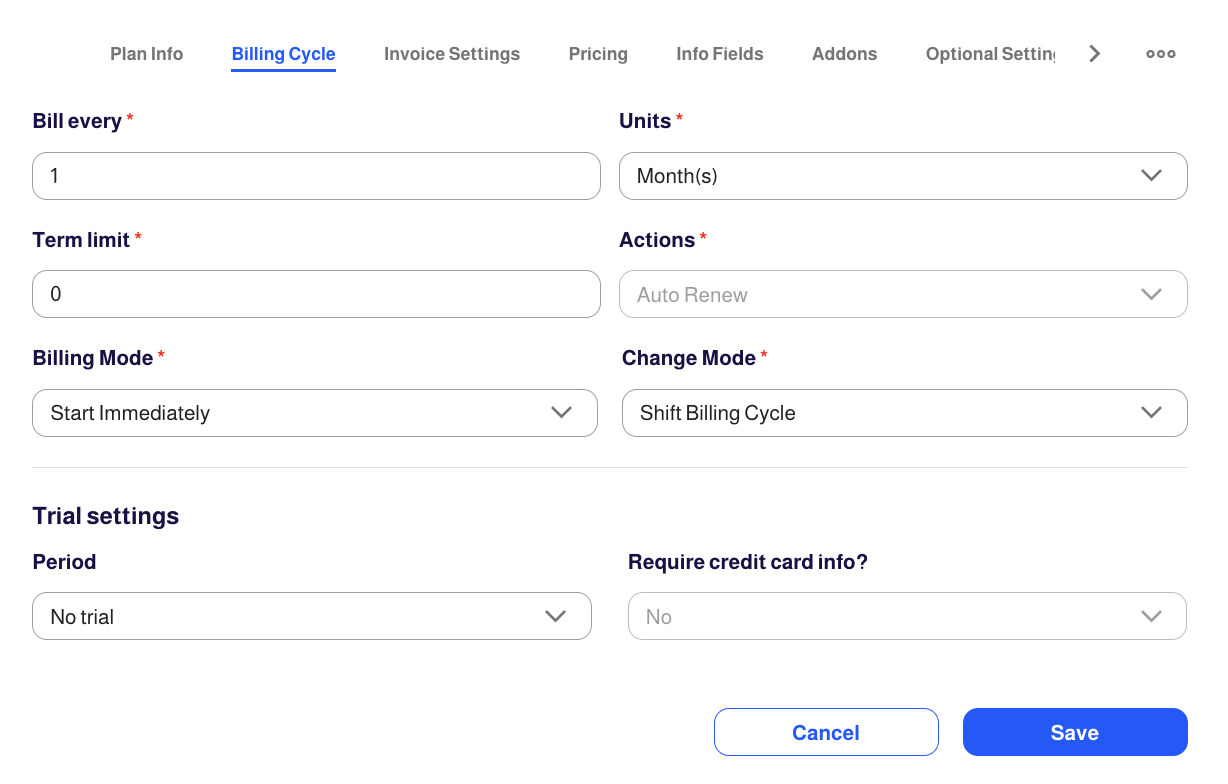
Trial Settings
You have the flexibility to provide your customers/subscribers with a customizable trial period, giving you the choice to include an option for collecting credit card information or not.
Usage Query
For more details, refer to the Plan Billing Model and Addon Billing Model sections.
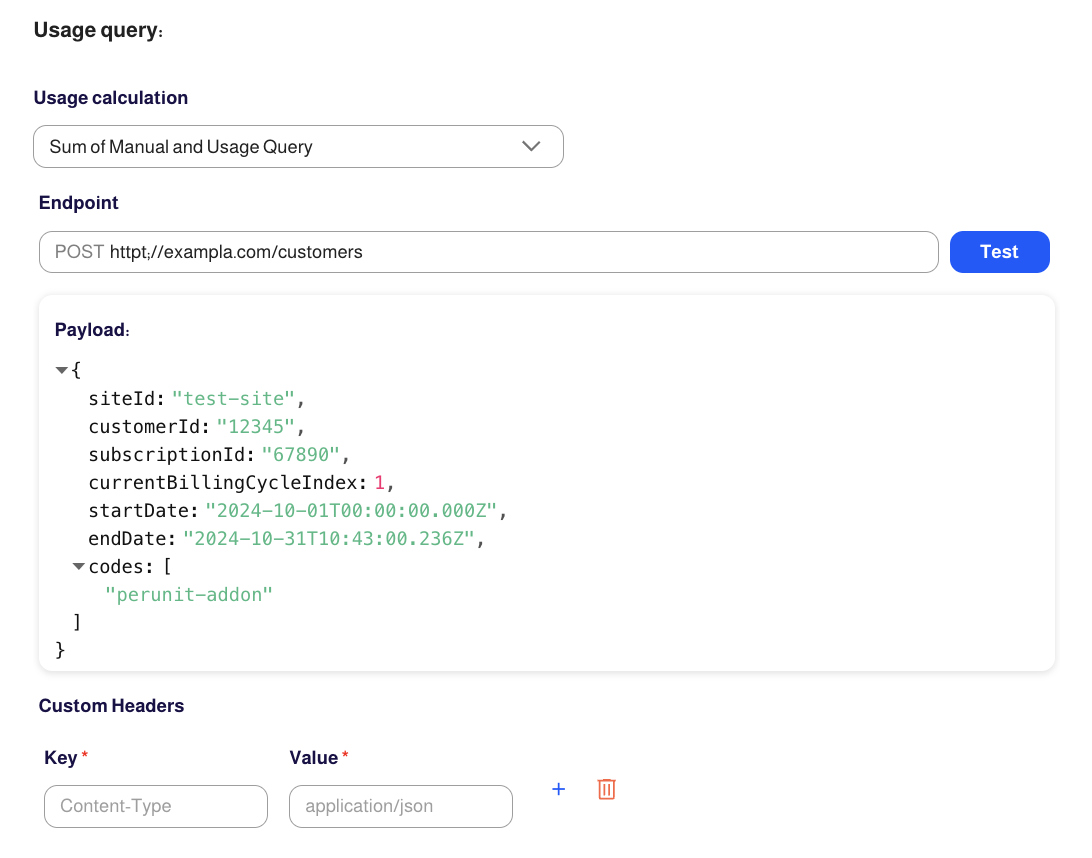
Usage Calculation
There are two ways to specify the Plan Usage Mode:
- Admin Portal: By default, the plan usage mode is set to Both (manual and automatic).
- Adjust the setting by selecting a calculation method—Manual, Automatic, or Both (hybrid mode) from the "Usage Calculation" dropdown menu.
- When Manual is chosen, the fields for the "Endpoint" and "Custom Header" will be hidden, as they do not apply.
- When Automatic or Hybrid mode is selected, the "Endpoint" and "Custom Header" fields will become visible and optional (not required).
- Plans API: Via the "data" parameter in the Update Plan Mutation, you can specify your preferred calculation method—Manual, Automatic, or Both.
Endpoint
- Subsbase relies on the endpoints you configure to collect data for usage calculations.
- It is important to note that without configured endpoints, automatic usage entry will fail, and only manual usage entry will remain available.
Custom Headers
You also have the option to add custom headers (key and value) as additional information to the endpoints during the data retrieval process.
Invoice Settings
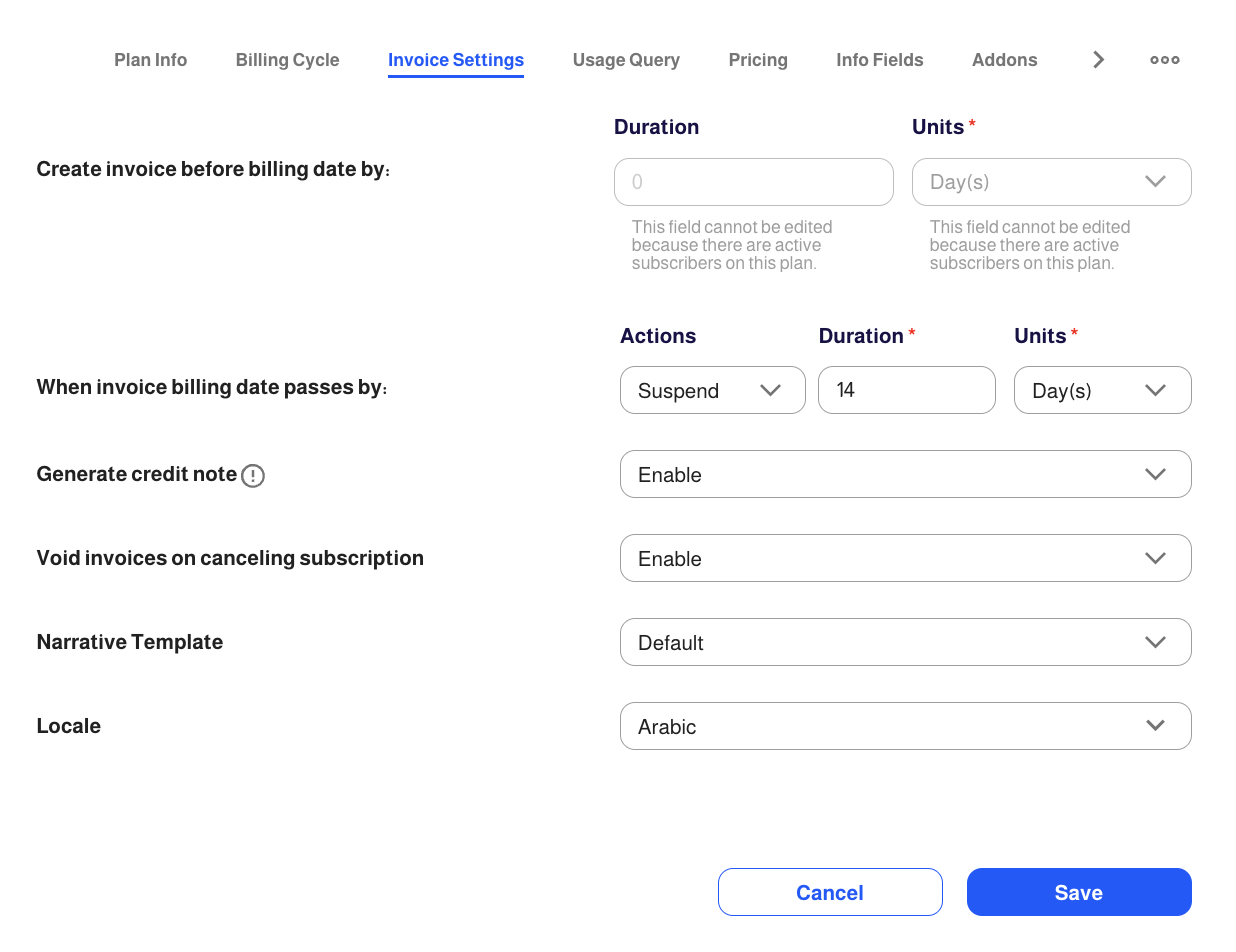
In the "Invoice Settings" tab in your plan profile, you have the ability to set up additional rules, including the one listed below.
When invoice billing date passes by
You can configure the grace period for a plan under the "When invoice billing date passes by" section. The available actions include:
- Suspend: Temporarily halt the service until payment is made.
- Cancel: Terminate the subscription if payment is not received.
- Do Nothing: Continue the service without any interruption, regardless of payment status.
Generate Credit Note
- When a subscription is set to 'Cancel Immediately' before the end of a billing cycle, the cost for the remaining days will be prorated. A credit note will then be generated to account for the remaining amount until the next billing cycle.
- In the Plan Profile, you have the option to enable or disable credit note generation for immediate subscription cancelations.
Enabling or disabling this setting in the Plan Profile applies specifically to that plan.
To enable/disable the generation of credit note across the entire site, access the Invoice Settings in the Settings section of the Admin Portal.
- By default, the generation of credit notes upon cancelation is enabled. This default setting can be configured from either the Plan Profile or Invoice Settings.
- This setting is automatically applied on the new plans. Older plans retain the default setting for credit note generation.However, admins have the flexibility to disable this feature for specific older plans if needed.
Void Invoice on Canceling Subscription
- When the "Void Invoice on Canceling Subscription" field is enabled, canceling a customer's subscription for a plan will automatically void any associated invoices that are in an "open" or "overdue" status.
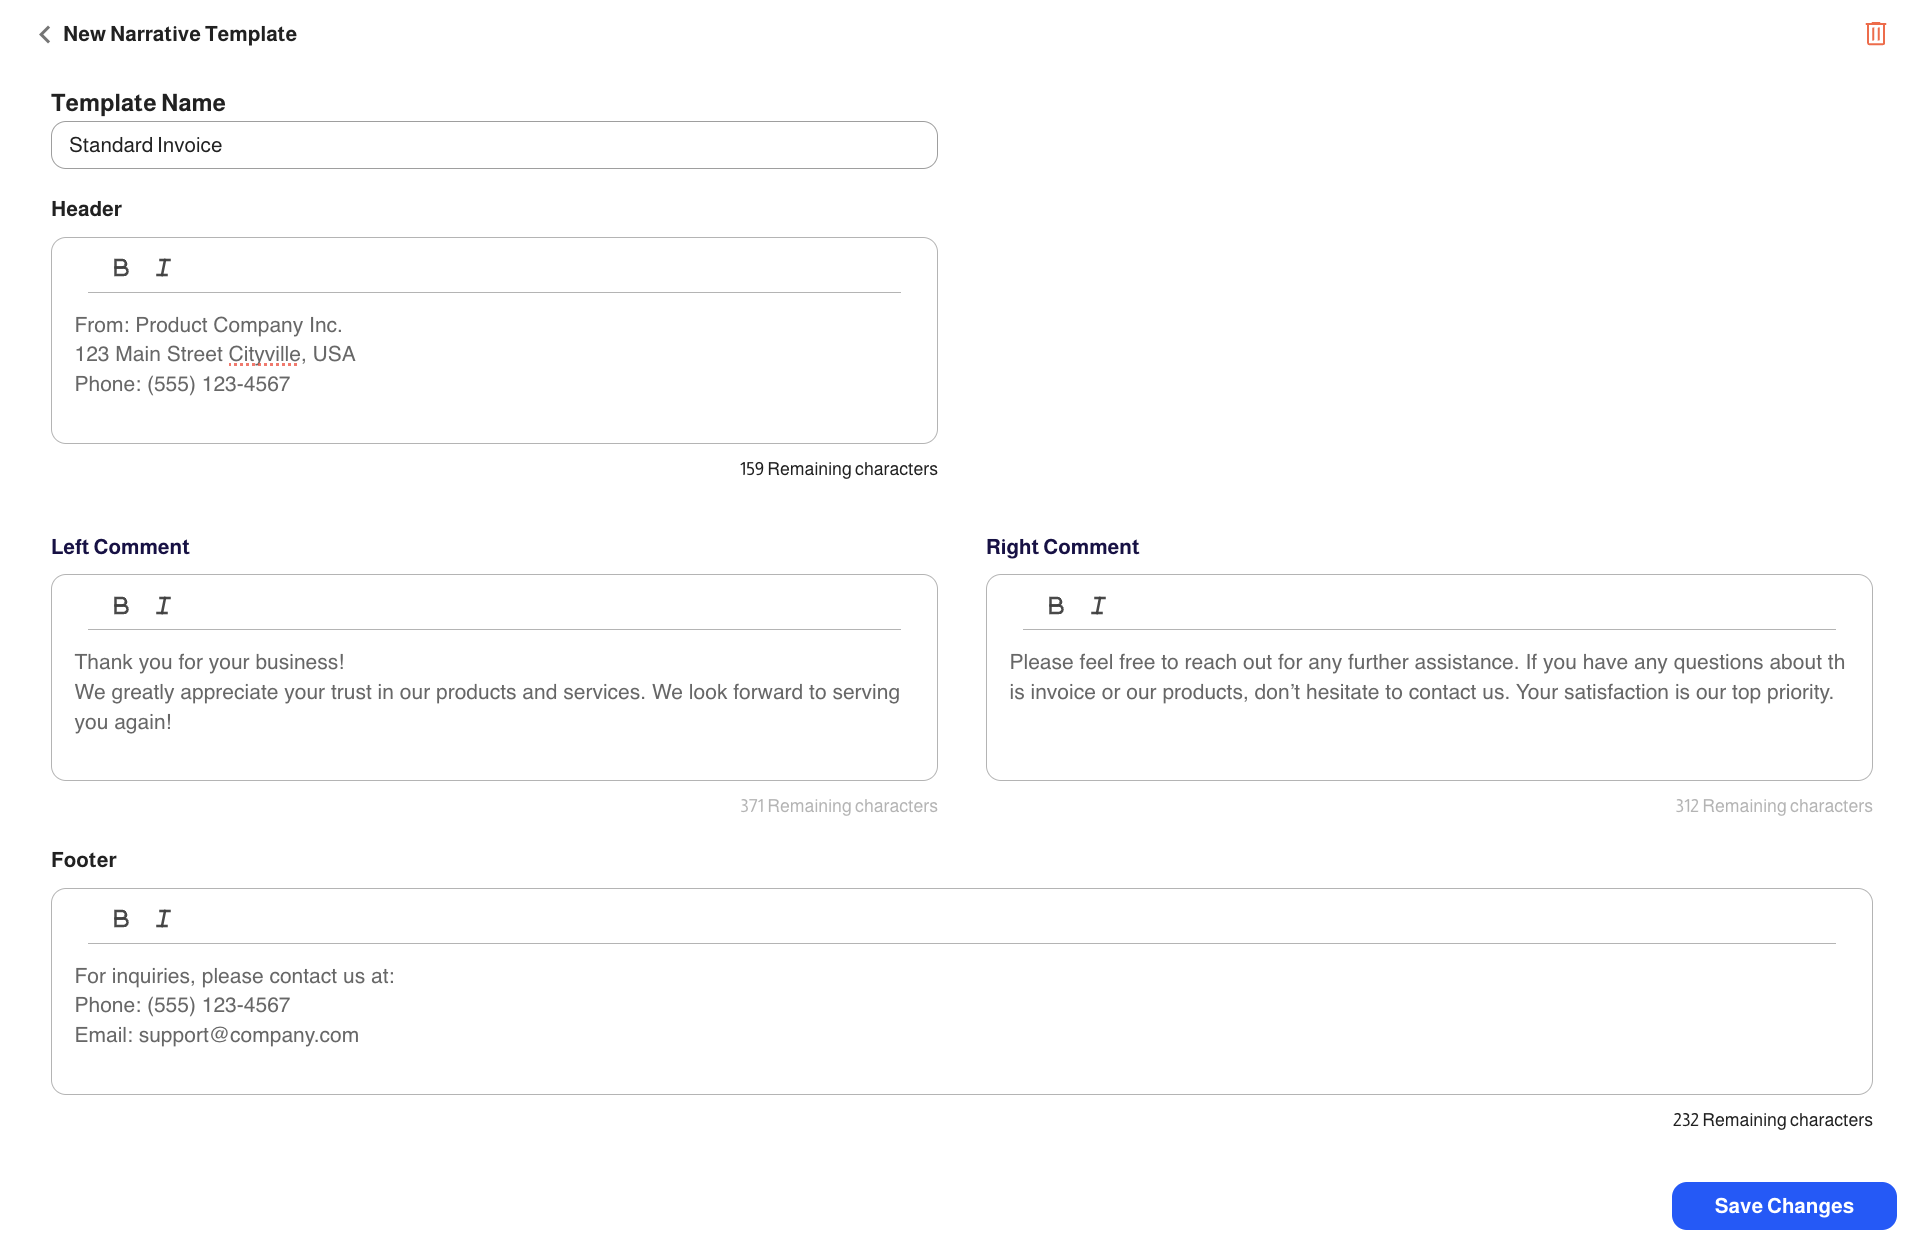
Narrative Template
- You can tailor the descriptive content of your invoices, such as payment terms and thank-you messages, by selecting a narrative template that fits your requirements.
- When setting up your plans, choose the desired template from the Narrative Template dropdown, which includes options you have configured in the Site Settings.
- Once selected, any invoices generated from these plans will automatically feature the chosen narrative. The narrative will appear in the Invoice's Narrative tab for your review.
Configure Narrative Templates in Site Settings
- Set up the Invoice Narrative Template in your Site Settings via the Admin Portal, or manage it using the APIs.
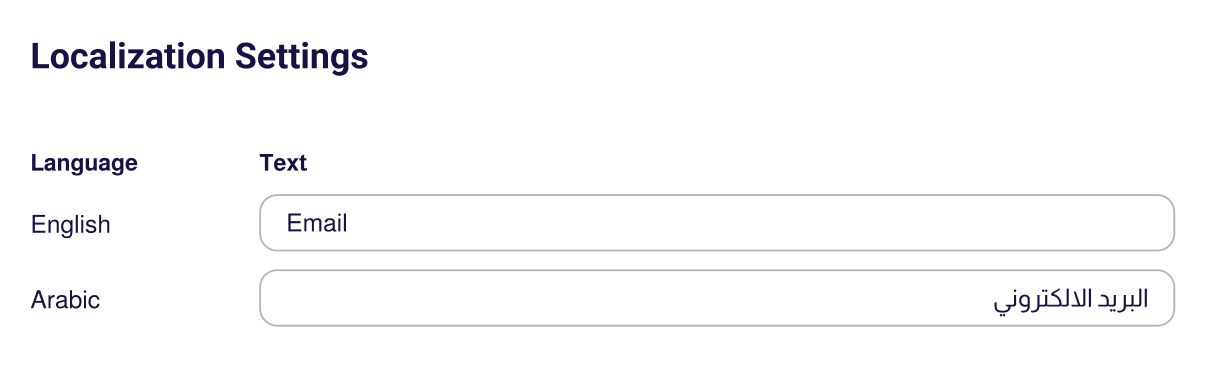
Localization Settings
- You have the ability to translate invoice narrative templates, allowing your customers to seamlessly switch between languages across the Admin Portal, Checkout, and Customer Portal pages.
- Any field marked with the localization icon can be customized to different languages.

- Click the icon to access the Localization Settings, where you can enter translations for each language.
To enable localization, admins must first set the site's language preferences in the Admin Portal under Site Settings > Language Settings. This step ensures that the Localization Settings work properly across all interfaces.
Locale
The Locale field lets you choose the language for invoices generated under this plan. All invoices for this plan will be created in the selected language.
Locale in Site Settings
- You can also set the invoice language at the site level under Site Settings > Invoice Settings. This sets the default language for all invoices generated across the site.
- If a plan has a specific locale set, invoices for that plan will use the plan's locale instead of the site default.
Example:
If the site locale is set to English but a plan has its locale set to Arabic, invoices for the site will generally be in English, except for invoices of that plan, which will be generated in Arabic.
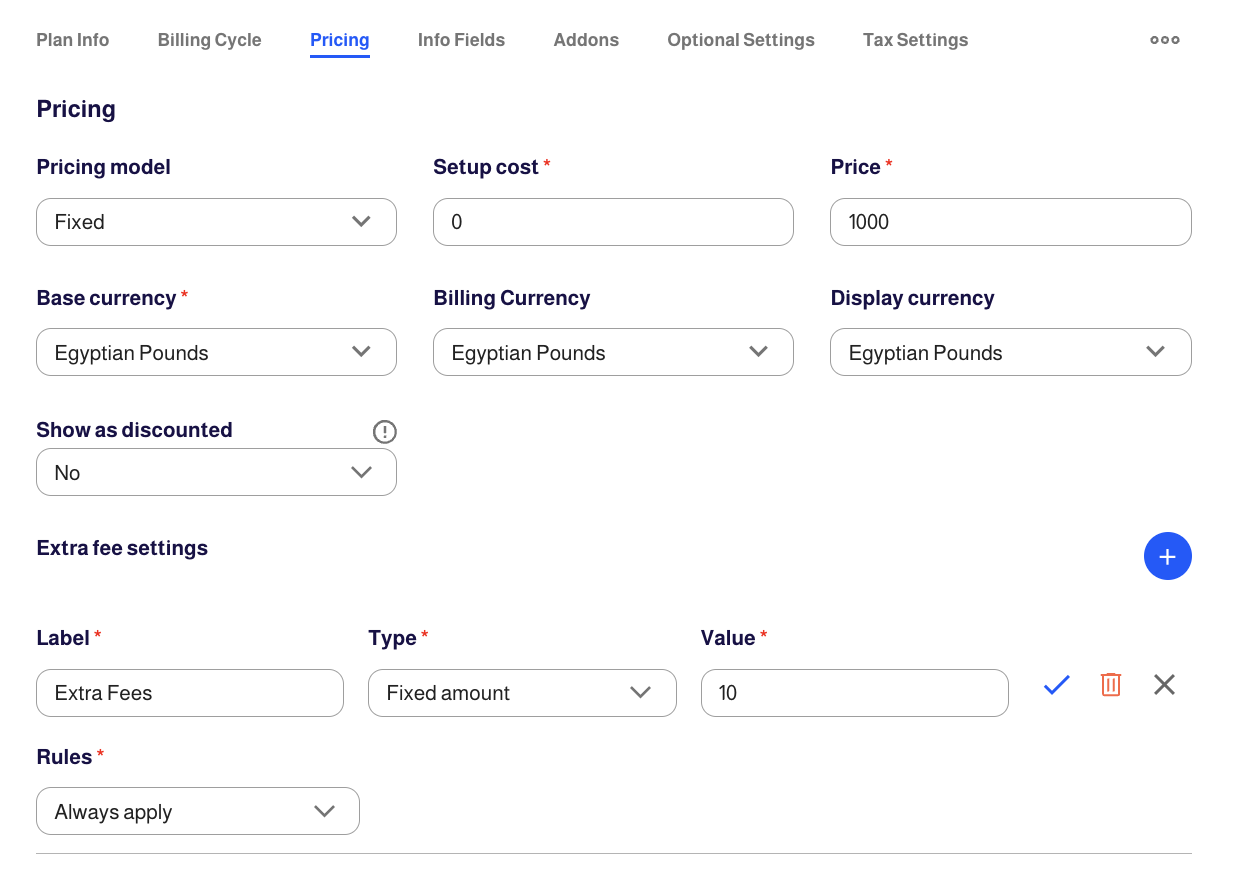
Pricing
In the "Pricing" tab of your plan profile, you can adjust the plan Pricing and configure Extra Fee Settings.
Pricing
For more details, refer to the Pricing Model, Setup Cost, and Price sections.
Base Currency
- It is the default currency in which the plan's prices are set and managed.
- All pricing-related entries, like the setup cost and charges, are configured in this currency.
Billing Currency:
- This currency is used to issue invoices.
- Invoices are generated and sent to customers in this currency, which may differ from both the base and display currencies based on customer preferences or regional requirements.
Display Currency:
- This currency is used only during the checkout process.
- Prices may be shown in a different currency for customer convenience, but the actual pricing is based on the base currency.
Extra Fee Settings
- You can configure fixed or percentage-based extra fees on your products and services.
- You can choose to apply the extra fees regularly or under certain conditions as per your specifications through the "Rules" dropdown menu.
Info Fields
Localization Settings
- You have the ability to translate info fields in your plans, allowing your customers to seamlessly switch between languages across the Admin Portal, Checkout, and Customer Portal pages.
- Any field marked with the localization icon can be customized to different languages.
- Click the icon to access the Localization Settings, where you can enter translations for each language.
To enable localization, admins must first set the site's language preferences in the Admin Portal under Site Settings > Language Settings. This step ensures that the Localization Settings work properly across all interfaces.
Addons
In the "Addons" tab on your plan profile, you have the ability to add and adjust addons.
Admins can independently set base currencies for each addon, distinct from the plan's base currency.
- To add a new addon, click the "Add" button.
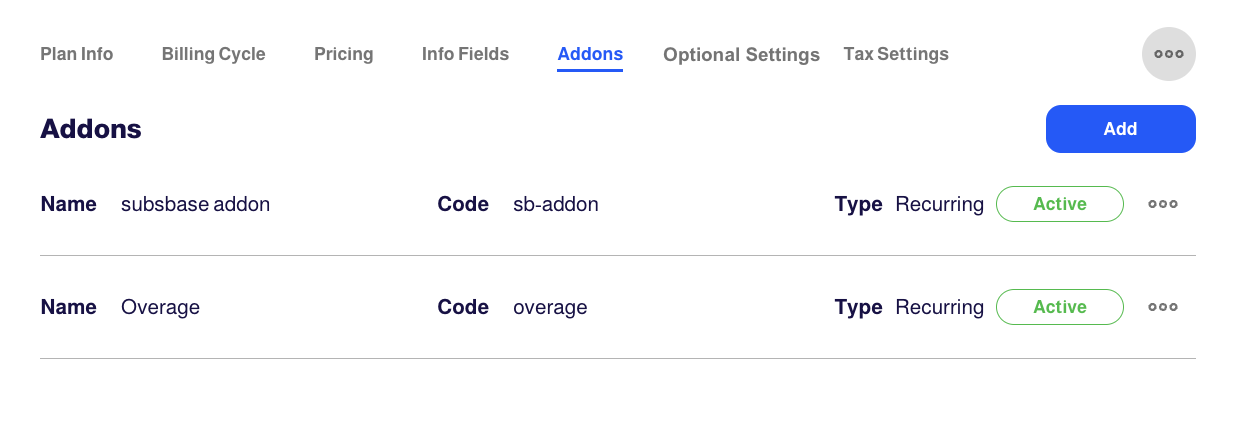
- To edit an existing addon, click on the addon from the list in the "Addons" tab.
Example:
A plan's base currency might be set to Egyptian Pounds (EGP), but you can add an addon with a base currency of US Dollars (USD). However, the addon’s billing and display currencies will always align with the plan’s billing and display currencies.
Learn more about the base, billing, and display currencies here.

If the addon's base currency differs from the plan's base currency, you must configure the conversion rates in the Plan Currency tab of the plan profile.
Optional Settings
In the "Optional Settings" tab on your plan profile, you have the ability to set up additional settings, including the ones listed below.
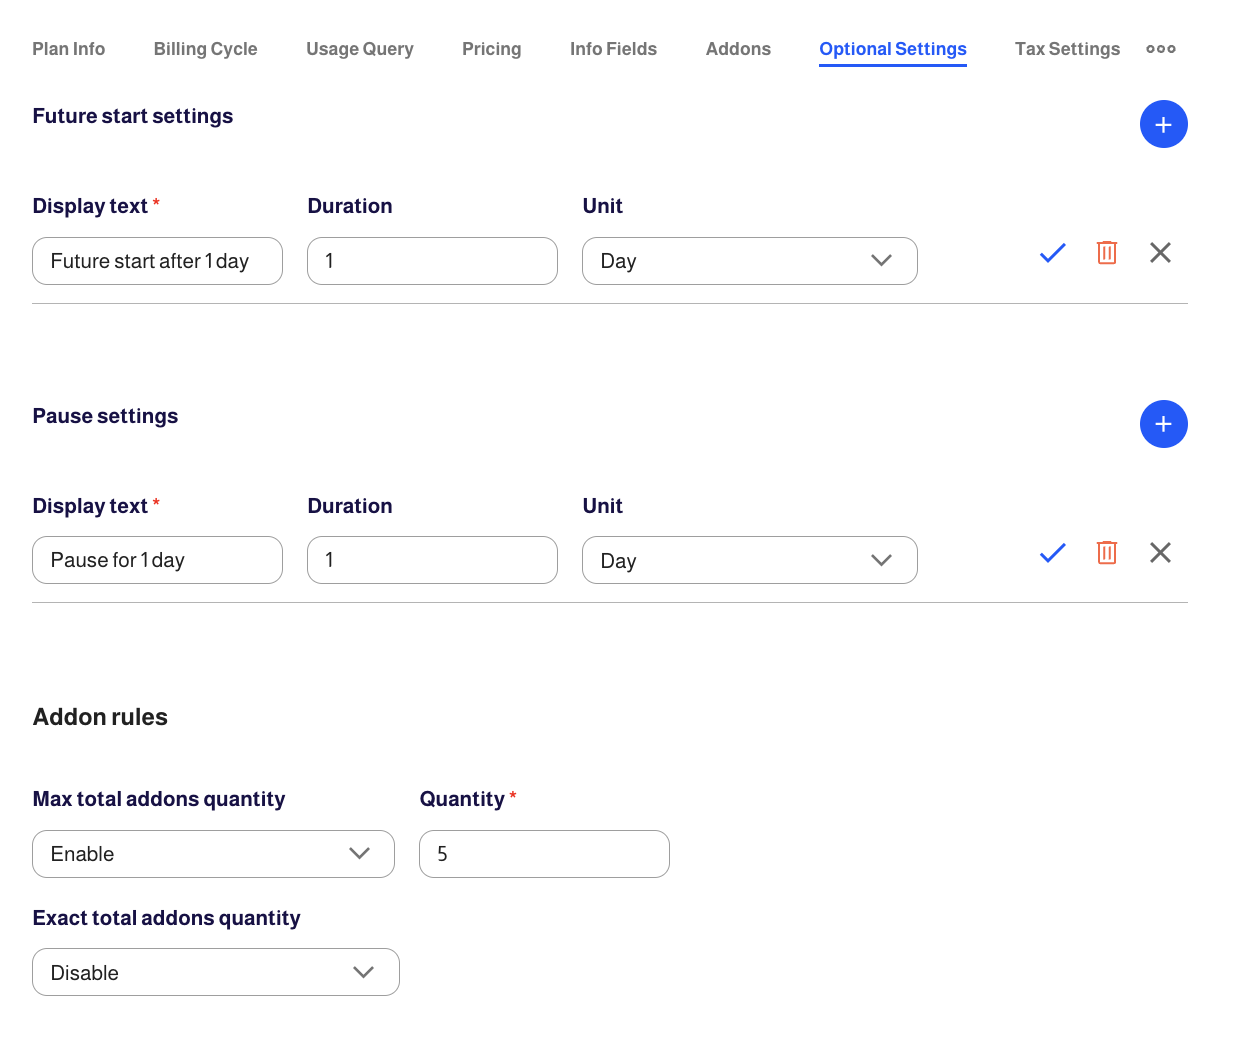
Future Start Settings
- You can choose to have the subscription start right away, with a trial period, or on a scheduled future start date.
- If you select this option, the subscription will be created immediately, but the invoice will not be sent until the future start date.
- If the subscription has a future start date and a trial period at the same time, the trial period will start on the future start date you specified.
Pause Settings
You can choose to pause an active subscription and skip its future renewals temporarily.
Addons Rules
Max Total Addons Quantity
- This rule lets you define the maximum quantity of allowed addons per plan.
- For example, if your plan includes five addons, and you specify your maximum total addons quantity for three, this means that you are allowing your customers/subscribers to choose only three addons per plan.
Exact Total Addons Quantity
- This rule lets you define the exact quantity of allowed addons per plan.
- For example, if your plan includes two addons, and you specify your exact total addons quantity for two, this means that your customers/subscribers must add this exact quantity of addons per plan.
Tax Settings
- Subsbase enables you to collect taxes on your invoices. You can choose how your plans should be taxed by configuring the fields in the "Tax Settings" tab.
- The value/price that you quote for your product or service in Subsbase is set to Tax-Exclusive by default, where tax is applied on top of the product or service price.
- If you are integrating with an accounting software, make sure that you use the same "Tax Title" in both your Subsbase site and your account on that accounting platform.
- In the "Tax Settings" tab within the Plan Profile, you configure specific tax profiles that dictate how taxes are applied to invoices for that particular plan or addon.
You have two options:
- Choose a tax authority that you are integrated with.
- Select from the tax profiles you have configured through the "Tax Profiles" in Site Settings, if you are not integrated with any tax authority.
1. Integration with Tax Authority
- Subsbase has made it easy for you to configure and automatically apply taxes to your invoices through our integration with different tax authorities.
- You have the option to select the tax authority to which you are liable to pay taxes, from the "Integration Providers" dropdown menu.
- Once you have chosen the integration provider, you will need to configure the fields below. All the required information can be found on the account you created on the website of the respective tax authority.
- For more details, please check the Tax Invoicing page.
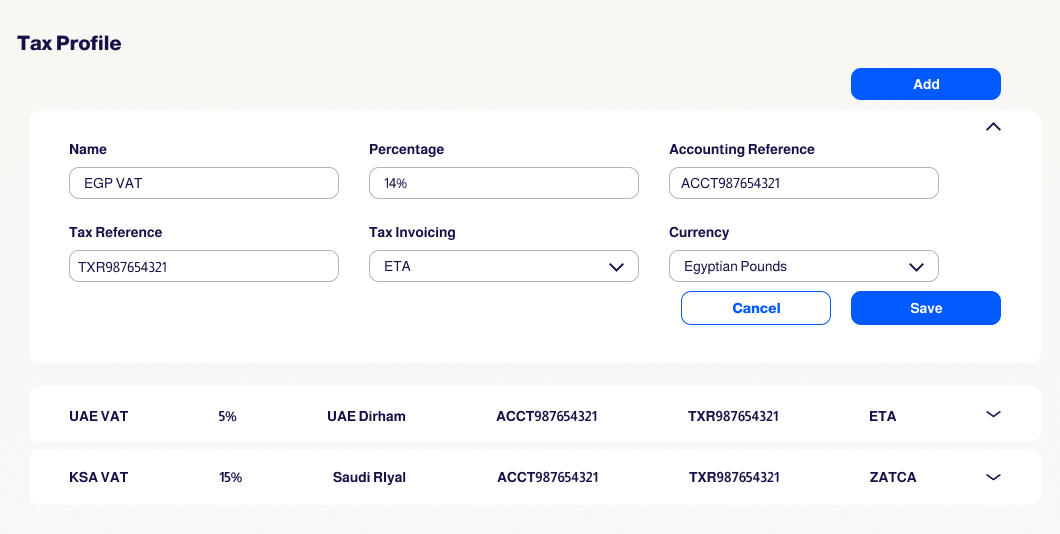
2. Tax Profiles
Configure Tax Profiles
If you are not integrated with any tax authority, you can create and edit "Tax Profiles" in "Site Settings." This provides the flexibility to configure your site's tax profiles independently.
Localization Settings
- You have the ability to translate your tax profiles, allowing your customers to seamlessly switch between languages across the Admin Portal, Checkout, and Customer Portal pages.
- Any field marked with the localization icon can be customized to different languages.
- Click the icon to access the Localization Settings, where you can enter translations for each language.
To enable localization, admins must first set the site's language preferences in the Admin Portal under Site Settings > Language Settings. This step ensures that the Localization Settings work properly across all interfaces.
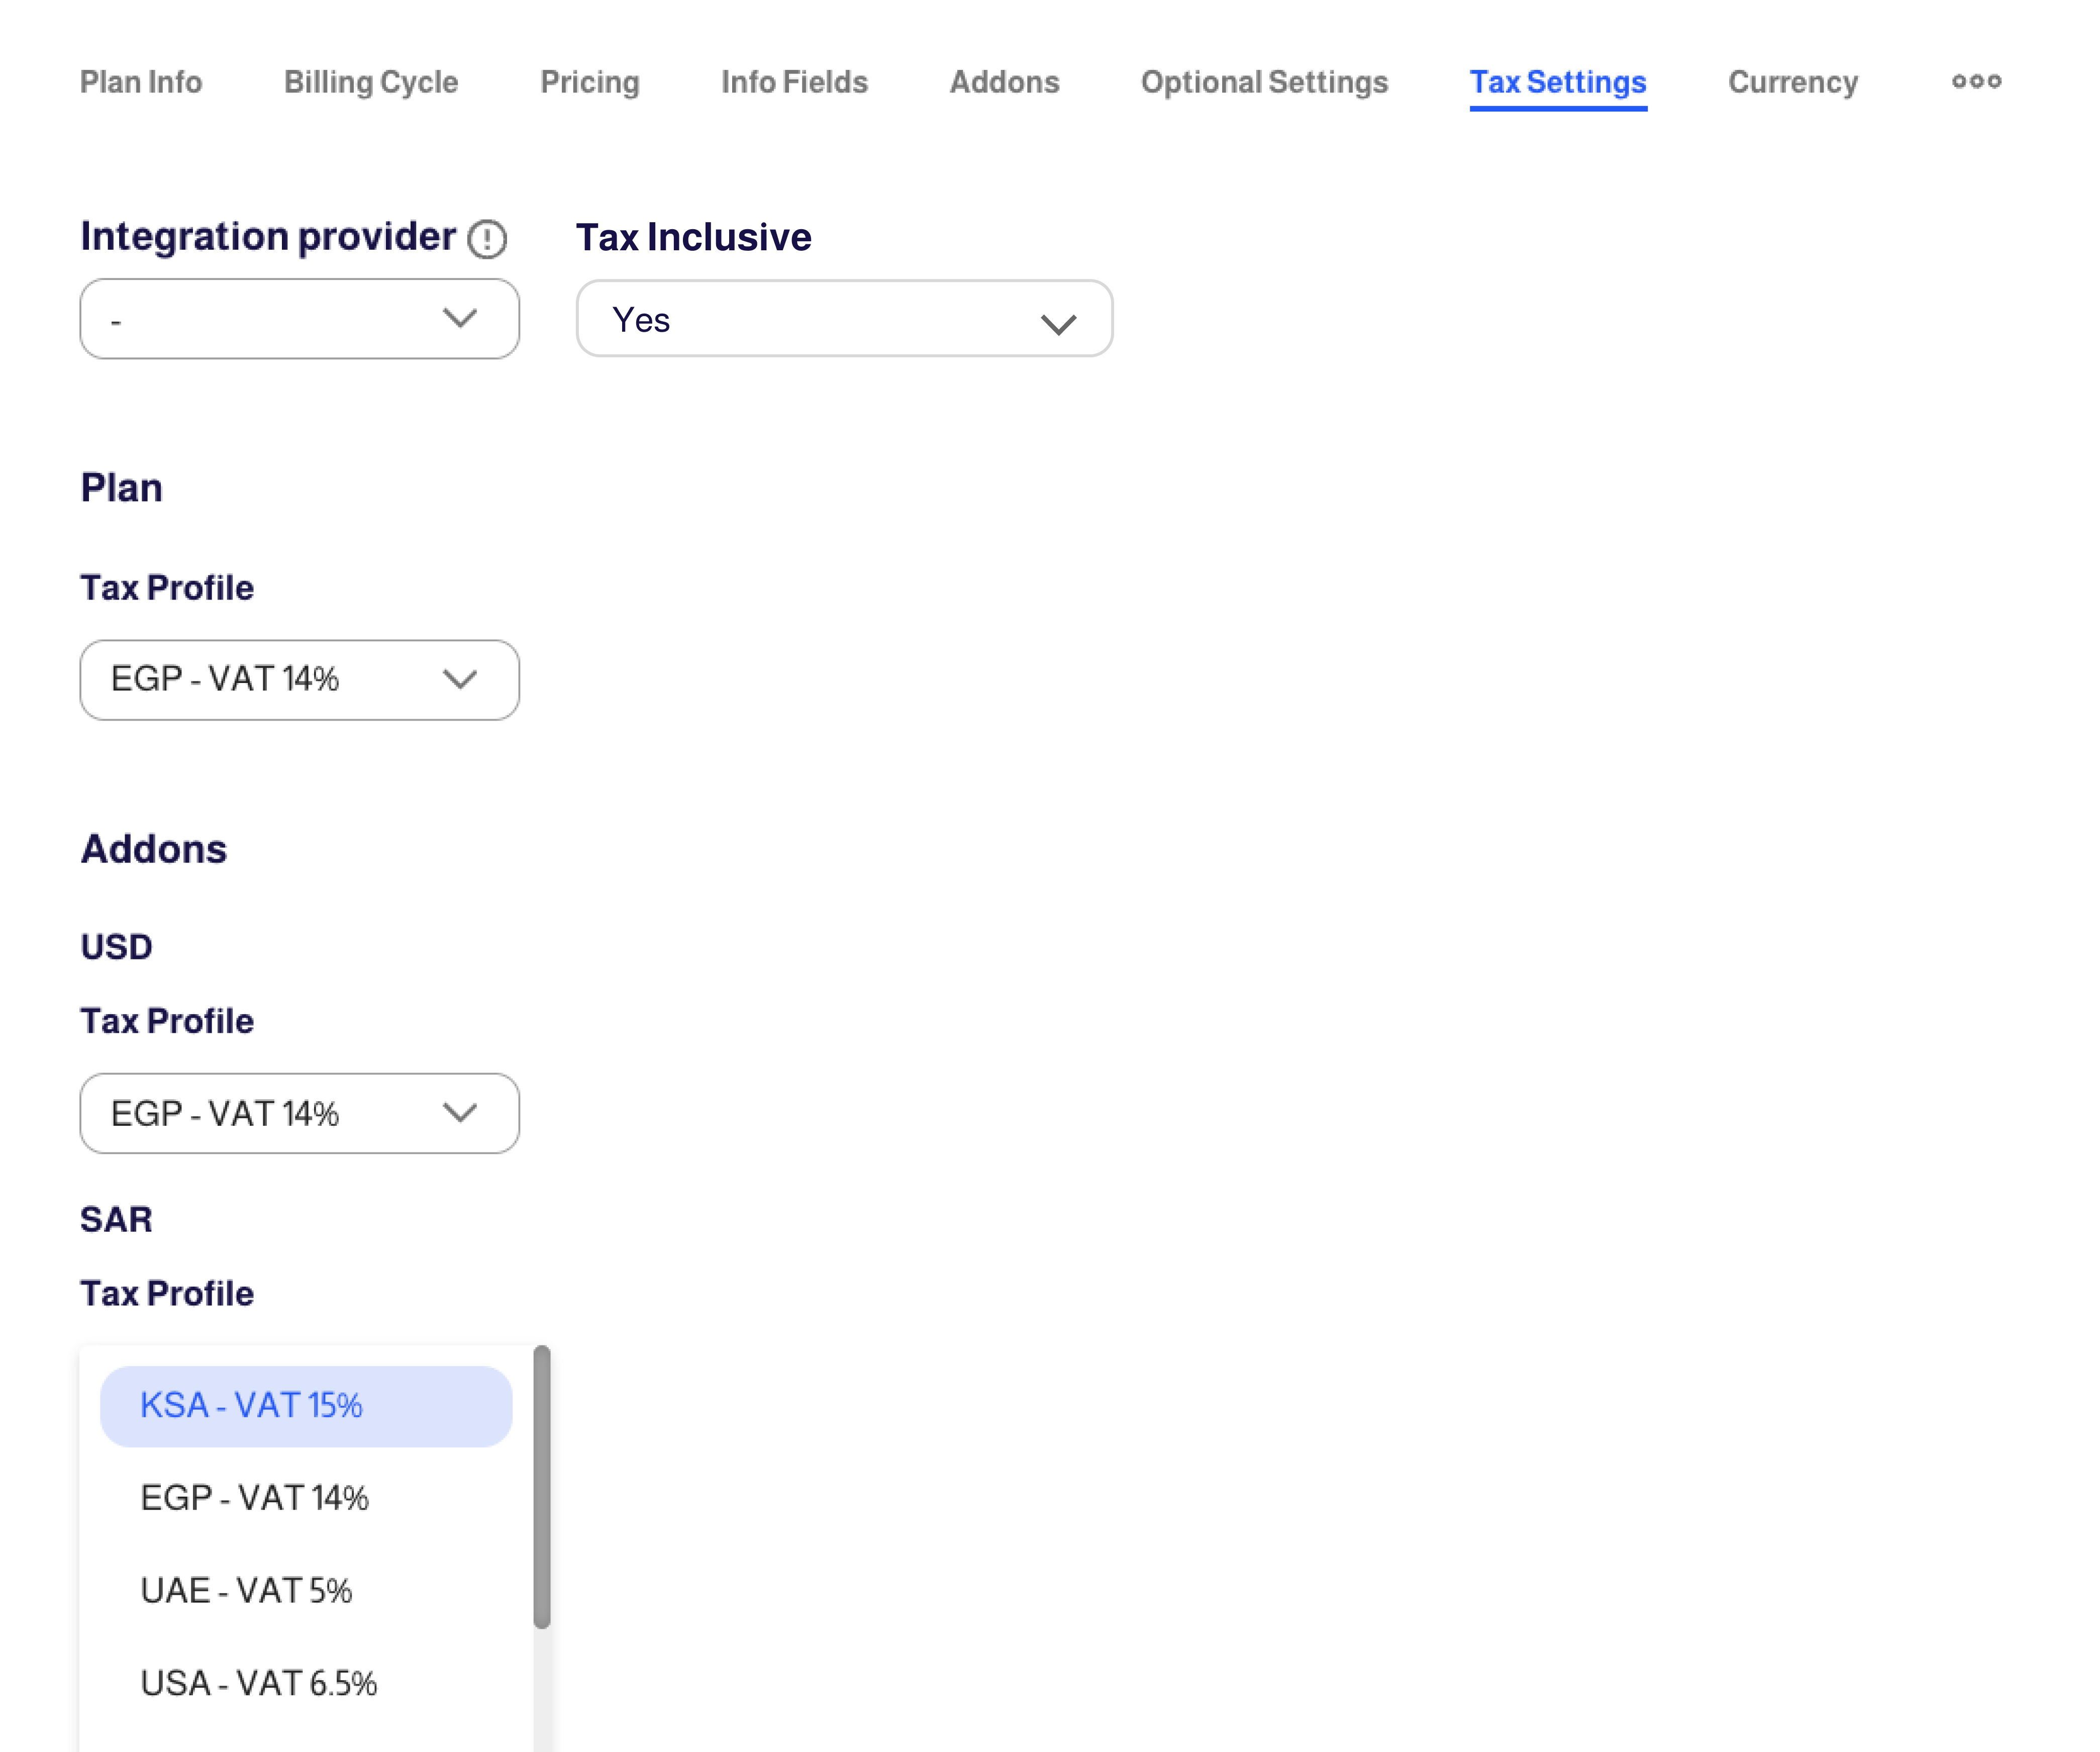
Choose Tax Profiles
- In the "Tax Settings" tab of the Plan Profile, you can choose the tax profiles you want to use for your plan and addons with different currencies.
- You can also enable the "Tax Inclusive" option.
- When enabled, the prices for your plans and addons will be treated as tax-inclusive. This means that the total price shown will already include any applicable taxes, rather than adding them on top of the displayed price.
- If this option is disabled, taxes will be calculated separately and added to the base price.
Plan Currency
- In the "Plan Currency" tab of the Plan Profile, you can configure the currency settings for your plan and addons, including conversion rates between the plan's base currency and the billing or display currencies, by choosing between "Manual" and "Use API" for conversion rates via a toggle switch.
However, any configuration made in the "Plan Currency" tab of the Plan Profile will override the "Currency Settings" in Site Settings.
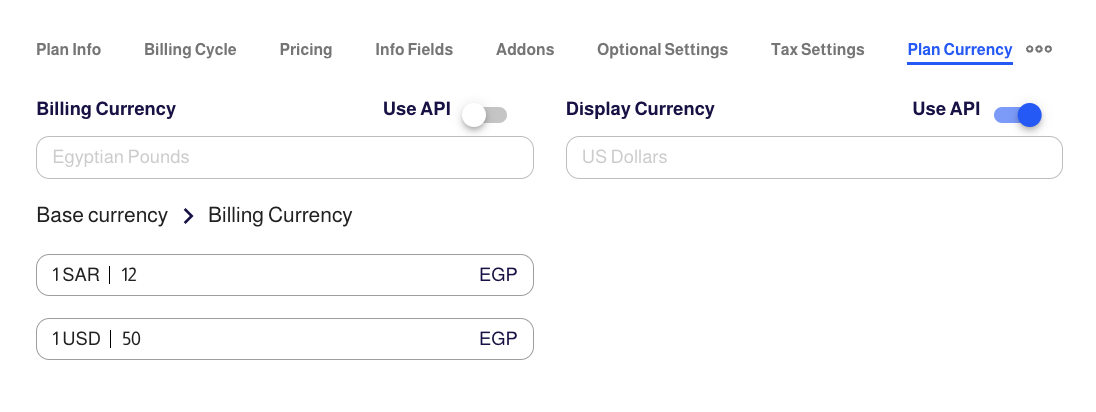
- Conversion rates need to be configured only when:
- The plan's billing or display currencies differ from the plan's base currency.
- The addons' base currencies differ from the plan's base currency.
Plan Actions
Copy Plan
You can copy a plan based on an existing one using the "Plan Actions" dropdown menu. You can access this menu by clicking the ellipsis (...) icon in each cell of the plan list on the Plans page, within the plan quick view section of each plan, or within a specific plan profile.
When you choose to copy a plan, all the plan details will be replicated onto the "Create New Plan" page, agiving you the option to edit the fields for the new plan.
- For example, if you had a plan with the following details:
- Plan Name: Monthly Plan
- Plan Code: monthly-plan
- After copying, the new plan details would look like this:
- Copied Plan Name: Monthly Plan (Copy)
- Copied Plan Code: monthly-plan-copy
It is important to keep in mind that "Copy" will be added automatically to the "Plan Name" field, and "-copy" to the "Plan Code" field, so be sure to modify these field names to align with the details of the new plan.
Delete Plan
You can delete a plan by utilizing the "Plan Actions" dropdown menu, which can be accessed by clicking the ellipsis (...) icon within each cell of the plan list on the Plans page, in the plan quick view section of each individual plan, or within a specific plan profile.
Listing Page Actions
Export CSV
- By clicking the "Export CSV" button on your Plans page, you can view a comprehensive list of all plans present on your site.
View Settings
Through the "View Settings" icon, you can customize the way your plans list is displayed according to your preferences.
Search and Filters
Search
- Plans can be searched by Name.
Filters
- You can filter the plans through the Filter icon, found at the top right side next to the "View Settings" icon.
- The filters allow you to group plans by Status, Pricing Model, Trial Period, Active Subscribers, Subscribers Range and Billing Model.
Sort by
- You can sort plans by Name and Status.
- And by clicking on the arrows next to them, you can switch between ascending and descending orders.